

Behind the scenes of yesterdays Wellbeing videoshoot!
06:30 Kit bag, check.
Audio kit, check.
Lighting, check.
Brain, just about.

Yesterday I was out filming talking heads and some b-roll for a Wellbeing project on behalf of EEBC. Wellbeing is our general mental and physical health, but there are many factors in the way that we live that can affect our chances of developing serious health problems in the future. These include some sensitive subjects, that I was capturing to provide an information base for those in the community that may be suffering, or have friends and relatives of those diagnosed with; Cancer, Coronary Heart Disease, Dementia and Diabetes.
I was featuring nutritional expert Yvonne McMeel throughout the videos, so I began by planning my main piece to camera with her in the Wellbeing Centre.
This was a standard video shoot, so I packed my kit bag to be prepared with whatever the day would bring! This included;
Video - Canon 5D mkIII, Tamron 24-70 F/2.8 VC, Sigma 70-200 F/2.8 OS, Canon 60D.
Audio - Zoom H6, Roto-Mic, Sennheiser ENG-G3 100 wireless.
Grip - Manfrotto 755CX3 tripod + MVH500AH, Manfrotto 190Pro-B (old version) tripod, Super clamp and magic arm.
Lighting - Daylight balanced 85W studio light with soft umbrella.
Extras - Lilliput 1018 (I am currently testing out and reviewing this product).

I took along the Lilliput 1018; the new flagship 10 inch touch screen field monitor, which produced crisp pictures and well represented colours. I ran this on a F-970 battery with HDMI through from the 5D, so I could monitor both. This did however cause the camera to heat up quite quickly. However, the monitor has awesome features usually found on high end products which include; exposure and focus peaking, on screen waveform monitors, levels and much more, which came in very handy for assessing the quality of the picture. (More coming later regarding this product).

 Char doing her make up thang!
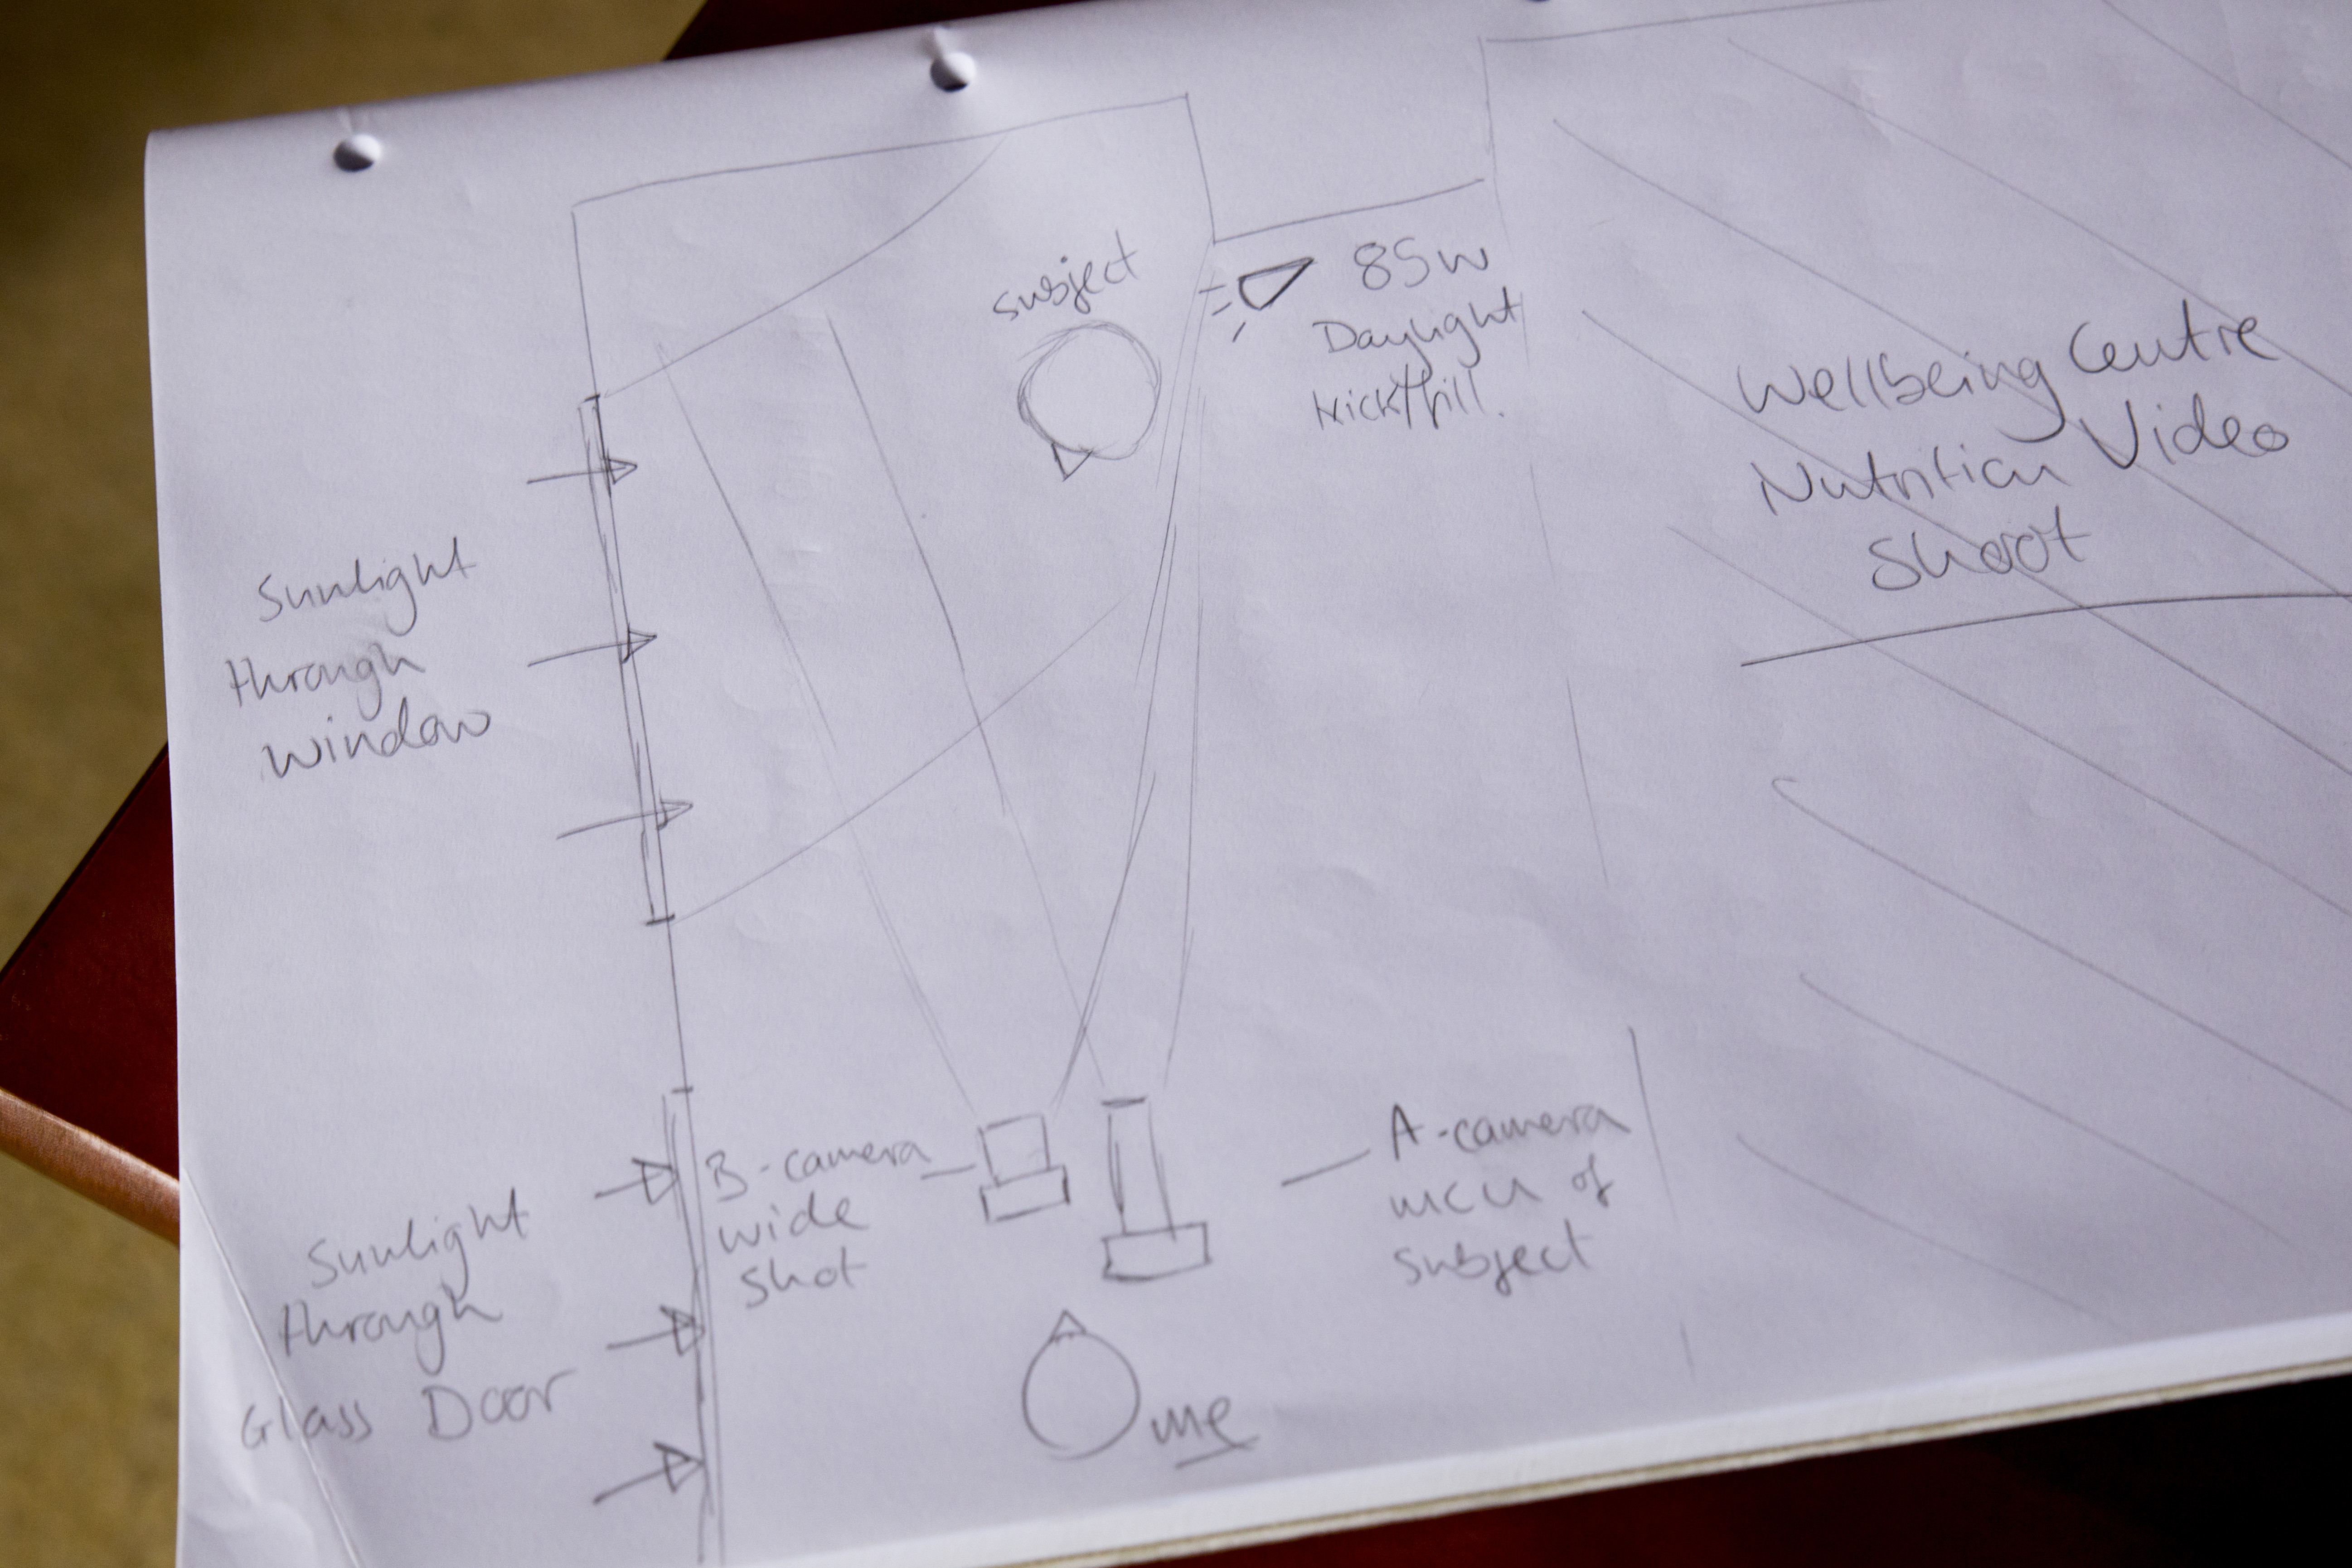
I began setup at 9am, shortly followed by Char the make up artist who set up her bits. The location for filming was the Wellbeing Centre, which as a wonderfully bright open facade with big doors and windows. Luckily enough, blaring heat and sunshine poured through the windows, so that was my key light at slightly cooler than daylight colour balance at 5200k. This also matched the daylight light fixture I was using to add a fill and kick to the subject.
Why did I use a 2-point light setup?
I could have rocked up with the intention of using just the daylight and the incandescent lights in the centre with the mentality that it will illuminate my subject well, but there are risks you have to be willing to take if you approach lighting in a casual way. Some points to remember when thinking about lighting your subjects;
- Are they defined from the background?
- Do they have harsh shadows on their face?
- Moving sunlight will change throughout the day, in brightness, direction and colour.
Now, when you haven't been to the location before it is difficult to judge the lighting conditions, so firstly if you can have a RECCE of the location. It is very beneficial as you can begin to compose the scene, judging the internal and external lighting, now noisy the environment is, whether you will need a backdrop instead of a plain background.. All points to consider before you turn up with the camera kit and begin filming.
Defining the subject from the background is what makes them look 3-dimensional and not flat, this is the same for the shadows too as it shows that features are visible on the face. With DSLR's it is possible to use depth of field to define your subject from the background, but lighting can also be used to 'pop' the subject out of the BG.
Harsh shadows are caused by strong direct light, and are unwanted as they mask features and don't represent the subject properly, unless this is the effect you are looking for. For piece to cameras and interviews having soft shadows around the nose show the features of the subject, again making them look real.
The sunlight is your best friend and worst enemy at the same time... As the Earth rotates, we move further away or closer to the sun which changes the lights direction; if you start filming in the morning with your subject lit from the front, by 12 noon the sun is over head and by the late afternoon the light will be behind you. To combat this, keep continuity by filming at the same times each day, or even simpler be aware of the suns direction and gradually rotate the subject and other lights to keep a constant illumination. For me, I was filming from 11am through to 15:00 with the sunlight to my left for the whole day which was very beneficial, but not every time will I be that lucky!
Watch out for clouds that can block the sunlight, and be aware of how the colour temperature of daylight changes throughout the day; cool in the morning and warm in the evening. For me, shooting in midday sun meant a constant temperature of 5200K for both cameras, matching the other light.
The use of a kicker or fill light, pushes out the shadows caused by the key light (the sun), and gives a halo effect to the hair of the subject making them stand out. The difference is subtle but effective.
Camera Setup and Composition
Once I had my lighting up and running, it was time to set up the cameras and audio equipment. I was going to shoot using the Samyang 35mm T/1.5 cine lens, but this would result in being intimately close to Yvonne, the subject, which would be quite off putting and may add shadows/interference such as me rustling papers to the recording. Instead, I used a telephoto lens as I can be a good distance away from the subject, and create a narrow field of view that frames up as an MCU (medium close up).
My main A camera was the 5D mkIII, and although the Sigma lens can open up its aperture to F/2.8 for shallow depth of field, this was not required for today. Instead, the camera was set to F/4.5 for a still shallow depth of field, but deep enough for the subject to move forward and backwards in the frame a little, and to de-focus the background. The ISO was set to 200, although when the Sun disappeared behind clouds I would ride the ISO to 250 or 320 depending. To stick to the 180 degree shutter rule, the electronic shutter remained locked at 1/50th.
The B camera was the Canon 60D, I paired this with the sharp Tamron 24-70 F/2.8 and shot wide open, again riding the ISO when required. I did this because this camera was capturing a wide shot of the subject, so depth of field was not noticeable. To keep continuity, both cameras were set to a white balance/colour temperature of 5200K, but it appears that the 60D picture is slightly yellow/green than the 5D picture.

Audio
The often forgotten partner to the pretty pictures you see, having top quality audio is just as important as having your subject in focus and exposed. I used the Zoom H6 as my recorder, with the XY mic attached to capture one stereo recording. I also used the Sennheiser ENG-G3 wireless mic kit, attaching a lav/lapel mic to the subject which would be my main audio source. As a back up I also used the Rotolight Roto-Mic plugged into the 5D just in case. Remember to take headphones so you can monitor the sound recording, just like you would use the cameras screen to compose the picture.

The filming went brilliantly. As a precaution I decided to use the 'record to multiple card' function in the 5D so I had a back up of the footage in case the cards got corrupted from such long recording times. As mentioned earlier with the lighting, as the light slowly changed, I also adjusted the position of the kick/fill to push back the shadows.
I was very impressed with the Lilliput 1018 field monitor too, and although it is larger than monitors I would usually use the touch screen control and diverse functions suited the shoot well, so I could keep a close eye on the changing light levels.
After the principal piece to camera filming was complete, I ventured out into Epsom and Ewell with Yvonne to film some b-roll pieces that would add to the information and dialogue about wellbeing and health. So, we visited Shadbolt Park outdoor gym, Ewell Court Library, Epsom's Derby Square, we were going to hit the market but by that time it was 17:30 and no chance of finding fresh fruit and veg to film.. We returned to the car to go to the last location, Epsom Downs, when this happened...

My car broke down. The filming day abruptly ended with a call to my insurers for recovery, while I also arranged a taxi for Yvonne to take her to the train station. That didn't put a dampener on the day though, I had captured great video and dialogue that I hope will help many people in the borough and wider community who may be suffering with cancer, heart disease, diabetes or dementia.
I then ingested the footage, and backed up a whopping 80Gb of footage and audio.. Lots to edit through, but thankfully those wonderful geniuses at Red Giant have a tool called Pluraleyes which can sync video with externally recorded video, so suddenly the issue to matching up the audio to the video disappeared, saving me potentially hours of work!
 A bunch of un-synced video and audio clips gets transformed into this -
Pluraleyes then allows you to export the sequence as an XML that I then imported into Adobe Premiere Pro to edit! It's ready to go!
Overall, very happy with the footage and the outcome of the first day! I need to get out and shoot some more cutaways/b-roll of healthy food, socializing and some more bits and bobs to add.
Adams video week roundup!
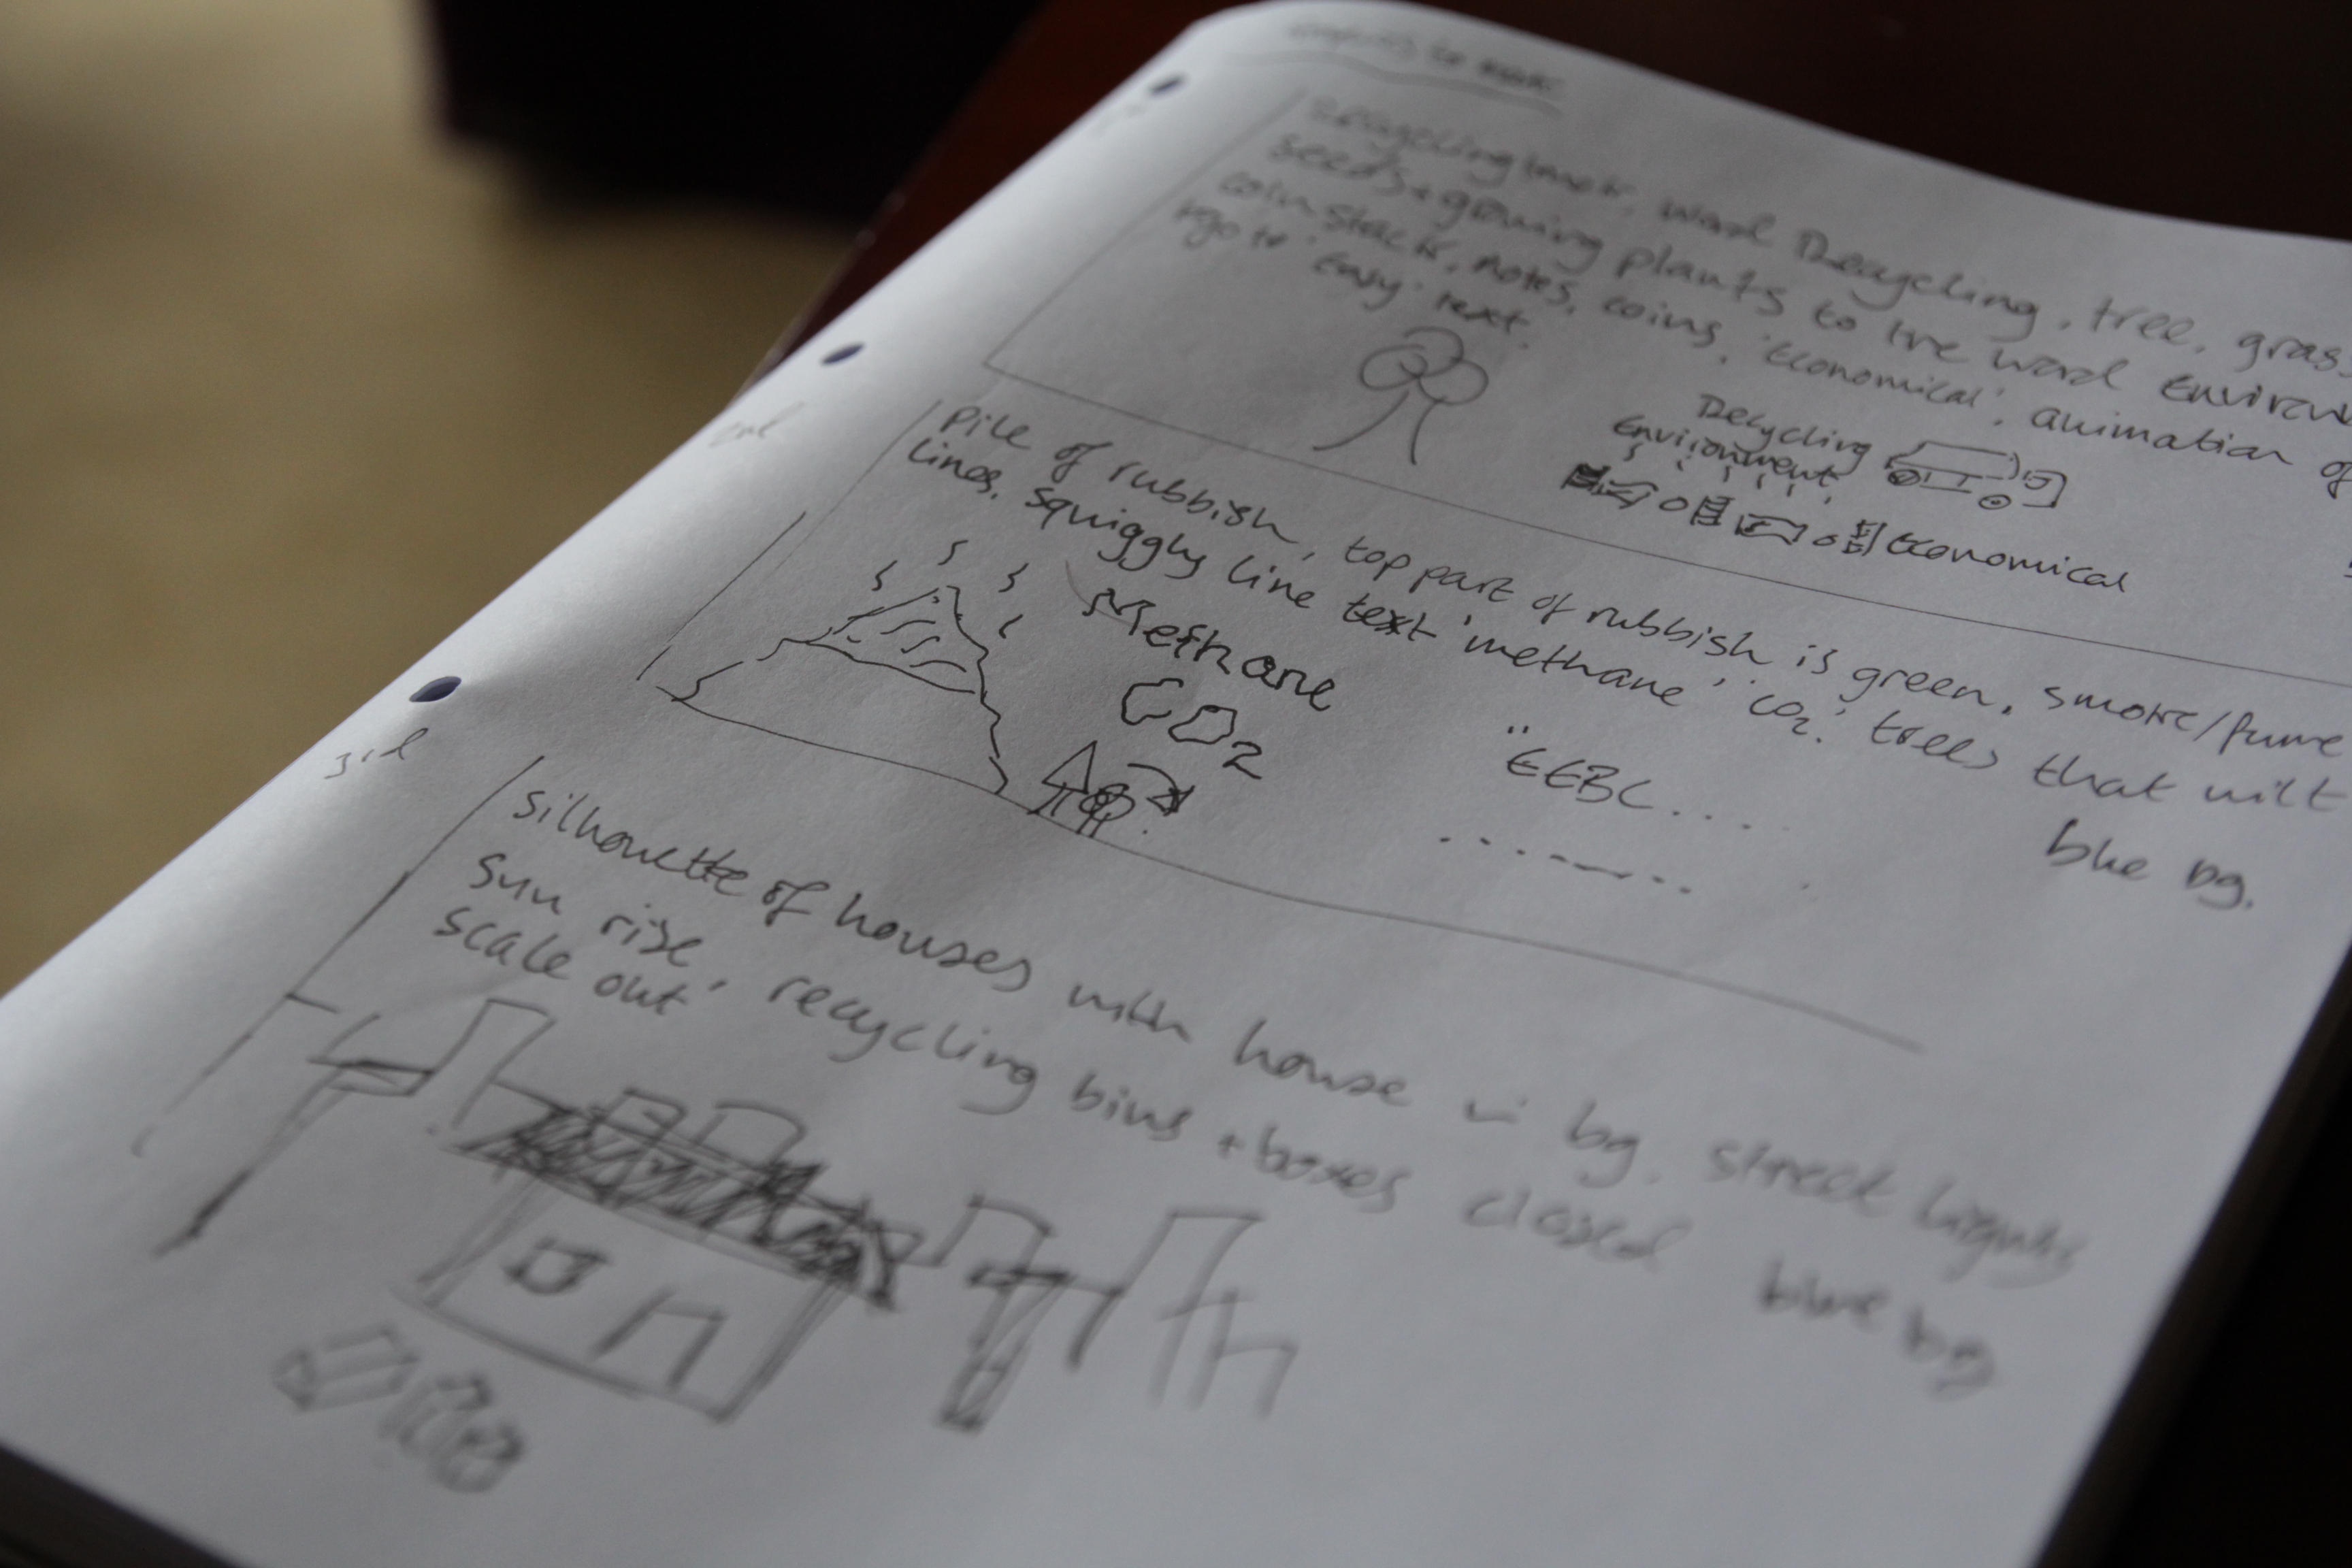
Blimey lots has been going on over the last week, I hope it has been as hectic for you as it has been for me! Monday started with continuing the design of the graphics for a recycling animation, a daunting task which put my drawing skills to the test. Bearing in mind I've spent the majority of the last year behind a camera, I took my time to learn the techniques I would need to use Illustrator properly. I would usually use Photoshop over Illustrator, but until I recently found out PS is not truly vector, and as I would be using a combination of the Pen tool and others to design the images this was very important, as I would need to transform the graphics later in After Effects.
My best mate Glen came down from Wycombe for a surprise week to, so I spent plenty of time catching up with him and chatting about work. He gave me so very important advice; "Everything is too complicated these days, you should keep it simple and your audience won't know the difference, especially if it is moving and animated anyway." True words, and I took Glens advice which not only sped up the process, but made me more confident with the work I was producing.
Here's a screenshot to show all of them! (I think I am working on a 10K canvas).

The graphics design has been on-going, I practiced when I was first commissioned, but it just shows how familiarizing yourself with the tools and applications can ease your work! A very very important part of this process was to intensively storyboard and plan each scene, so I know what graphics can be generated beforehand, so I spent a good couple of days story boarding and sketching the graphics I would need, followed by a long list of assets I would go on to to create.
Pre-vis sketches:

For the rest of the week I started importing the graphics into After Effects, and setting up the 15 scenes. I am finally starting to see progress! I am still working on this section, and it will take another week or so to complete all the animations. Again, I storyboarded this in the planning, so I know exactly what to produce for which scene which saves so much time. Also, the best thing about this planning part is that it does not have to be a work of art to depict your ideas, just a simple sketch to represent what you will need to create.
On Thursday I joined a crew of fashion designers, hair stylists and models to film a magazine photoshoot for Sherman Hawthorne (the hair stylist and creative director of the shoot) at The Lemonade Factory studios on Queenstown road. With eccentric styles and art direction, I set about to capture high contrast, dramatic footage which will compliment the photos. It was an early start, here I am waiting for my train at Clapham Junction;

I was a single shooter, I had the pleasure of transporting the equipment to the shoot which included a steadicam vest that I ended up not using. I've learned my lesson here not to take extra kit!
My kit list was as follows:
Canon 5DmkIII (A camera), Canon 60D (B camera)
Tamron 24-70 F/2.8 VC, Samyang 14mm T/3.1 cine, Samyang 35mm T/1.5 cine, Nikkor 50mm F/1.4 manual, Samyang 85mm T/1.5 cine, Sigma 70-200 F/2.8 OS
Manfrotto 755CX3, Manfrotto MVH700AH, Manfrotto Hydra arm and super clamp,
CamSmart camera rig + Lilliput field monitor, CamSmart Stabilizer vest, Flycam Nano
Zoom H6, Rotolight Roto-mic.
As with all of these shoots, time runs short so I was restricted to short burst of filming time with the models to capture the specific ethereal and industrial motif, but I also shot around the photographer to maximize my usable footage. I made use of the 50fps slow motion for the moving shots, so that the models movements are exaggerated, as well as stabilizing the shot.
As the props included wire fencing and chicken wire, aliasing was a problem when shooting shallow depth of field, or at an angle to the object. To remedy this I used a lower aperture (F/4-5.6) for some shots, but also I can add a Gaussian blur in Premiere Pro when editing to soften the lines, gently smoothing out unwanted aliasing.
A couple of frame grabs from the shoot!
 Here I'm using a moving shot to create a distorted perspective from outside of the set.
 Here I use a low angle shot, removing the identity of the model to create a 'trapped' and 'mysterious' feel to the model, and why she is in the box.
Weekends are always working weekend for creatives and freelancers. I spent yesterday working on the animation of the recycling project again, continuing to compose the scenes using simple 2D shapes and animation styles that have become very popular recently.
I also came across this post from Chase Jarvis about how to manage your time properly, its a great post with a detailed outline of 90-minute working slots that should improve your productivity, I urge you to read it if you're someone like me who can't stop working, then apply the plan to your working life. I know I will be!
Do Less = Do More by Chase Jarvis
I haven't had many #videoquestions come in recently, so please keep them coming so I can help with tips for the community of videographers and creatives! Send them over to me @Plowman91 on Twitter.
Finally, ending with a must watch video, check out Philip Bloom's video shot with the Blackmagic Production Camera, the 4K one at Miami Beach, what do you think of it? Is it worth investing now the Panasonic GH4 is on pre-order and it looks like Sony will have a 4K DSLR announcement coming at NAB2014 too..!!
Philip Blooms Four Corners Miami Beach (Blackmagic 4K camera)
That's all for now folks! Keep the creative juices flowing!
Fashion Photo/Videoshoot at The Lemonade Factory
I'm pretty bust at the moment, so here are a couple of frame grabs to keep you entertained! I'll do a post on the shoot yesterday, and have plenty of footage to trawl through too!
Planning a product promo + review shoot!
I've been working on the plans for a number of videoshoots to test out the awesome Rotolight mic and LED ring light. As the kit works especially well with people and subject focused shots, I am orchestrating a model/fashion/lifestyle shoot to show off the equipment to its full potential.
 (Photo from Rotolight website - Rotolight and Jason Lanier)
I spent the morning trawling through various fashion sites, blogs and Pinterest for inspiration on make up, clothing and models. I've never used it before, and from my experience it is a great resource for mass data collection. (The reason I'm not signed up to Pinterest is due to its Terms and Conditions). Building up a mood board, I've narrowed down some ideas and will spend tomorrow wandering around my town to find unexpected gem locations!
If you know any models; male and female, make up artists, fashion designers that would be interested in collaborating then please get them to contact me!!

I've had this idea in my mind, of a young woman running toward the camera as it tracks backwards, she holds her shirt together around her chest, hanging on to lace summer sandals. Cuts to her feet as she skips to slip her sandals on, slow motion playing a big part here.
Close up of her glorious smiling face as she races forward, her hair like silk in the wind flowing as she exits the frame. Tracking behind, as the young woman continues her path, into the horizon and out of focus as the camera slows and tracks high in the air.
![8-forest-road-landscape-photography[1]](http://ajp1991.files.wordpress.com/2014/02/8-forest-road-landscape-photography1.jpg)
(Ideas Intellectual Property of Adam Plowden 2014) muah!
That is all your getting for now, a teaser while I magic up the rest!
I'll be posting later about the questions I got via Twitter and Facebook; choosing your camera - is a camcorder an option for you? As well as analyzing picture profiles and how using filters can help your video! Much more to come, so share!
Strategic grading with 'burnt in' footage.. Canon/Manfrotto/Elinchrom Promo for SWPP Conference 2014
I continue to work on the promo videos for Canon/Manfrotto/Elinchom today. After shooting the material in a 'neutral' picture style, there was still a lot of contrast, sharpness and saturation in the image. This has caused a couple of problems with the adjustment of the levels and colours when grading. Burnt in footage is where detail is lost due to a crushed dynamic range, out of focus picture, or a mis-interpreted colour balance (and plenty more). This footage is notably harder to work with due to the loss of detail; and when you come to colour correct or grade the shots, life becomes more difficult as hues and light levels are burnt in to the image. Applying numerous filters and effects to remedy this can only add noise and grain, and degrade the footage so it is important to remember to flatten the image before shooting!
Even with a neutral picture style selected, the internal settings for contrast, saturation etc sometimes remain the same, so remember to go into the picture style settings and set them all to the lowest. This will achieve a flat picture which is much easier to work with in post. For those who don't wish to apply heavy corrections or grading to your shots, shooting in neutral will work fine too, just add contrast when editing to remove the gamma grey curve and punch out the sharpness!
I've had to resort to black and white images for some shots due to burning in detail in low light shooting situations.
Here are some example frames of what I have been working with, and how I have graded them.


These are the frames from the second video. I was in a studio conversion for the MUA part, and Bjorn's place for the shoot. White balance wise it was cool, and when shooting directly into the the window I got a lovely hazy light effect.


We shot the first part at Gylly beach in Falmouth with Carly who runs an extreme fitness group called BootyCamp. Going for a gritty, filmic look for the gym part I used negative bleach bypass. For the beach, I tried to add some drama to the already crashing sea, unluckily for us it was freezing cold so we weren't up for staying there for long.
Captured with the Canon 5D Mark III, Tamron 24-70 F/2.8 VC, Sigma 70-200 F/2.8 OS, Samyang 14mm T/3.1, 35mm and 85mm T/1.5. Post production in Adobe Premiere Pro CS6 and graded using the in built colour correction tools and Red Giant Magic Bullet Looks.
When all the components to my new editing system arrive I am going to be transferring the grading workflow to Adobe SpeedGrade instead of Magic Bullet due to its ease of use, features and tools for cinematic grading as well as having an accelerated 2GB GPU with CUDA graphics... :D
The videos will be released next week on Vimeo, so watch this space for updates! If you can't wait until then, get down to SWPP on Saturday where I will be showing the video with Bjorn and talking about working with video on DSLR!
This gives you a bit of an example of what I've done to work with footage that has some lacking detail, creating a visual style to convey the subject of the video.
Interested in more of what I do? Check out my website, follow me on twitter, watch my videos! Oh and please share my blog and website if you can :)
Got any questions? Send them my way!
[contact-form][contact-field label='Name' type='name' required='1'/][contact-field label='Email' type='email' required='1'/][contact-field label='Comment' type='textarea' required='1'/][/contact-form]
Stills Copyright Adam Plowden Videography 2014.
Want creative and cinematic promotional video, and need to keep costs down?

Are you in need of innovative, cinematic and artistic promotional video's and media, that makes your business, product, event or service stand out, attract a wide audience and immerse them in the visuals and sound?
My portfolio includes video/media work with - Moet Hennessy, Broadcast Magazine, The BBC, AstraZeneca, Manfrotto & more.
I'm offering 10% off on all productions until the 15th of November 2013! Check out my work at
and get in contact!
Back to normal for freelance videography
A week since IBC, things are pretty much back to normal for here in Epsom. I have been furiously emailing the companies and people I met to get my foot in the door for some videography or digital media content production.. We shall see! Oh yeah, immersive experience, here is what I am listening to - http://8tracks.com/monkcoco/amsterdams-jams
I have been working on an edit for a video of a day trip around Amsterdam city, just a few shots of what I though was worthy of being included! ("You only get one" quote from Glen Symes). It is currently taking a looonngggg time exporting in Adobe Media Encoder due to down-res'ing from 1080p to 720p for the web, as well as some heavy grading done in Magic Bullet, which always takes time anyway.
Here is a couple of photos from the edit, and the grade to show you how :)


What can I say, do your clients pay for render time? XD
I'm going to upload the video of Amsterdam later today, so keep updated as I shall post it on here! I used Adobe Premiere Pro CS6 to edit the video, and Red Giant Magic Bullet to grade. I did a couple of timelapses so just sped them up and used 'Frame Blending' to create the smooth motion blur. I shot most of it on my Canon 60D and Tamron 17-50 F/2.8, also using Sams GoPro Hero3 for the other shots. I chose Zero 7 "Destiny" for the backing music as it is chilled and ambient, just like the culture over there!
In the meantime I am developing my marketing strategy for the videography business I am trying to get funding for, through The Start Up Loans company (James Caan), but that hasn't been at the top my list, although it really should be.. If you've got any tips for start ups and writing business plans then please forward them this way!
I am also working on videos in the edit suite which include interviews with F&V, NHK, Tokina, Ikegami, and NanGuang, so keep updated for those too!
Ciao for now :D
What I've Been Up To.. It's been a while!
Good afternoon! Its a blazing hot day here, I'm preparing my trip to IBC (checking flights and passes etc), and getting to know the other IBC Rising Stars at this years IBC in Amsterdam. I'm so excited! I've been busy with a variety of jobs since my last post, including photography and shooting. I helped out a make up artist friend of mine by doing a photoshoot with a model in Hampton Court and Bushy Park. Here are some of the best photos:


Leanne Cook is the Make Up Artist and has loads of experience in TV and special occasion make up. Here's a link to her site - http://www.leannecook-mua.com/
I've also been working on a couple of weddings with JHWF, here is one that I shot in The Orangery, Holland Park, Kensington.
[vimeo http://vimeo.com/72345141]
Other recent updates include the testing and shoot with the Camax LCD High Definition Field Monitor for videography, cinematography, broadcasting and photography. A full review of the field monitor will be uploaded soon, for now here are a couple of stills and my first thoughts about the monitor.


- Very easy to use straight out the box (although lack of battery and longer cables held me back from using it immediately on location, which I had to purchase separately.)
- Basic functionality for a low cost solution.
- Lightweight; great for on location or light rig solutions.
- Overall a good basic solution to a field monitor, however this product should be specified by its packaging and reflected in the quality in design of the packaging and the manual and firmware.
- I was surprised to see a battery not included.
What else has been going on? Oh yes! I am now a Manfrotto Local Hero, and have my profile on their page! Many thanks to Dave Beck for your help, and I am extremely excited for our LED lighting field test shoot this Friday! I will be testing out the 5 new on-camera LED lights, as well as the new 1x1 flood panels (bi-colour and daylight/tungsten), got a music video and model shoot lined up so keep following for the updates!
Here is the link to my Manfrotto Local Heroes profile - http://www.manfrotto.us/Local+Heroes/Adam+Plowden/52400709
Apart from all that, IBC is coming up next week which I am so ecstatically excited for! If you are attending and want to meet up then get in touch!
Photoshoot with Leanne Cook Make Up Artist
A couple of snaps from today's photoshoot with Leanne Cook Make Up Artist for models and stars, thanks to Glen Symes for the help, and of course to our beautiful model Becky!