


The Making Of 'The Great Outdoors' For Manfrotto
Get behind the scenes with our production for Manfrotto's 'The Great Outdoors' campaign, featuring ZEISS Milvus Super Speed prime lenses and the DJI Mavic Air.
Spring is here, and so are Manfrotto's new backpacks in the form of the Pro Light Cinematic Expand, and Pro Light Cinematic Balance. They are larger than the original Pro Light range which makes them ideal for carrying a plethora of filmmaking gear, in this case the ZEISS Milvus Super Speed prime lenses, DJI Mavic Air and Zhiyun Tech Crane 2.

Checking out the views with the Manfrotto Pro Light Cinematic Expand backpack and ZEISS Milvus Super Speed 1.4/25.
I headed out to the beautiful Surrey Hills to test out the new backpack and absorb the landscapes while out filming. Rich accompanied me to capture some awesome behind the scenes photos and video content too.
We spent a rainy day wandering around Holmbury St Mary and Leith Hill, recce'ing locations for filming that week. Luckily for us, the sun shone through the clouds for our 3 days filming!
Here is the kit list for the shoot:
Sony a7S II (with the SmallRig cage)
Sony a6500
Canon 5D III (BTS stills)
ZEISS Milvus Super Speed Primes (1.4/25, 1.4/35, 1.4/50, 1.4/85)
Zhiyun Crane 2
DJI Mavic Air
Canon 25-105mm F/4
Canon 17-40mm F/4
Samyang 35mm T/1.5
Manfrotto NITRO N8 video head and 535 MPRO tripod
All of the main filming kit fitted into the Manfrotto Pro Light Cinematic Expand.

The range of equipment used in The Great Outdoors filming. Inc Manfrotto NITRO N8, 535 MPRO, ZEISS Milvus Super Speed Primes
Choosing The Surrey Hills Locations
We captured some fantastic shots around the hills, featuring well known beauty spots like Leith Hill. Going on an adventure around familiar and unfamiliar territory, capturing the environment and landscapes that surrounded us was a great way to test the kit.
To add to the narrative of the production, Scott from The Surrey Hills Adventure Company invited us to the lagoon where he instructs SUP (stand up paddleboarding) as well as bushcraft, to shoot some material there. The weather wasn't the best, but Scott headed out on the paddleboard which made for some great aerial shots.
The sharpness of the ZEISS Milvus Super Speed 85mm was ideal for getting shots of the boat house, which was deliberately framed like a Wes Anderson shot!
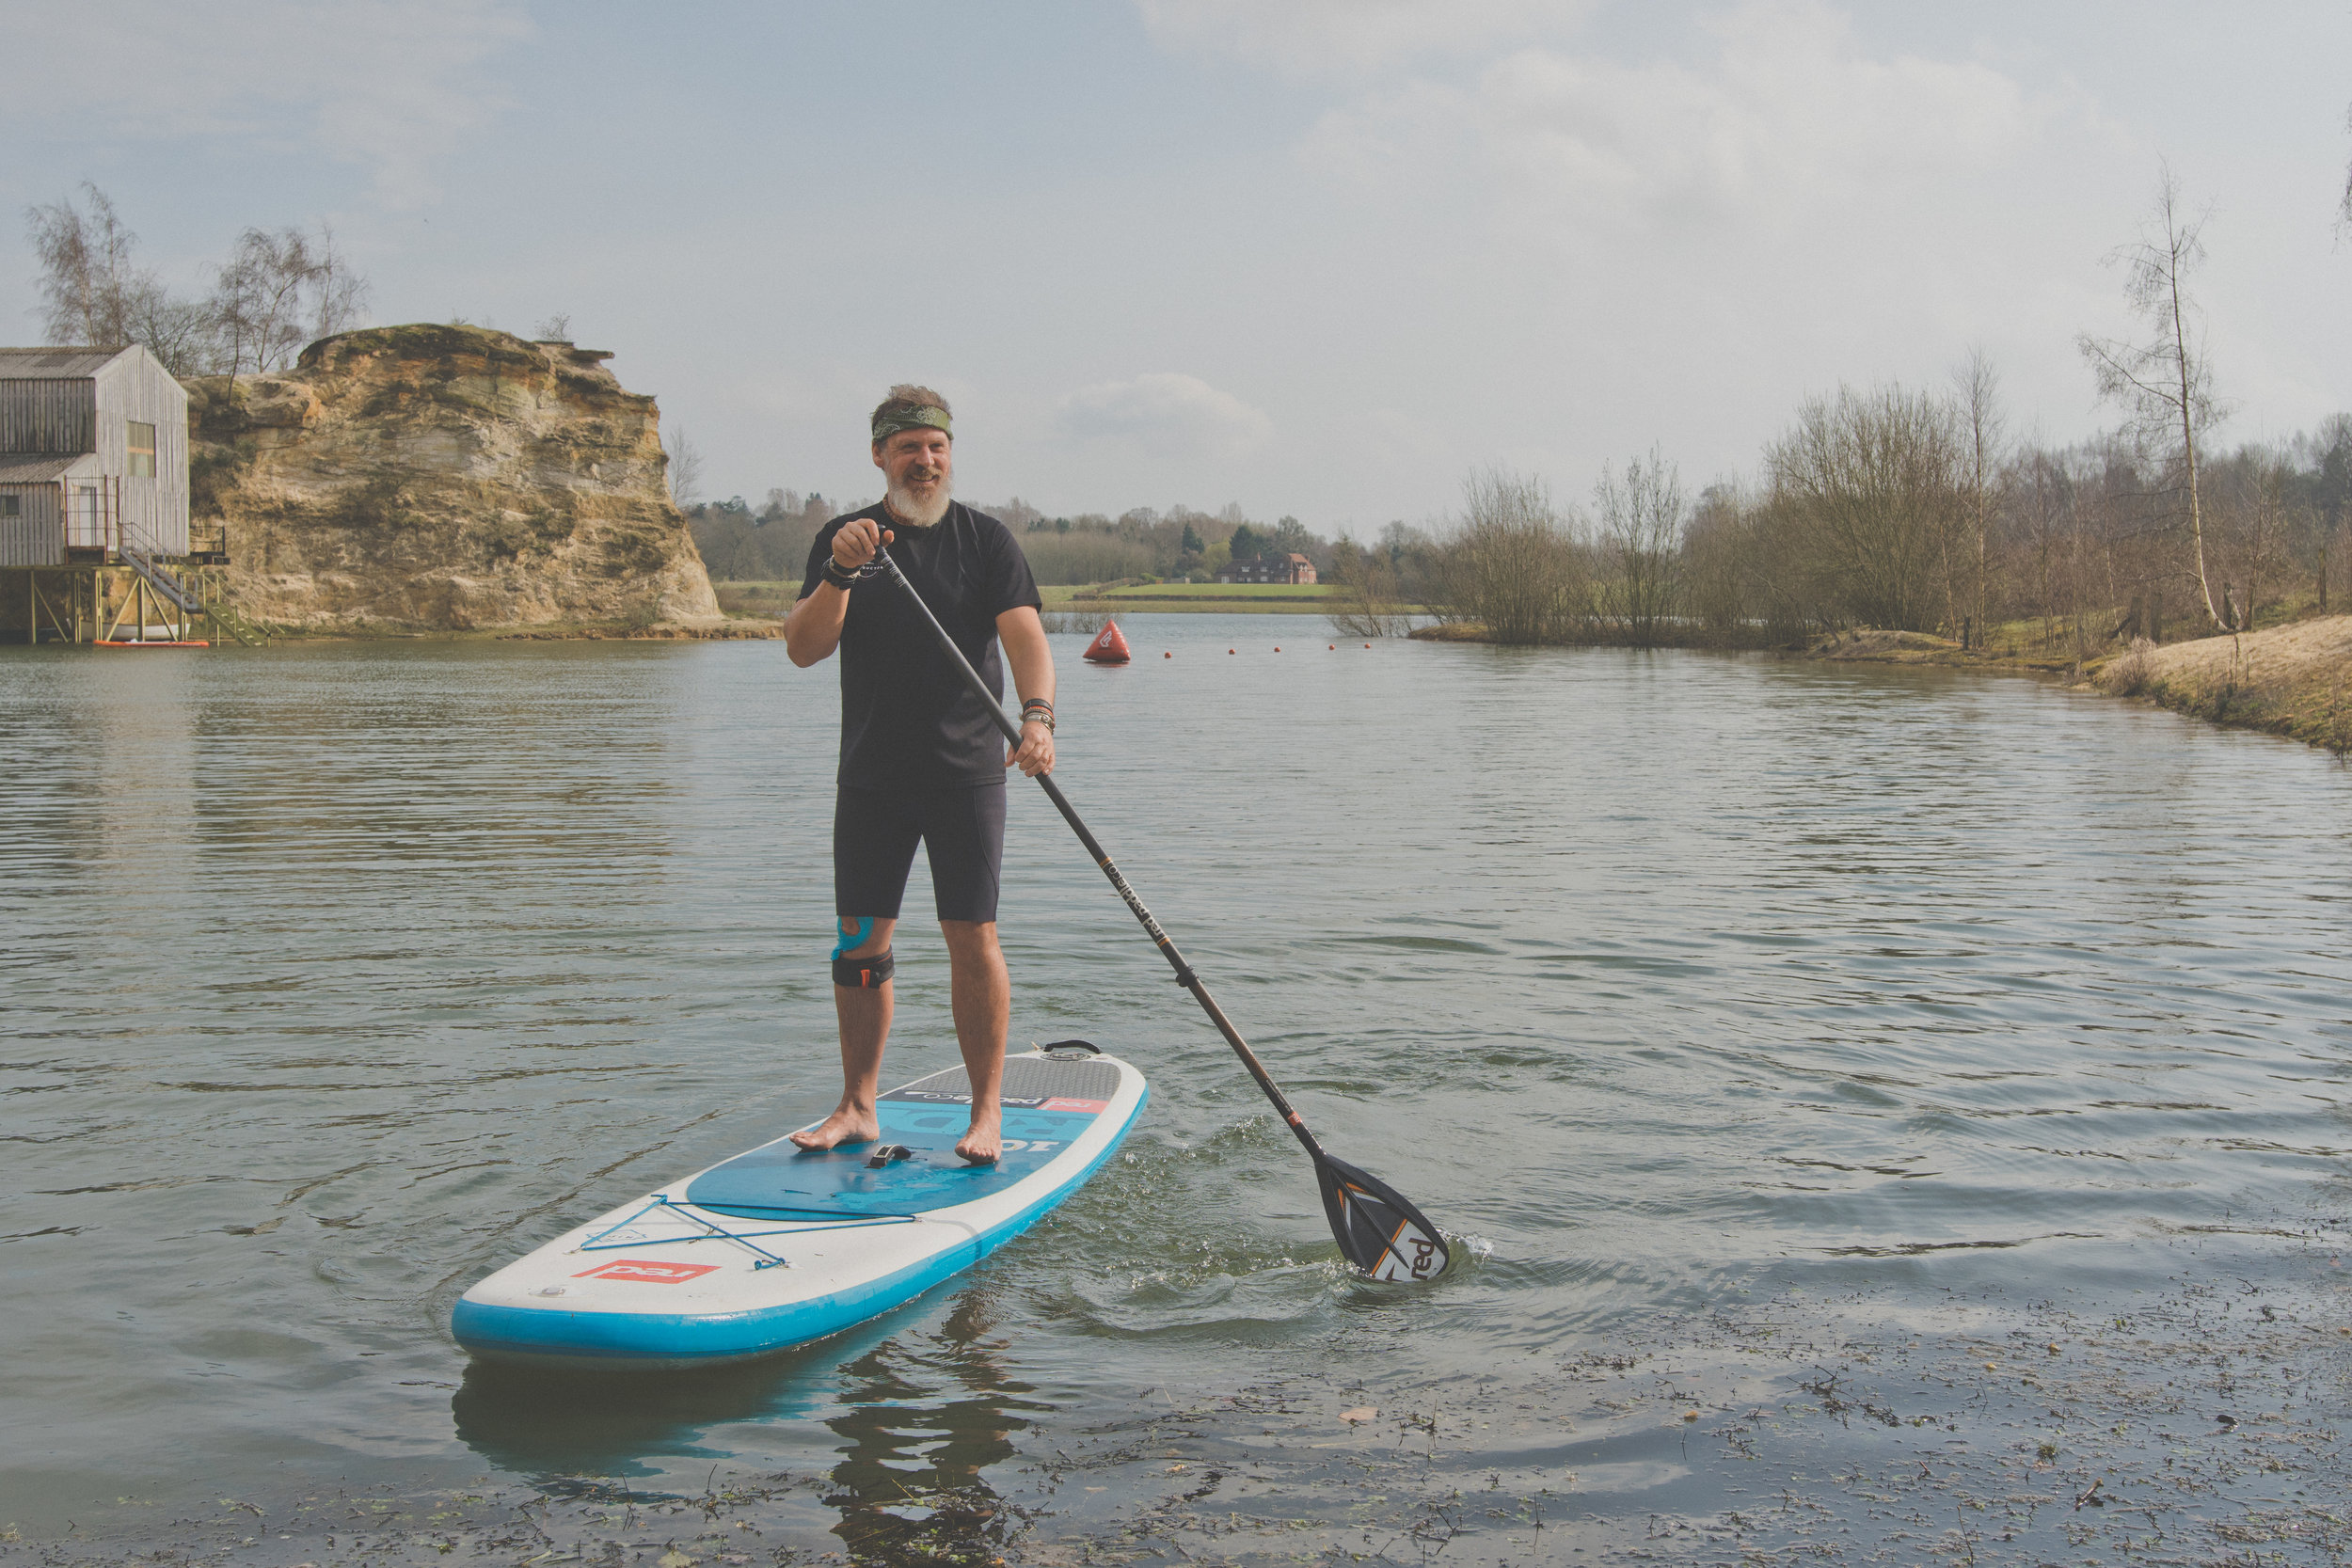
Scott from The Surrey Hills Adventure Company taking his SUP for a spin.
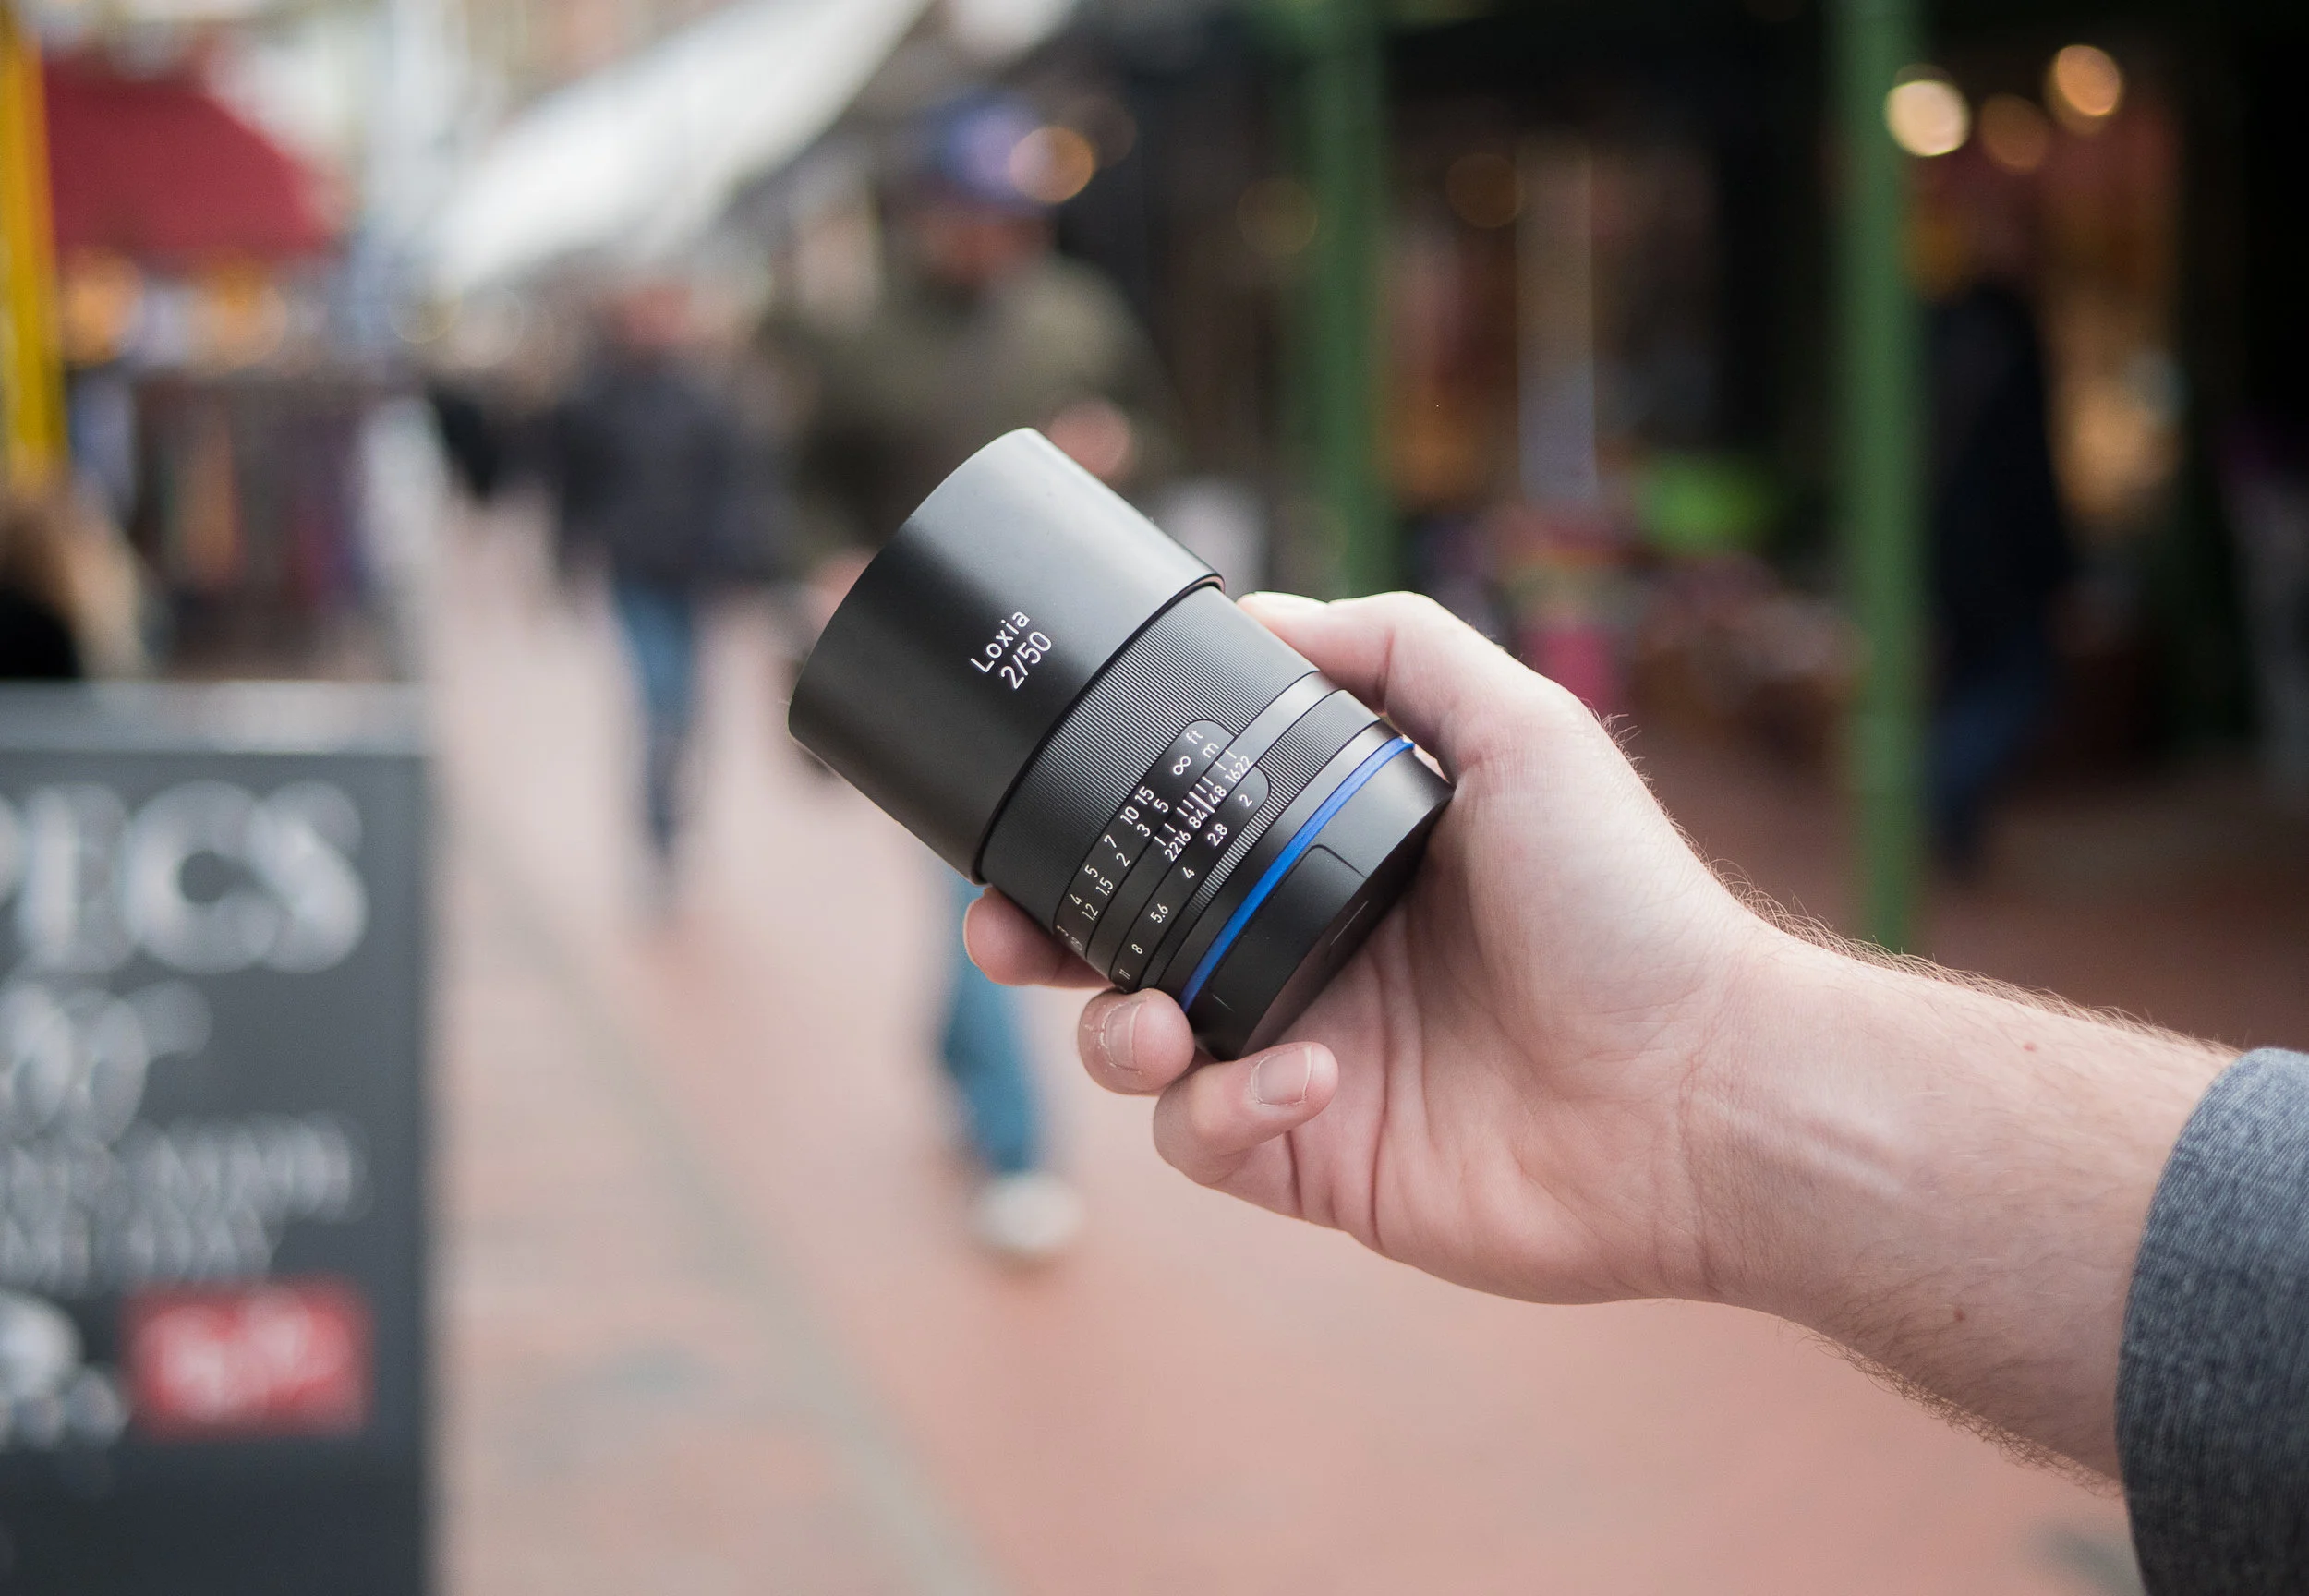
The ZEISS Milvus Super Speed Primes have a constant aperture of F/1.4 and can have the gear ring attached for use with a follow focus system. The lenses are of incredible visual quality (rendering 6K plus resolution images), and were ideal for filming on the Sony a7S II with the Sigma MC-11 adapter. I rigged up the camera and lens in the Small Rig cage, and attached the Manfrotto Follow Focus too, for precise focus pulling control at wide apertures.

The gear ring attached to the ZEISS Milvus 1.4/85 for a Manfrotto follow focus unit
For the silky smooth motion shots, the a7SII was rigged up with the Zhiyun Tech Crane 2, and even with the heavy ZEISS Milvus lenses, the gimbal performed very well (upon balancing correctly). The stabilised sensor aids greatly to reduce the up and down motion of walking, with the Crane 2 keeping everything else lovely and steady. As a handheld gimbal, I cannot recommend it enough.
Working With The DJI Mavic Air
I had the opportunity to shoot some lovely aerials around the area too on the DJI Mavic Air. This is my first little drone venture and is fantastic fun. The Fly More combo has enough batteries for between 45 minutes and 1 hours and comes with a nice carry bag too. I've managed to fit the drone, 3 batteries, controller and a set of Polar Pro ND filters in there too.

The DJI Mavic Air is a fantastic addition to the kit bag (Manfrotto Pro Light Cinematic Expand), and fits into the bag very well!
By the way, those Polar Pro ND filters are really needed to keep the shutter at 1/50 or 1/100 for slow mo. I've set the drone to Cinelike-D profile with reduced contrast, and then applying an S-like curve in post to bring back the colour and contrast. Shooting in 4K and 2.5K resolutions is great for post-production flexibility, when delivering a HD sequence.
Another technique to improve the colour richness, especially in the sky is to export the Mavic Air footage from your NLE as a PNG sequence, and then import it into Lightroom to apply the 'Dehaze' tool, which makes the colours more vibrant. It's a bit of a round-trip, but this effect/feature isn't available in Premiere Pro CC, yet.
One downside to the DJI Mavic Air is that the shadows are quite noisy, even when the image is exposed well, so keep an eye out for that. Below are some of the outtake drone shots of the Surrey Hills from the campaign.
The edit was where the story of 'The Great Outdoors' was to be built, and with some voice over recording and subtle soundtrack, the first part of the video began to come together. There was a lot to say about the shoot and the Pro Light Cinematic Expand backpack, in such a short amount of time. The visuals had to tell the story more than just what I was saying.
Rather than making the campaign video just a review, I chose to make the second part of the video different; changing the soundtrack and pace. This part was showing what you can do with the kit, what you can create and what stories you can tell.
I must say a massive thank you to Rich Tarr who accompanied myself on this production, capturing the BTS photos and video content. Without him, this couldn't have been possible! Also to Scott from The SHAC, if you're into outdoors, seriously check them out!

Rich Tarr, BTS producer
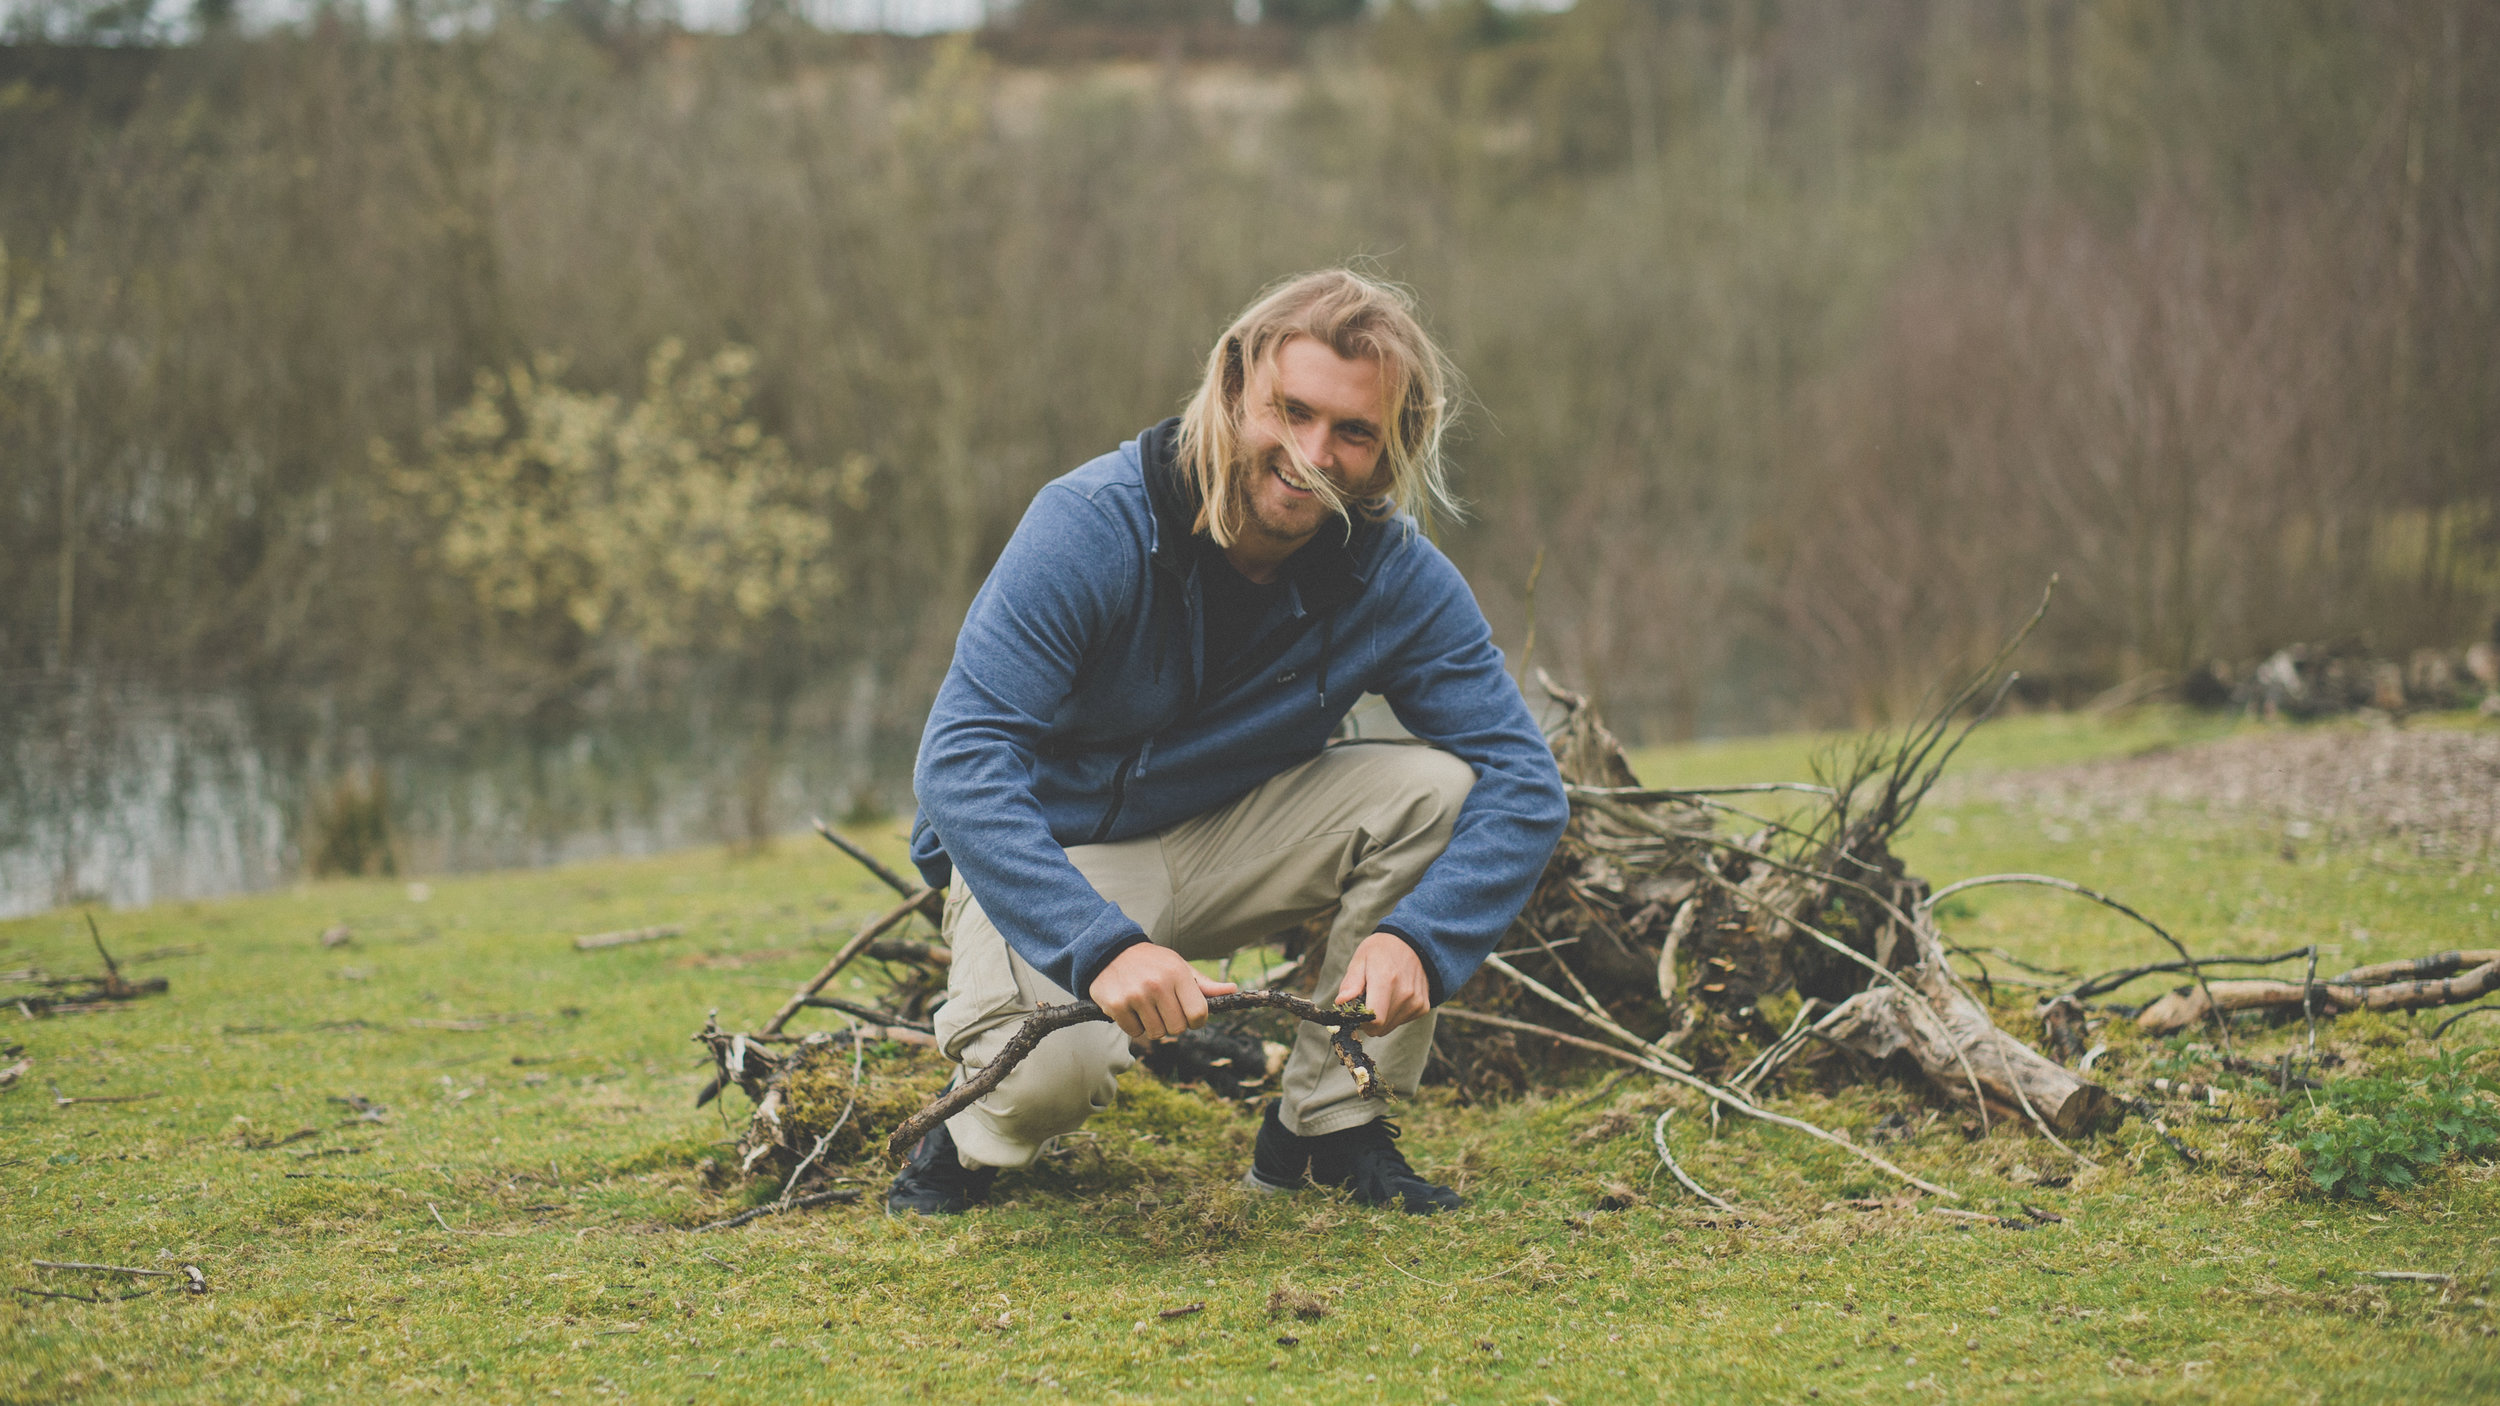
Rich getting back to basics
My verdict on the Pro Light Cinematic Expand? It's come with me for every shoot since this campaign. It's large and comfortable enough to carry a two camera setup with a set of 4/5 lenses and a telephoto. There is always extra room for mics and clamps, stands and the like by expanding the bag or making use of the quick access pockets. Try the bag out for yourself, it really suited my filming kit choice.
Overall, the campaign had a great reception and myself, Rich and Scott were really pleased with the result. To add to that, ZEISS will also be featuring a blog post and unique video about using the Milvus Super Speed prime lenses on their LENSPIRE website, so keep an eye out for that soon!
If you've got any questions about the Manfrotto Pro Light Cinematic Expand, filming with the ZEISS Milvus Super Speeds, flying with the DJI Mavic Air, then just get in touch!
Zhiyun-Tech Crane 2: The Best Hand Held Gimbal Out There?
Zhiyun-Tech has taken the indie film world by storm over the last year. Their products are affordable and produce results that can be easily compared to much more costly gimbal systems. I've been using the Crane 2 for months now, here is my experience of using it.
Note: I am a Sony shooter so won't be looking in depth at the capabilities of the Crane 2 with other manufacturers, I have done some follow focus tests with the Canon 5D III as an example.
Feature wise, the Zhiyun Tech Crane 2 packs much more into the gimbal than the Crane 1 and Crane v2 combined. It's increased payload means that shooters using Canon 5D's or Sony a7's with Metabones adapters can comfortably operate the gimbal with less stress on the motors. I've even seen Canon cinema cameras, RED cameras and Sony FS5's rigged on them!

Using the Zhiyun Crane 2 while filming for Manfrotto
A brand new feature is the follow focus, in which I've seen some great examples of Crane 2 operators pulling and tracking focus on moving subjects. Zhiyun Tech has since updated the gimbal firmware so that a number of the camera control features are now available when filming on Canon, Sony, Nikon and Panasonic cameras!
The biggest improvement for me has been using a Manfrotto standard quick release plate, that simply slides on and off the gimbal. It means you can go from filming on a tripod or monopod straight onto the Crane 2. No hassle, no screws to undo and then re-balance the gimbal. It's simple, and it works.

On a recent shoot, I swapped between filming with the Sony a7S II and Sony a6500 on the Crane 2, which was ideal!
Dual handles for the Crane 2 allow for more accessories such as a monitor or microphone to be added to the setup. There is also a follow focus unit now available too, that hooks up to the focus wheel on the handle. For more info about the gimbal and accessories, check out the product page here.
I use the Zhiyun Crane 2 on pretty much all of my video shoots, and combining it with 4K or slow motion really adds a level of production value that I hadn't been able to achieve before. Check out the next blog on the making of 'The Great Outdoors' for more gimbal action with the ZEISS Milvus Super Speed Primes!
Prime Lenses for Sony E Mount Cameras? ZEISS Loxia Prime Lens Review
Movement For Video: Sliders, Gimbals and More!

The Filmmaking Masterclass 2015.. Behind The Scenes (Part 1)
Producing a video with storytelling (Part 1)
I jumped at the chance to film the BTS when I saw Philip Bloom and Nino Leitner's 'Filmmaking Masterclass' were coming to Surrey for their 2015 workshop. Having captured many events before, this was a chance for me to hone in on my videography skills and produce a great BTS film to show what the workshop is about and help promote it for future events. Of course, filming for Nino and Philip put more pressure onto producing something amazing.
As I'm a one man band producer, I roped in help from good friends of mine to help film other aspects of the workshop (which spanned over 3 days). Meticulous planning was required to make sure we captured everything we could, and that the equipment was ready for the next days shooting on location. Keeping in mind the"shoot 20% content and 80% b-roll" tip was definitely important for this production, so there was plenty of emphasis on attendee interviews at different stages of the workshop to capture progress, and filming them working as a crew producing a short film too. This together helped form the basis of the beginning, middle and end narrative; a structure that is familiar, but works to add progression and pace to a video.
Preparing the treatment
To keep the production tightly knit and not over shooting, I produced a treatment for each crew member so we knew exactly what was going on, where, with what kit. This helped us work to capturing something different each day and follow the narrative -
1. Brief the crew with the aims and expectations of the overall production.
2. Confirm the details of the location, including the best travel routes from their location (avoiding major motorways and roads during congesting).
3. Choose the best equipment for the job. Never over pack the kit bag, go simple and strategic for the look and style of production.
4. Prepare an equipment list to check off each day and familiarize crew of the production setup with camera techniques, settings and audio.
5. List all key moments and shots to acquire throughout each filming day, which may include interviews, specific time lapses, and drone or gimbal shots for example.
On the day:
6. When you are working in a crew, they are your family.
7. Introduce the crew to the key people at the event; from the event organizers to the mentors, to ensure that they are all comfortable and acknowledged as part of the BTS crew.
8. Film a couple of shots with the crew to demonstrate the style of production and tips for filming in that location/settings.

Adam and Ed

Ed and Mikey
The Kit
The kit prep was a challenge as it's always tempting to take too much, which in some cases makes you less mobile. For the workshop, crews would be spread over a large location (indoors and outdoors) so being portable with a small footprint was the cornerstone of what kit was used.

Manfrotto Backpack 35-PL

A personal favourite of mine is using the 100mm macro lens for portraits or specific subjects or objects as it beautifully crushes the background into a lovely bokeh, as if it was taken on a much better lens and camera. That combined with the Shogun shooting in 4K gives so beautiful images. Also, as much of the first and last days shooting was indoors, I often ramped up the ISO to 6400 and happily shot away knowing that the resultant image would be pleasantly clean.

Audio wise, I had the Rode VideoMicro hooked up to the A7S for the entire production, its an awesome little microphone which sits neatly on the cage. I’ve found previous on camera mics clunky and often require a 9V battery, but the little VideoMicro uses the camera power and packs a load of great audio quality into a tiny price tag. For the interviews, I hooked up the Rode NTG4+ into the H6 and handheld. No need for a clamp and magic arm in this case.
The Shoot
The night before the workshop got the attendees together to meet and chat, I took this opportunity to interview some of the attendees to get their expectations of the workshop (the beginning part of the narrative). The pre-event networking is a brilliant way to break the ice with people who'll become part of your crew, and become new friends. The interviews were shot on the Tamron 24-70, it was rather dark so I remember shooting quite shallow with a high ISO. For the audio, I used the NTG4+ but this still captured a fair bit of background noise.
Day 1 was based around working together as a crew and planning the shoot for the following day. Throwing the participants in the deep end, they were set the task of producing a short video using 'in camera editing', a challenging task for them that revealed how the crews communicate and work together. I captured plenty of the crews shooting their scenes, and grabbed some vox pops from the group mentors on the fly to add some narrative to filming. I simply shot this on a monopod using the VideoMicro for audio, as I was in close quarters with the mentors.


Throughout the day I shot more of the participants networking (one of the key reasons to come to events like this as, it's not what you know, it's who you know), and their presentations in the afternoon. For the presentations I shot mainly on the 755CX-3 tripod to get nice steady shots on a long lens, while using the 100mm macro got me wonderfully close for portrait style shots of the participants.
Sometimes I shot on the Manfrotto MVM500AH monopod, just to get into tighter spaces or be more maneuverable on my feet.

Come the end of the day I grabbed essential interviews with Philip, Nino and Johnnie in a couple of locations to add some variety. What the mentors say will act as an audio-narrative for the BTS films as the questions flowed from 'Why do you recommend coming on an intensive workshop like this?' I also grabbed some interviews with the attendees, getting their thoughts and experiences from the first day, that would then help me build up the storytelling narrative of progression for the BTS film.
Part 2 of this blog will look at the second workshop day where the attendees capture and edit their short films, as well as the post production process I used to edit the BTS film together!
5 Key Trends of BVE 2015
While I was doing interviews and checking out the tech at the UK's premiere broadcasting event, BVE 2015, I picked up 5 key trends..
- 4K is being pushed by TV and camera manufacturers, and unlike 3D, it' here to stay. Manufacturers in broadcasting and video are beginning to make way for it in terms of testing and QC, as well as streaming high resolution and frame rate content at very low data rates for delivery on multiple platforms. Check out OmniTek and Ateme.
- More production companies are turning to the cloud for storage and delivery services and platforms. I'm testing out ioGates at the moment.
- BVE is proof that both global and local companies that visit and exhibit can have success at a trade show, despite the cost. I've noticed after visiting the show for a couple of years as a company that it is a great place to meet up and catch up, network and enjoy the industry. It being the only major show in the UK is great as its visitors come with varying skill and knowledge bases, as well as locations across the UK.
- A number of new products were launched and shown at BVE, but ARRI still wows the crowds. Last year it was the Amira, and this year ARRI released the prototype ALEXA mini, the 'star of the show'. Check out ALEXA MINI on C5D
- As a resource for learning, BVE does not disappoint with its great range of seminars, presentations and talks from industry leaders. From students to experienced broadcasters, it's still the main event to attend for free seminars full of awesome content.
Next year, BVE 2016 will be the main event of London Entertainment Week 2016! As the event grew into London ExCeL to become a key place to be in the broadcasting and media calendar, event organizers i2i Group comments:
““In recent years we have seen increasing overlap from theatre, film, AV and social media into the traditional ‘broadcast’ space, and have reflected this in our free seminar programme and the composition of the exhibition at BVE. In recognition of this increasing convergence, BVE is poised to become the centre of an all-encompassing celebration of the UK’s global position as an innovator in the creative industries, acknowledging all those involved in delivering world class film, TV, commercials, theatre, live events and gaming, while maintaining the integrity and relevance of the current show.””
2016 is sure to see our industry boom!
More posts to come: JVC, Movidiam, Rode, Manfrotto and more.
Filming and editing the Soundbox opening video!
I thought I'd give you an insight into the production of my latest video release; the Soundbox studio opening!
The event took place before the summer, and I took along Sam to help me out with the gear and eat delicious cupcakes! We arrived with about an hour prior to the opening so I could capture some of the establishing shots and BTS of the final touches to the studio.
I had my standard video setup with me:
5D mkIII, Tamron 24-70, Sigma 70-200, Samyang 14, 35, 85.
Zoom H6, Roto-mic.
I also used the new Manfrotto Spectra LED lights, the bi-colour model is fantastic for a kick of soft light that can be easily controlled to daylight and tungsten colour temperature.
For the grip I had my trusty Manfrotto 755CX-3 and MVH-500AH as it is lightweight and easily maneuverable around small spaces, as well as the Manfrotto 681B monopod and MH054 ball head, Edelkrone slider plus and flycam nano.
Construction and tidying up was still under way when we arrived, so I captured some of the nerves and excitement leading up to the big launch. For the establishing shots I used the Edelkrone slider on the Manfrotto tripod, combined with the 14mm cine lens it gives a great moving perspective and shows off the space very well.
Natural light conditions
It was quite dark in the studio, so I struggled with aperture vs exposure and often shot very shallow to retain light. The beauty of the 35mm and 85mm cine lenses is that at T/1.5 they are extremely sharp and great for low light, however without image stabilization a tripod is recommended. I always have my 'go to' lenses on hand as they have good IS and are zoom, so for more run and gun style shooting it suits it much better than needing the time to set up and compose a shot.


The monopod became more useful when the eager visitors began arriving, and after a short and sweet speech, Matt and Jack opened Soundbox to the public!


I captured the buzz and excitement of the event, you could feel the anticipation in the air to see the hard work all finished! I worked with the 5D on the monopod and tripod for most of the time, and occasionally used the Flycam Nano for some moving shots through the studio. I did have to balance the camera and lens when I arrived, as it was set up for a different body when I last used it..
One important skill that I've learned is to become invisible to the guests at the event, or if that tactic doesn't work, being a photographer is a good one too! Acting professional and friendly keeps your subjects in a relaxed and candid manor, rather than adjusting their clothes, posing or avoiding the camera all together. If your subject can feel your good aura, they should respond positively :)
The lead artist of Soundbox is Rebecca James, who was there to perform and support the launch of the studio too! She belted out some great numbers, accompanied by a group of ace musicians on bass, electric guitar and percussion. The track in the background of the video is Rebecca's new one, and will be on her upcoming EP!

Slow mo
As you've probably noticed, I shot a large majority of the event in 50fps (slow motion).. This was purely a creative decision on the day, and also a chance to work in a different format presents it's own set of challenges to overcome.
Now, on the 5D mkIII it will record 1080p 25fps and 720p 50fps. When recording in 50fps the picture appears much softer, and a little darker too due to the shutter speed reduction. In an already darkly lit location, either shooting shallow or with a high ISO were my options as I don't like using a light on camera.
You can push the 5D mkIII very far with it's ISO in video mode, and I often shoot at ISO 2000 and above in certain circumstances.
Gear
Shooting with the Manfrotto gear made me discreet in my filming approach, and provided me with perfect grip and stability for capturing the video. I could rest easy also knowing I stored by camera gear in the Pro Backpack50, so if anything happened to it; kicked dropped, moved, liquid spillage.. My gear is safe.
Post
Backing up the footage happened pretty much immediately after the shoot, onto both drives in my work station and a couple of EHD's. Then, in Premiere Pro I imported the footage, and split up the 25p and 50p into separate sequences so the slow mo footage can be slowed down to the right playback rate.
After cutting down the rushes to the best content, I imported the audio track which Matt from the studio sent over. It's Rebecca James' new track '1000 Roses', which will be on her new EP. To add to the rhythm and pace of the edit, I used the beat and some surprising cuts with the track, and adding in the slow mo shots of Rebecca's performance and the band playing looked good I thought!

Anyways, I added an S curve to an adjustment layer over the whole of the sequence, which limited the black level at 16 and the white at 235. This added a neutrality and a different look I was eager to try out.

So, what are your thoughts? Got any questions about the production? Hope you enjoyed this post!
Canon countdown - 23 hours remaining!!!
What what what are Canon up to?! With the announcement of the 7D mkII at Photokina, it seems odd to plump for a mid-weed, October day to tell the world about a new product?!
Check out Canon See Impossible for the cryptic message and countdown, could it be a 5D mkIV, with internal full frame 4K? We will have to wait to find out!

Click the pic to visit the page!
What are your thoughts on Canons ad-hoc announcement? Got any rumors you wish to share?!
Rotolight Sound and Light Kit Review!
I have had the Rotolight Sound and Light kit for a little while now, and I like it. I like it even more so because Rotolight has been the only manufacturer to really think about what consumers moving into the industry, and already established creatives would need from the outset. Without light you have no picture, and without sound you only have 50% of that video.Videos with bad or unprepared sound are noticeable, just if the subject of the video was not lit correctly. Unfortunately we are now used to watching and seeing very high quality, glossy pictures with filmic motifs, and excellent sound including orchestral scores. We aspire to work on these 'big budget' productions, or to make videos that look like them, but without thinking about your lighting and sound, you are very far off. I produced this review and the music video using the Canon 5D mark III, and a range of Samyang Cine lenses. To keep the light source and sound as pure as possible, I only used the Rotolight RL-48 B ring light and Roto-Mic. I also used my custom camera rig, which is manufactured by CamSmart, as well as a 5" Lilliput field monitor. I used Adobe Premiere Pro, After Effects and Speedgrade to edit and post-produce the videos.

RL-48 B LED Ring Light
Out of the box, you get everything you need (apart from batteries) to start shooting straight away. The inclusion of a Rotolight belt-bag is fantastic for getting the light out quickly if you are shooting on the run, and for storage while traveling and keeping the batteries, light and accessories safe. One pain I always have, as I am a single shooter is that to change parts of my equipment setup; which means opening my big bag, routing through to find the bit I need and then carrying on. With Rotolights ingenious solutions they have removed that need entirely!
Inside the LED light is a set of ND, skin, colour and minus green filters that can be applied directly inside the housing of the unit itself; no need to carry around filters, gels and pegs to achieve your desired brightness and tone. This is great as no longer do you rely on a bag of old gels to adjust the temperature and brightness of the light source, and all filters are supplied by LEE, so you know you can trust them. The LED's being naturally daylight at 5600K, you are set to use the light in most conditions! For photography and video with people and models, Rod from Rotolight recommended using a softening ND and the skin filter which gently soft lights the subject, with a peachy, wrapping beam. There are no shadows, and the result is a beautiful glimmer of light in the subjects eyes giving them emotion and life.

During my time with the Sound and Light kit, I tested out its practicality when out filming indoors and out on location. Above is a still grab from the indoor shots of Josh performing his lines to the camera; you can see a hint of light in his eyes, and a soft-neutral coverage of his face. This was the look I wanted to achieve; an intimate piece-to-camera. I used the ring light and mic mounted on the hot shoe of my camera setup, this gave a direct beam onto the subject, and would work for any subjects in front of the camera. Indoors the RL-48 ring light gives out a beautiful 140 degree beam of light that wraps around your subject, without any hot spots (usually on the forehead). I was filming a music video, but would work exceptionally well in model and fashion work, where beauty is exaggerated through the images.

It took some innovative thinking to get the lighting right for this continuous tracking shot. Although I was shooting in the afternoon sun, I still needed a key light to keep Josh's face illuminated throughout. The night before we were at the location shooting the same scene, but had the ring light mounted on the camera. This time I needed the source to be much closer, so I whipped out the Manfrotto Magic Arm and Superclamp and clamped the light to the boot of my car. In the still grab above, the light is only a foot away from the left of Josh!
What I found here was the need for a brighter light. The 48-LED ring light provided great overall coverage of my subject, but I required a brighter beam to achieve the desired soft-skin and glimmer in the eye look. Although Rotolight produce large LED lights (Anova) for videography and cinematography, I didn't need that much more power. I think for video it would be great to see this model brighter, or have different brightness levels, as usually you require more light than less - especially when adhering to the 180 degree shutter rule. Once your shutter and aperture are set, the only exposure controlling parameters you have is the ISO/ASA or your light sources brightness, and where you're unable to move the light closer or further away from the subject; having a brighter light from the outset is more beneficial. This is a small niggle from myself, but can be shown with examples in these still grabs -
 (Here the light from a street lamp came in very handy.)

This shot was taken on a 14mm T/3.1 lens at ISO 1250. Although I have remedied the low light in Adobe Speedgrade, a green tint is visible across the frame. A minus green filter is included in the kit which can be used where the green spike (due to LED technology) is prominent, but as I was filming in near darkness I chose not to use the filter to get maximum light output, which by the way is 100w! During the shoot I also used the light hand-held to get intimate with my subject, but not blasting them in the face with an offensive flash gun or LED panel light.
Roto-Mic
Like I mentioned earlier, video is (in most cases) useless without good quality sound. Imagine watching a film or TV program and the sound is noisy and fades in and out as the presenter moves around the frame. It is distracting and essentially draws the audience away from the video, it is suddenly and mostly subconsciously hard to watch and enjoy. With current trends in pro-sumers moving to DSLR to make films and video, there is more pressure on achieving good quality sound when acquiring your footage; the built-in mic does not do your pictures justice.

Here, Rotolight have entered the sound game by producing an on camera directional shotgun mic, with excellent pickup response and sound to noise ratio. When I first started out in freelance videography 3 years ago, I got myself the original Rode VideoMic; it was the best I could afford at the time, and it did the job I needed - to capture good quality audio that will enhance my video. Since then, Sennheizer, Audio-Technica, Hama and many more brands have seen the need for on camera mics for DSLR videographers, and a competitive market has emerged. One that the Roto-Mic will compete very well in due to its superb signal processing and price - an attractive offer to anyone seeking to invest in a cost-effective solution. You will need a 9V battery to power the Roto-mic, but it will last you a good 100 hours.
One very annoying problem with on camera microphones is noise added by the mic's shock mount. The Rode VideoMic I have is notorious for that, creating a squeaking noise as you move or walk with the camera that was audible and therefore recorded into the sound of the video - very unwanted! The Roto-Mic shock mount has been specially designed to minimize any movement the mic may be affected by, holding the capsule stiff, without wobbling on the mount; keeping unwanted noise out.
Rotolight considered many filming scenarios when designing the new mic; it includes a gain adjustment of -10dB to +10dB which is very handy when you are far away from the subject or action, or are filming in a loud and noisy environment. A two step high pass filter is also built into the body of the mic which removes any wind noise and rumbles from the captured sound; perfect when filming outdoors. These small but important features show that Rotolight have done their research into where DSLR videographers are working, and how they need to use their kit.
I was really pleased with the results of the sound recorded with the Roto-Mic, I was expecting another Rode VideoMic moment but it never came. The mic surprised me with its quality recording, and with a little noise reduction in post production the final sound recording is clean and crisp.

Rotolight has also been innovative in their mounting options, considering many different setups with the light and mic together. This makes a lovely change from complex accessories hanging off the camera to use two hot shoe mounts. The option to use the light mount, or to mount the light on the microphone gives you many different setup options that doesn't restrict your shooting, and is not fiddly or complicated to change! I was using the mic and light together; here the mic mounts onto the camera hot shoe, and then the light can be pushed onto the barrel of the microphone. Although I was dubious of this at first, as it would add extra weight to the shock mount and possibly interfere with the sound recording; it has proved me wrong with being fully functional no matter how the light and mic is set up.

My verdict
- Fantastic kit if you are starting out in DSLR videography - a must have kit to get you started.
- Ring light provides excellent soft light for work with models, people, macro and prominent subjects.
- Filters included is really handy, although as I am heavy handed they are sometimes difficult to apply.
- Battery life is second to none - 4 hours with recommended lithium AA batteries (x3) or regular lithium AA (x3) for 3 hours.
- Various mounting options means shooting is not restricted.
- Mic is broadcast quality - remember sound is just as important as video.
- Gain adjustment is handy in quiet and noisy locations.
- The Rotolight bag keeps your hands free!
Of course with every review there are some constructive criticism comments, but not many for me as my experience working with the Rotolight Sound and Light kit has been very pleasant. Firstly, a higher power portable light would be ideal for video, with intensity control. Secondly, now Rotolight has entered the sound game it would be great to see other microphones like hand held bi-directional or even lav mics, and a boost in the recording quality (maybe a Zoom competitor??!). Thirdly, and this isn't criticism, more a request for a flexible light stand or arm so the light can be positioned in extreme and unusual angles.
I am recommending you to go out and get this kit if you're into your DSLR video and photography and need a light source and microphone that you can take to every shoot you go to! It will definitely be coming with me in the future, and I can imagine the RL-48 LED light working fantastically for wedding films and interviews, teamed up with the Roto-Mic and you have a perfect, all in one, on camera 'run and gun' solution to your filmmaking and photography.
You can check out the video I produced for Rotolight demo'ing the new Sound and Light Kit here, and the music video will be released very soon!
[vimeo http://vimeo.com/87515700]
Got your to do list?
I have. It is quite long too, and all the things on the 'to do' list have to be done before I start the next video production... Daunting! Easter holiday weekend as a lovely one, with warm sunshine glowing over the Surrey countryside I ventured into the great outdoors to Leith Hill for a day of walking and geo-caching . Of course, the camera came with me to capture the happenings.

 (Photos copyright Adam Plowden 2014)
I am finalizing the details of the Recycling video for my council, on Friday I'm recording the voice over, the last component needed for me to complete the video! It has been a long project, but definitely worth the hard work animating. On Monday I went into Epsom with John from JHWF to film the ending shot from the DJI Phantom drone and the GoPro Hero 2. I decided to use an aerial shot as the last one, as this reinforces the community aspect of recycling to benefit our local area, as well as seeing all of the green land that surrounds Epsom.

Photo copyright Adam Plowden 2014.
I am getting a plan together for the new Manfrotto School of Excellence video series I'm going to produce, so please send over any questions on equipment, techniques, settings, videography or DSLR that I will answer in the video series on getting started with video.
Sorry for the silence!
Blimey, wiping the dust from my blog I can see it has been neglected over the last couple of weeks. I can explain this, I've buried my head deep into working on a recycling video for my local council. For this I have designed and animated original graphics in Illustrator and After Effects, to be edited together in Premiere Pro. I can't give too much of what I'm working on away until the video is publicly released on the council website and other displays around the town of Epsom! But as you are a dedicated lot, and showing you the techniques I used won't do any harm!
Here's a screenshot from my AE window. Here you can see the little graphics floating around in the background, and overlaid on top is animated text.
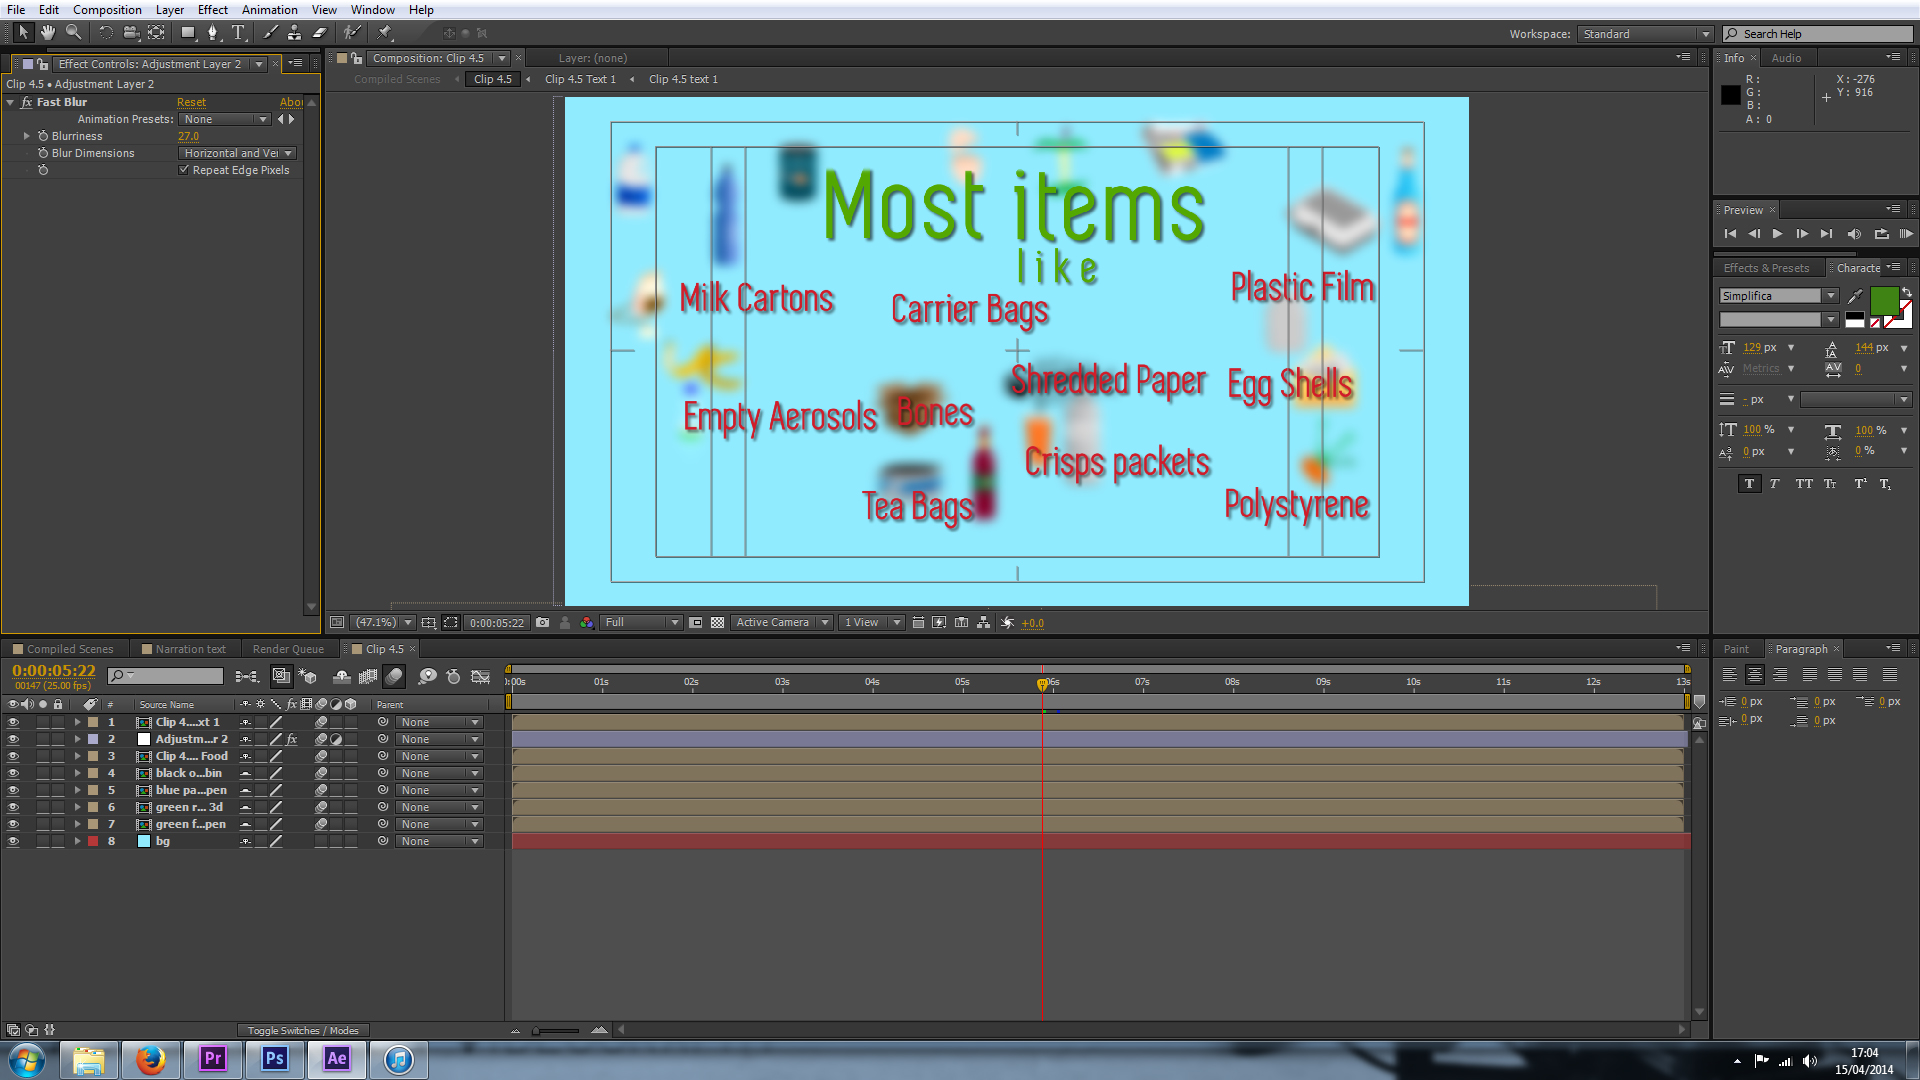 I've used pre-comps here to create different sections of each 'clip'. This allowed me to keep my timeline and frame tidy as I would only be working on specific parts of the clip at a time. For example, in the above frame the little graphics are pre-composed with their animation keyframes, so I can layer up the blur and text on top to be revealed later. For each 'clip' I also pre-composed all of the text as these are animated individually using various effects.
 Some of the more complex motion graphics, here I used falling particles (Particle World II) to fill up the alpha channel of a recyclable object, where a mask then revealed a solid; making the object look like it is filling up with the falling particles. To create this effect I changed the physics parameters to allow the particles to fall slowly, and spread as they go. Remember to use random seed when duplicating effects like this too ;)
 To add to the emotive feeling of the video, it was important to include human thoughts and processes on why recycling is important and beneficial to the environment and us! This is me interviewing Alan about how easy it is for him to recycle.
Equipment used includes: Canon 5D mkIII, Tamron 24-70mm F/2.8 VC, Zoom H6, Sennheiser ENG-G3, Rotolight RL-48, Manfrotto 755 carbon fibre pro tripod and MVH500.
This was a quick and easy shoot, using DSLR for videography means I have great light sensitivity in post places and it is easy to set up. I used the Rotolight to kick a little more into Alan's face, and recorded using a wireless lav mic and the XY stereo mic on the Zoom for a backup. Setup-interview-de-rig took one hour.
Pleased with the outcome, I got onto editing the sequences together now that the animation was looking good!
 In Premiere Pro, I used the Luma Corrector and RGB Curves to adjust the exposure and colour balance of the clips, here you can see the split view with the original on the right and the edited on the left. The Luma Corrector does a great job of removing Gamma, which takes out a gamma curve (grey) from the footage and can be used with contrast to create a really punchy, cinematic look.
With still more to go, and an aerial shot from a DJI to go and film, I am eager to see peoples reactions when the video is complete!
Fashion Photo/Videoshoot at The Lemonade Factory


I'm pretty bust at the moment, so here are a couple of frame grabs to keep you entertained! I'll do a post on the shoot yesterday, and have plenty of footage to trawl through too!
Update from Adam!
It has been a very busy couple of weeks since BVE, which by the way was great this year. I was over the moon to see the new finalized range of Manfrotto LED Spectra light panels which I got to test out a couple of years ago. Seeing products develop over a long period of time is interesting, even more so when your opinion is considered in how the final product should perform. Manfrotto also had their re-designed SIMPLA rig to demo, a much lighter and more ergonomic model I must say which is compatible with 15mm rig accessories like their matte box and electronic remote control.

As well as that, Manfrotto have also joined forces with Schneider Kreuznach optics (page in German), who have a new range of cinema lenses, specifically designed with ease of use in mind. All of the lenses from 24mm to 135mm have the same filter size, length and focus rotation to make filming with a range of the lenses effortless, simply change the lens and your peripherals stay in position. The optics of the lenses blew me away. Even in the well lit Excel, the background bokeh was stunning, soft yet so crisp. I cannot wait to get my hands on them. I think the combination of the new Manfrotto 055 tripod, the SIMPLA rig and Schneider glass will be a killer cine kit, delivering incredible visuals, making your shoot run smoothly, and at a low cost. Give it a year and this will be the go to package for production rentals, and part of every kit bag.

In other news, I've been working with EEBC on a couple of projects; a short video on recycling and another about a Wellbeing centre for those suffering with dementia and their carers. Both projects have messages that are close to me, so I've been working hard to blow my clients expectations out of the water. For the recycling video, I'm combining video with animation to show why recycling food and material waste is ever more important today; generating renewable electricity and resources. The Wellbeing centre video will be live action video, featuring the range of activities available to those in the community as well as the vast benefits to carers and visitors to the centre.
So, busy busy at the moment. I'm also meeting some designers from the fashion label ACF (Art Comes First) next week about another video featuring the design process here in London. Very exciting, I've been patiently waiting for an art-collaboration project to come along, it's what I started the business for!
I've had no #videoquestions for a while, so remember to keep them coming to @Plowman91!
Remember, inspiration is everywhere so take your camera with you!

EDIT!!!! Just remembered to include this, I spoke to an un-named informant about the new Samyang/Rokinon VDSLR cine lenses and whether any new models are going to be released. Our brief chat resulted in confirming rumours of a 50mm and 135mm cine lenses coming very soon! I think it's exactly what the lens range needs, and I will certainly be investing in the 135mm if it is at T/2.2, or pushing it at T/1.8 would be a dream come true. So hear my thoughts Samyang/Rokinon!
Silence is golden, Planning is key!
A new #videoquestions is out today on how to plan your video production so it runs smoothly, and is within your time and money budgets! I'm out for a pre-vis meeting this morning for a video that combines animation, where planning has been a very important role in creating a narrative and generating an estimate price for the production. I'll share my work with you in this#videoquestions later today!

Manic at Adam Plowden Video HQ!
Its been incredibly busy over the last few weeks, so apologies for not posting for a while! Lets fill you in. February has been a tough month. Work as been here and there, it is always difficult at this time of year and made even more difficult by starting a new business. I expected a lull at the beginning, so not to lose hope I kept myself busy. Although I haven't been posting, I have been out filming all the time, especially these last couple of days.

Rotolight sent down their awesome ring light and roto-mic, which I have been testing out and reviewing in what feels like all weather conditions! One minute it is sunny, the next it is bucketing it down. A couple of times I got stranded in the downpours with my kit, a prolific moment was this, up in a quiet and forgotten playground near Epsom Downs. I only got 3 shots that day, then the rain came and we retreated.

Since then, the weather has picked up, and so has the tempo of production! I got an email from Rotolight asking if its possible to put a short video together for BVE with the footage I got when using the roto-mic and ring light. Feeling up for a challenge I accepted, and have been busy producing a music video to coincide with the video for BVE! I reeled in one of my good mates Josh McDonough is an awesome musician and producer, currently working on a new studio build to perform in the video, and in return he can have the music video to kick start his recording-producing business.

To show how you can maximize the creativity and convey the flexibility of the Rotolight Sound and Light kit, I used various techniques including mounting on a camera, hand held, and playing with the light to create unique blooming and light effects. I had a few ideas of what the visuals would look like, an intimate piece to camera in the soon to be studio, as well as getting out and using the light in low light situations to add an urban feel.
There will be much more later, but right now I need to continue with the editing and graphics for the Rotolight video!
New supercomputer is built!
I've been waiting months to finally have a computer that can handle the work that I do!! Previously working on laptops (which coincidentally die each year) I needed to step up the game to a high performance desktop which will expand my capabilities in not only video editing, but also motion graphics and compositing. I got myself an i7, NVIDIA 650TI 2Gb graphics card and all the rest to allow working speedily in Adobe applications (taking advantage of the mercury playback engines) and also allowing me to use Speedgrade and DaVinci Resolve for professional colour grading as the new graphics card is CUDA enabled!! My workflow speed will go through the roof!
Throughout all of January, the components dribbled in one by one, until it was only the PSU to come. Amaz0n buggered up my order, which I was expecting in 2-4 weeks. The order then got pushed back another 2-4 weeks, which I was furious about, so got on to Amazon support who clarified the 'warehouse' issue.. Everything is computerized these days so I don't understand how a major marketplace cannot get there warehouse stock levels and back order numbers right!!
I cancelled my order with Amazon, and put it through Scan instead, who delivered the Corsair 1000w PSU in only 2 days. Top service!
Being impatient (eager), I wanted to get the new computer going as quickly as possible so I begun assembling the components in the case. I had never done this before so the nerves were running riot, washing my hands every couple of minutes to make sure I wasn't getting grease or dirt on the motherboard. It was stressful, but I managed to get most of the bits it, bar the CPU and hard drives.
Yesterday Sam helped me put together the rest of the components and the cabling, and the building of my new workstation - could not have done it without him!
 The blank canvas of my computer.
Now all I have to do is fill it up with my work and data, install Adobe and then I can get working!
Actively seek great opportunities, there is no such thing as a big break.
Video Questions; Choosing the right camera, picture profiles and using ND filters!
Heyo all! Thanks for sending in your questions, I will try to answer as many as I can will practical, real world examples! If you have any more, please send them my way! Question from Chris via Facebook: "Can you recommend any camcorders for HD video and good low light performance?"
Answer: A DSLR for video is not the right choice everytime. Why do you think television broadcasters use camcorders and system cameras? For broadcasting, there are regulations and legal limits that must be followed for the final video to be shown live; there are many including the compression of the video signal, the black and white level (check out waveform monitors and video signal) to name a couple. DSLR's do not adhere to these regulations hence we don't see TV crews running around with 5D's in London.
Where DSLR's produce a great image due to the large CMOS sensor, they have big restrictions such as needing to change lenses, poor audio support (unless you invest in audio equipment), rolling shutting, aliasing, moire.. I could keep going.
So, taking camcorders in the equation; most have long zoom ranges (20x and more!) at wide apertures, with additional digital gain, in built ND filters, built in stereo microphone and audio in/out. The sensors are different too, some using CCD (which splits the 3 colour channels) for better colour rendition and less compression.
These days, manufacturers such as Sony, Canon, JVC produce ENG (electronic news gathering) camcorders with those above features, meaning no extra kit to carry, most are hand held or shoulder mount for ease of use. Therefore it is seemingly easier to video on a camcorder, until you require a large sensor camera for artistic video.
Product recommendations for camcorders - Sony AX and VG range, Canon Legria, XA and XF range, JVC produce great camcorders too and have stepped up their game over the last year with the GM-HY range including a 4K model too.
If you want to spend a little more, the Sony HXr-NX3 (recently reviewed by Den Lennie) looks incredible for what you get in one camera - http://www.sony.co.uk/pro/article/broadcast-products-get-close-up-hxr-nx3
Next question from SAHIB on Twitter: "Do you use a neutral picture style when shooting, and do you use neutral density filters?"
Answer: For those unaware of picture profiles on your camera, check them out in the 3rd section of the movie shooting (red) menu (for Canon users). There are a number of options listed, which alter the way the picture is recorded depending on your choice, you can also customize these profiles too using the INFO button.
Canon picture styles - Standard, Portrait, Landscape, Neutral, Faithful, Monochrome.
I will not be detailing the ins and outs of all the picture styles, more of a visual comparison.
What does a picture profile do? Much like LUTS, picture styles adjust the intensity level of the; Sharpness, Contrast, Saturation and Colour Tone in the image, so what picture profile you use can change the 'look' of the video you capture.
Check out this video I put together today showing the results of the cameras picture profiles, and others I have loaded onto the camera. You can see a clear change in the image, but it is subtle differences that will make your video work stand out.
I previously used the Neutral picture profile, customized to reduce the contrast, saturation and colour tone to produce a very grey and flat image. I was using this profile to achieve this look, as it is how RAW footage is captured to then be graded in post production. Neutral does replicate this 'flat' look, but after doing research into other profiles, Neutral reduces the data that is required in the picture (the contrast and saturation) that I would then put back in in post. This causes noise to be generated in the image, and can cause it to look unnatural and crushed, as the contrast and saturation that had been removed by the picture profile is being added back in later in the workflow.
That was long, but I hope it makes sense. If you compare the 'Standard' to 'Neutral' there is an evident drop in saturation and contrast, with a loss of detail in the top of the trees. If you compare 'Neutral' to 'VisionColor', there is an increase in saturation and contrast in the shadows and highlights.
The 'Neutral' picture style, similar to Technicolor CineStyle reduces the data the sensor captures, so I would not recommend using it if you plan to do colour correction and grading in your workflow. REMEMBER - whatever you capture when out filming will 'burn in' the detail, colours, sharpness and contrast into the image, making it harder to edit and remove unwanted errors. So, it would be better to use a profile that holds the data and detail so if wanted, you could work on grading the footage later.
From tests and experimenting, I favor the VisionColor profile; it is not as destructive as Neutral, holding colour and contrast without making the image flat. I definitely recommend checking them out here.
Next Question from SAHIB on Twitter: "Can ND filters change the style of video?"
Answer: This does depend on what and where your video shoot is. If you are working indoors, or with lighting that can be controlled by you then neutral density filters may not be required as you can alter the brightness of the scene by reducing the intensity of the lights. However, if you're out filming in a situation where you have little to no control over the lighting, then ND filters are key.
Personally I use variable ND filters, currently from Polaroid but much better filters are available from Hoya & Tiffen. The function of these filters is to reduce the light entering the lens, meaning camera settings can be kept the same. This allows you to follow the 180 degree shutter rule, which means keeping your electronic shutter speed at 1/50th to reproduce film-like and realistic motion blur.
So, with your shutter speed locked at 1/50, and your chosen aperture has been set, the only other exposure altering options you have is to ride the camera ISO to make the image brighter or darker.
PROBLEM!
With a fast aperture of F/2.8, and you are currently shooting in sunny daylight, your image is going to be very over exposed. Reducing the aperture to F/8 or F/11 may correctly expose the image but you have lost your depth of field! What to do!
Get some Variable ND Filters!
These ND filters rotate, allowing a variable ND amount to be set externally, without changing your cameras settings! This means that you can keep your cinematic depth of field and realistic motion blur without reducing the shutter speed to 1/250th or your aperture to F/11.
I recently shot this video using an ND filter on an 85mm T/1.5, which allowed me to shoot continually at T/1.5 for extreme shallow depth of field.
Making a quick edit: Variable ND filters are one of many options. ND Filters also come in stops; increasing by a factor of doubling so 2, 4, 8 etc. If you can stretch to separate stop ND filters they work just as well, and with the lower end (under £100 products) they will be better quality than one under £100.
In videography and cinematography, ND filters are applied in the matte box in front of the lens. So if you plan to use one, look in to matte boxes with the ability to add filters, but prepare to pay for it!
Well, that covers Video Questions for today! I hope to have answered and covered all bases, and remember they are from my personal knowledge and experience.
Got any more? Send them my way!
Awesome day at Warner Bro's Studios for BSC Expo!
It's been a great day at the BSC Expo; based at Warner Bro's Studios Leavesden the expo features the worlds newest and best cinematography technology and workflow solutions. The journey was easy, I flew by Wycombe to pick up Glen and we made our way to the studios, then walked to C stage. We could see the Harry Potter studio tours in J and K on the other side of the lot, but it was huge!

We took a slow stroll around the stands, it was great to see Rotolight who produce LED lights for photo and video. Their 'Rotolight' product is incredible for a pocket beauty light; due to its circular design the light gives soft overall coverage of the subject, and for models its perfect for achieving a ring of light in their eyes. As well as that, they have developed their own on camera microphone too, giving photographers and videographers alike an entry package, I'm very happy to see this!
The RED stand had the RED DRAGON on display, demoing the 6K, wireless focus and zoom, touch-control monitor.. I can't wait til shoot with a RED package, think it will be be some time though!


The Panavision motorized camera axis was a jaw dropper too, I was so interested due to planning on constructing my own as a DSLR gimbal solution. There is no way I could achieve the precision and accuracy of this device, but with some smooth stepper motors it is completely possible! (If you can't buy it, then try making your own; it worked for me with a camera jib and camera rig!).


And no, we weren't at the Harry Potter Studio tour...

As Bucks New Uni is on the way back to Surrey for me, we stopped by Wycombe for a drink in the SU, the last time I was there we were completely smashed.. "F****ng absinthe death" aye Glen!!


Awesome day, so happy I got to see Glen too, thought I was going to have to wait until March!
For those interested in visiting BSC: GO, it is a great expo completely for cinematography so think cameras, lenses, grip (steadicam, jibs, cars etc), lighting (and plenty of great LED innovations from Digital Sputnik and Chroma Q) so definitely check it out!