zoom

Filming in LA 'CineGear 2015' in Hollywood with Sony A7S, Manfrotto + Rode

APVideo: CineGear 2015 @ Paramount Pictures, LA

It's been a rather amazing few weeks for me here at APVideo. So here is the low down on what I did, what kit I used and what is coming up next!

Jump back to the beginning of June and I get a call from NewsShooter.com asking if I'm available to cover CineGear in Hollywood for them. With an empty space in the diary, I jumped on the chance to visit LA and begun the prep to cover the expo with video.

To familiarise myself with the exhibitors, I checked out the interactive map and visited the websites of companies of interests and viewed the latest press releases to get clued up on the news. (Always be prepared).

Manfrotto provided me with the fantastic Roller Bag 70 for my trip overseas, into which I moulded the foam inserts to protect the cameras and kit I'd be taking. Since it was a short trip, I only took the bare neccessities!!

  • Sony A7S in Movcam cage and Metabones Adapter mk IV
  • Tamron 24-70
  • Nikon 50mm F/1.4
  • Zoom H6
  • Rode Lavalier
  • Manfrotto 755CX-3 + MVH500AH

Told you it was bare!

It was a couple of long flights over to LAX.. Some snaps from the journey on the A7S.

It was my first time flying to America, so I was keen to snap up as much as I can, and enjoy the Virgin Atlantic hospitality!

I highly recommend the Mondrian Hotel on West Sunset Blvd, it is bloody amazing. Rooftop restaurant and bar, amazing hotel views, and staff that feel like family!

View from Mondrian LA

The following morning I constructed the Movcam cage rig with the kit I brought, which compacted all of the filming kit into one tiny hand held rig which I could put on the Manfrotto 755Cx-3 tripod.

I got myself one of these handy little hot/cold shoe mounts for anything with a 1/4" screw hole; in this case I was using it with the Zoom H6 but it fits most accessories. If I were using the Atomos Shogun, I'd of used a magic arm (just for flexibility in adjusting the screen angle), but as I was monitoring the audio with headphones and checked the levels beforehand I didn't need to see the monitor per se. An alternate is to simply use a ball mount, but I find these sometimes don't lock down the position strongly enough (especially cheaper ones).

Very lightweight packing for a 3 night trip.

I took of the video head by unscrewing the locking screws at the base.

I got an UBER from the hotel to the studios, and after registering and waiting for the show to open, I made my way to the stages to begin filming! I had about 10 interviews to do on the first day to get a head start and the main content back to NewsShooter (who are a day ahead time wise).

Cool-Lux, Atomos, SLR Magic, Beeworks and a host of other manufacturers were on the list to capture. For the setup, I shot using PB's recommended video settings (cine-4 etc see previous blog post) with the Zoom H6 recording dual audio both on the stereo XY mic and via the Rode Lavalier which I clipped onto the interviewees.

Thats Andrew from SLR Magic talking about their new Rangefinder, Anamorphot and Noktor lenses.

The plan was to shoot the 10 interviews with plenty of B-roll and begin editing that night. It was a late one, staying up until 4am editing the first batch of videos. I got the SLR Magic one out that morning before my head hit the pillow.

4 hours later.

Up I was to complete the last of the edits in Premiere Pro. The videos follow the same format, so after opening the exported XML sequence from Pluraleyes I could simply drop in the titles and credits, the lower 3rd and QC the video before exporting.

The show opened later that day, so I made my way down that afternoon. The Manfrotto tripod I was using was perfect for this kind of filming. Being mobile and having a small footprint is a real issue when covering events, and you should try and stay as small and quick on your feet as possible.

Michael from ARRI at Cinegear

The rig was so convenient I carried around on my shoulder all day!

That evening it was recovery time from the lack of sleep and jet lag carrying over from the previous night, but while I was putting my feet up watching Jurassic Park in the hotel I had Premiere whizzing away with the new footage I had shot that day.

Because of the format, replication of sequences was rather fast. Using Premiere means no rendering time and instant playback, so I spent little to no time waiting around as I queued up the finalized sequences into Media Encoder, and batch exported while I was editing together the next sequence. Keeping check on the white balance and varying exposure of indoor and outdoor shooting meant no colour correction was needed in the edit, which also sped up the production process, I could get the news from the show quicker out to NewsShooter!

The beauty of shooting on the A7S was that I could shoot at F/11 and beyond outside due to the wonderful Hollywood weather, but inside if I needed extra light I could punch up the ISO to 2400-6000 with no real visual difference (unless you want to pixel peep).

The Rode Lavalier is a real workhorse for me. Before leaving I set it up with the small wind jammer and the Micon-5 XLR adapter so it would plug comfortably into the H6. For an inexpensive microphone it does a fantastic job of capturing the subject and cancelling out the background noise, which at an expo is quite loud in some cases.

In case you need advice on SD cards, I use the Transcend Ultimate 600x 64Gb U3 cards (purply pink label) as they are XAVC and S-log compatible.. Not that I have shot using the S-log yet.

Feel like I should say 'Mirror, mirror, on the huge podium in the centre of my hotel room'.

Just as quickly as I arrived, it was time for me to depart. I got an UBER to LAX where I picked up a couple of snacks to munch on while I edited the remaining videos to be exported when I got back home.

That guy sitting above my laptop was vaping away on an e-cig by the gate. I thought to myself 'surely this wouldn't be legal in England'.. It isn't!

That guy sitting above my laptop was vaping away on an e-cig by the gate. I thought to myself 'surely this wouldn't be legal in England'.. It isn't!

Bye bye wonderful Mondrian and LA

I returned home after a stop over in Las Vegas for probably about 20 minutes. So no gambling or anything like that as it was a quick transfer. So quick in fact that I needed to run to the gate (again, thanks to Delta, grr).

A fun filled 12 hour flight across the states and Canada, across the ocean and back into England was compiled of all 3 Hobbit films (as I was yet to watch them), followed by a hilarious comedy film called 'What We Do In The Shadows' by the same guys that made 'Flight Of The Concords'.

Bye bye LAX!

Damn its dry down there.. No forests or green!

Overall it was a brilliant working trip to Paramount to cover CineGear 2015 for NewsShooter, and a wonderful experience visiting the US too. I look forward to working again with NewsShooter at future events!
New summer post coming very soon!

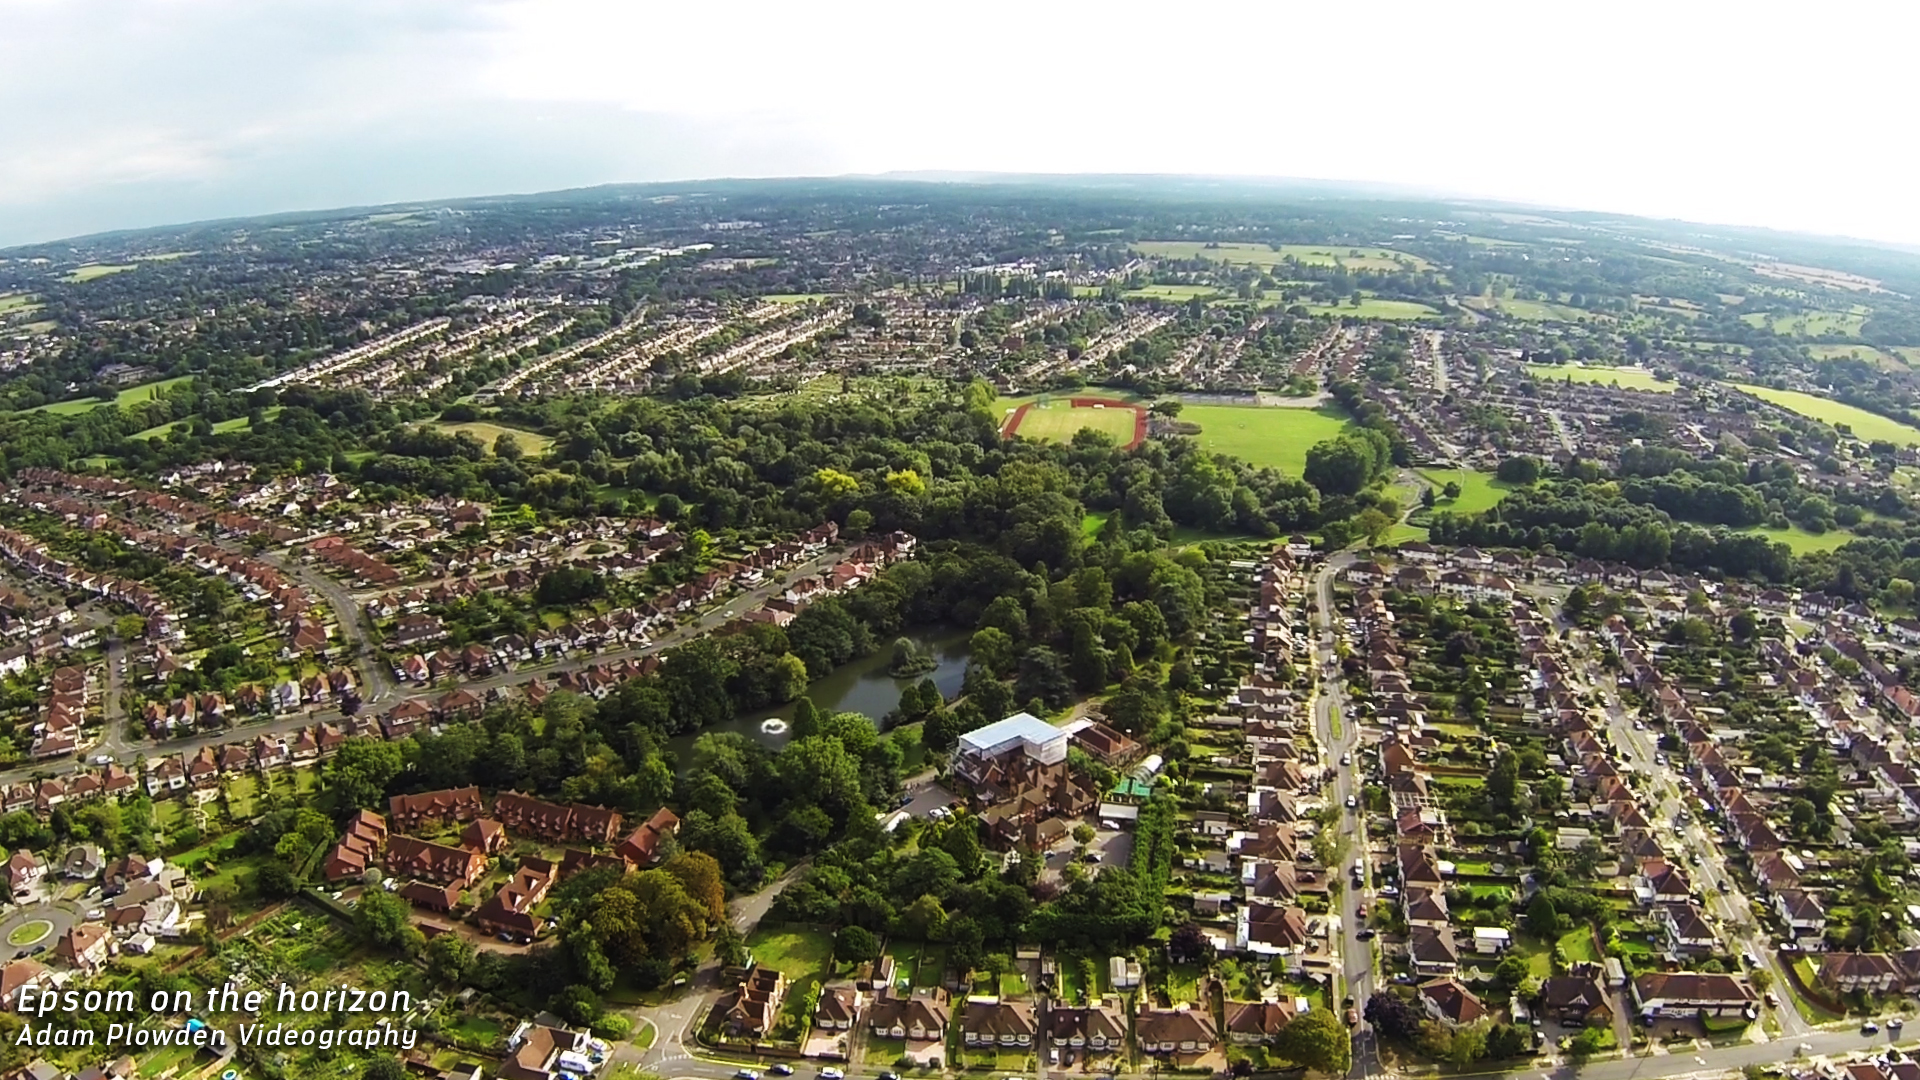
It's been an extreme summer season! From epic weddings with drone flying to creating the videos for The IABM for IBC, it has been immense. Epsom and Ewell from the air, Adam Plowden Video

Now nearly 9 months since starting Adam Plowden Videography properly, I am over the moon with the great clients and people I've worked and am working with.

I still have a number of productions on the go, and I will be attending The IBC Show in September so there is much more great stuff to come!

Massive shout out to the team over at Manfrotto who have been a great help with sorting out equipment for my travels abroad!

Keep those creative juices flowing!

[vimeo http://vimeo.com/103717010]

[vimeo http://vimeo.com/75340958]

Behind the scenes of yesterdays Wellbeing videoshoot!

06:30 Kit bag, check.

Audio kit, check.

Lighting, check.

Brain, just about.

bts early morning sky

Yesterday I was out filming talking heads and some b-roll for a Wellbeing project on behalf of EEBC. Wellbeing is our general mental and physical health, but there are many factors in the way that we live that can affect our chances of developing serious health problems in the future. These include some sensitive subjects, that I was capturing to provide an information base for those in the community that may be suffering, or have friends and relatives of those diagnosed with; Cancer, Coronary Heart Disease, Dementia and Diabetes.

I was featuring nutritional expert Yvonne McMeel throughout the videos, so I began by planning my main piece to camera with her in the Wellbeing Centre.

This was a standard video shoot, so I packed my kit bag to be prepared with whatever the day would bring! This included;

Video - Canon 5D mkIII, Tamron 24-70 F/2.8 VC, Sigma 70-200 F/2.8 OS, Canon 60D.

Audio - Zoom H6, Roto-Mic, Sennheiser ENG-G3 100 wireless.

Grip - Manfrotto 755CX3 tripod + MVH500AH, Manfrotto 190Pro-B (old version) tripod, Super clamp and magic arm.

Lighting - Daylight balanced 85W studio light with soft umbrella.

Extras - Lilliput 1018 (I am currently testing out and reviewing this product).

behind the scenes videography equipment

I took along the Lilliput 1018; the new flagship 10 inch touch screen field monitor, which produced crisp pictures and well represented colours. I ran this on a F-970 battery with HDMI through from the 5D, so I could monitor both. This did however cause the camera to heat up quite quickly. However, the monitor has awesome features usually found on high end products which include; exposure and focus peaking, on screen waveform monitors, levels and much more, which came in very handy for assessing the quality of the picture. (More coming later regarding this product).

behind the scenes make up artist Char1 behind the scenes make up artist Char2 Char doing her make up thang!

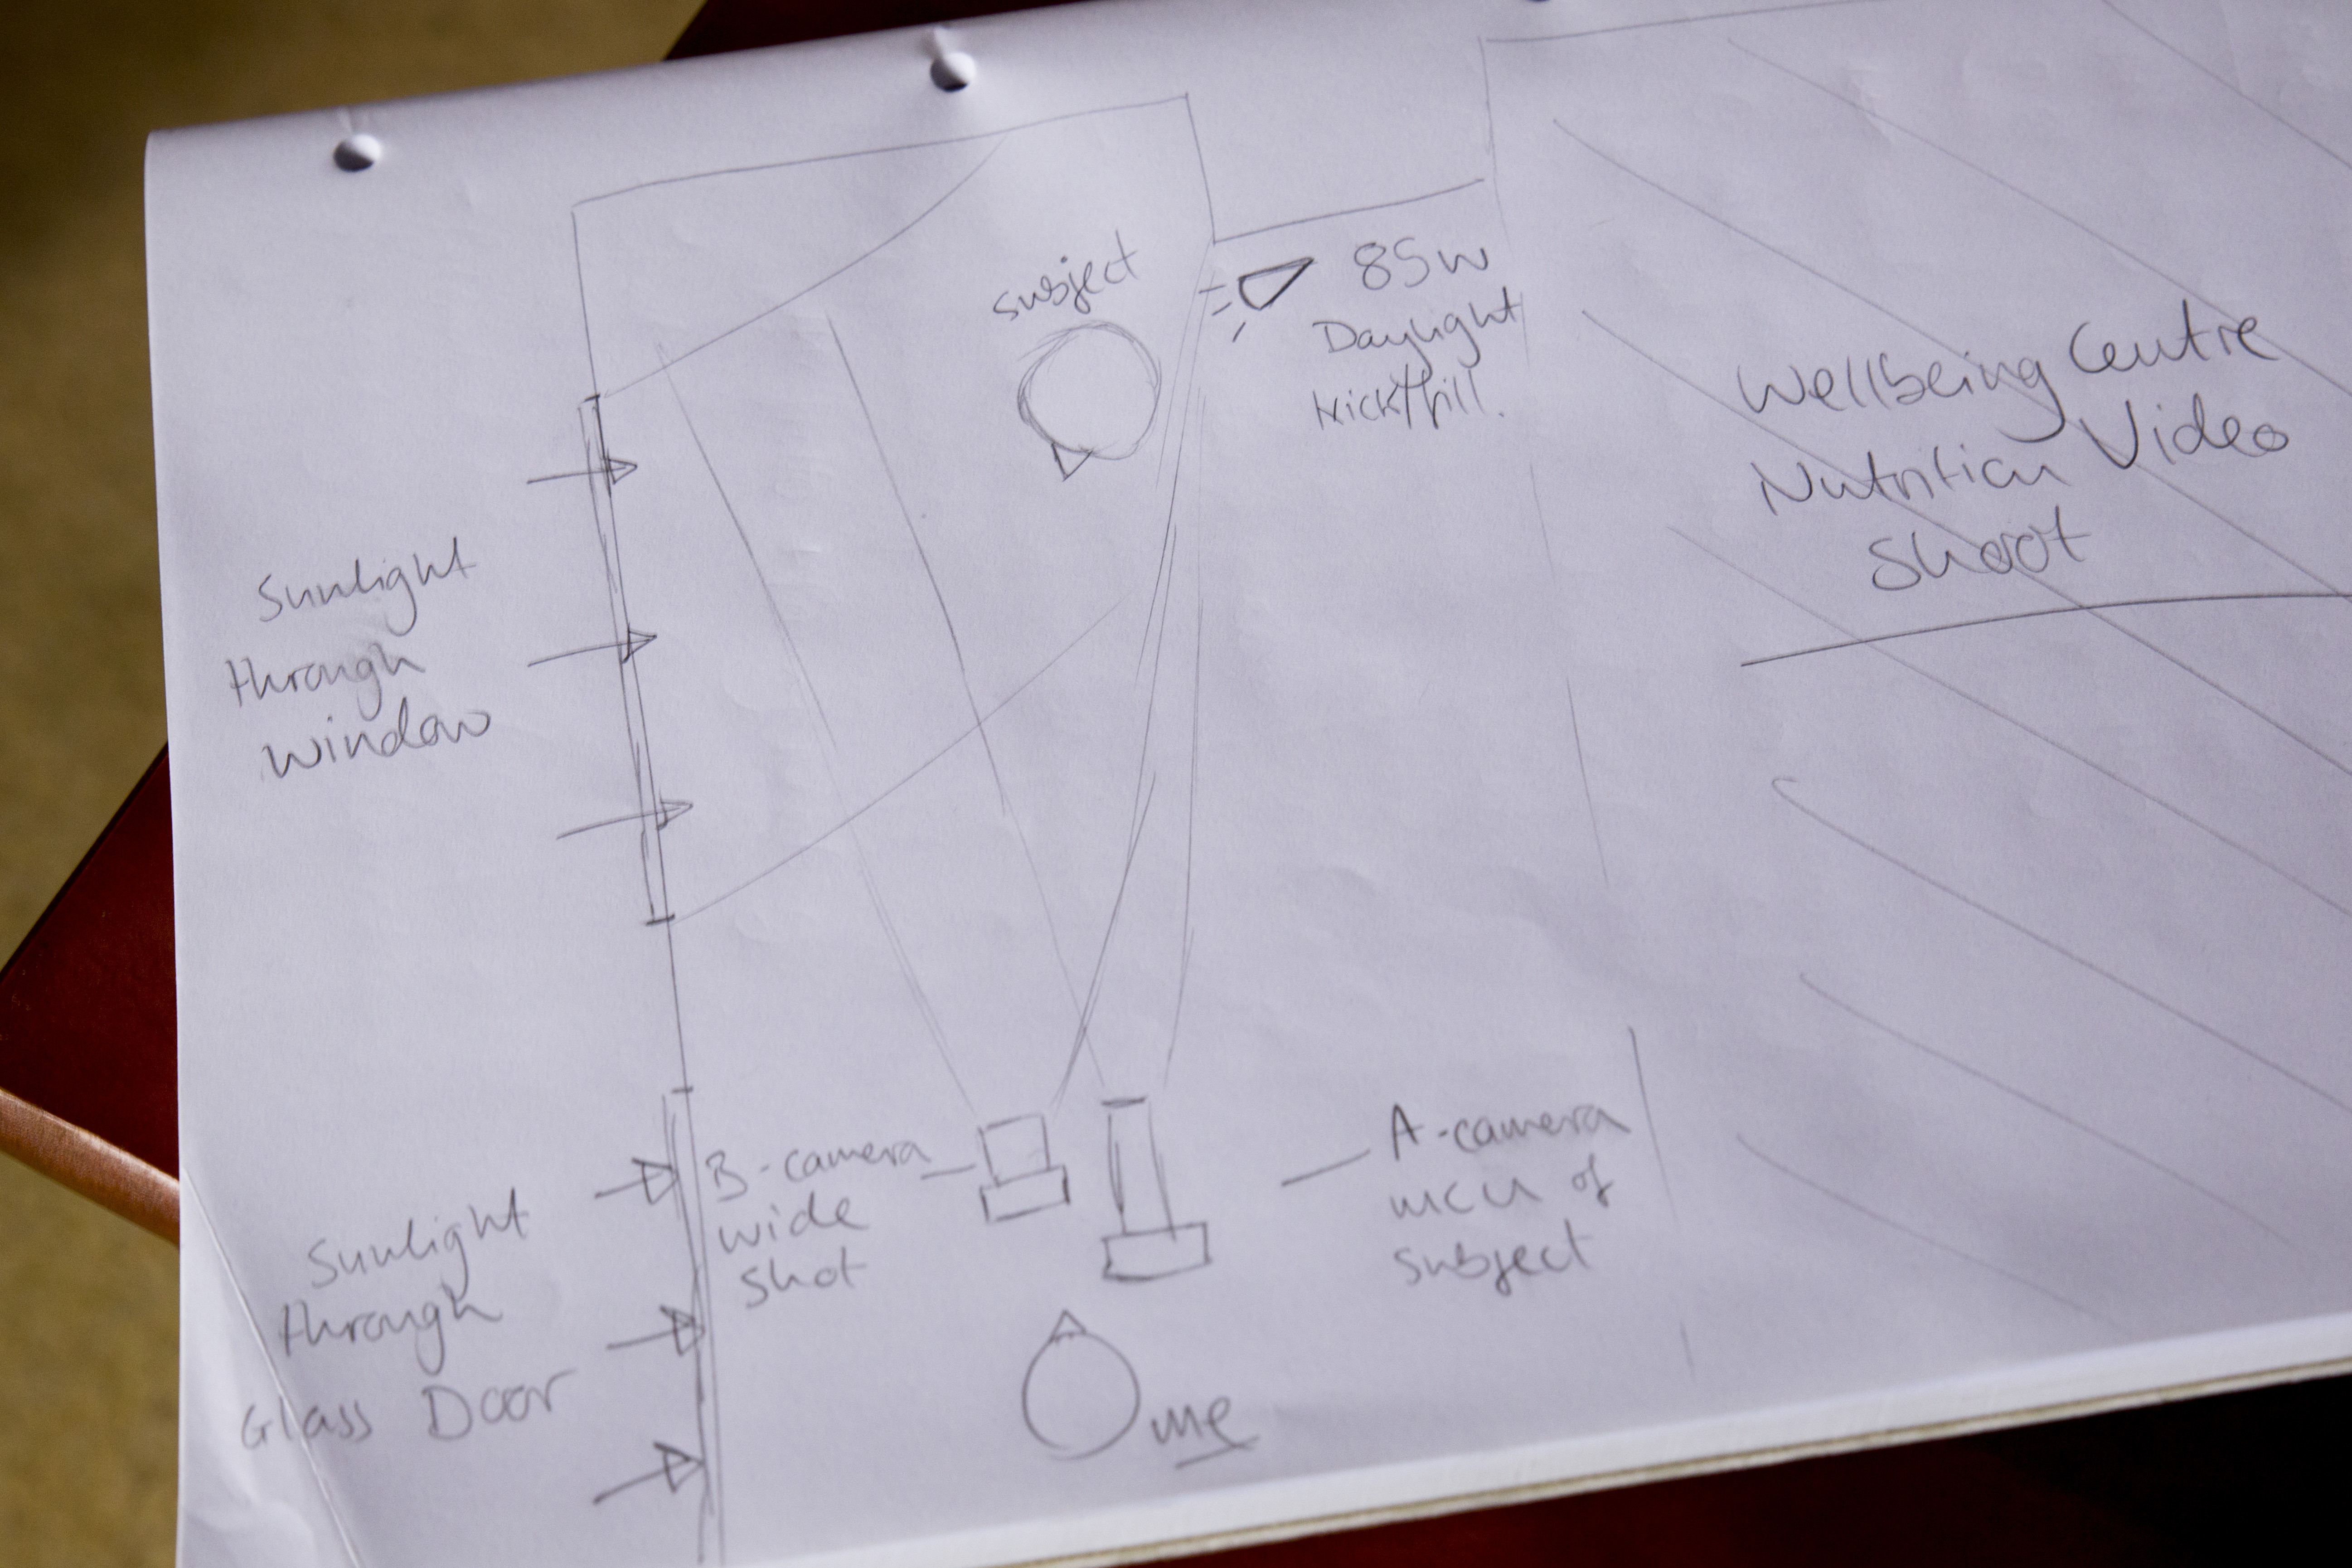
I began setup at 9am, shortly followed by Char the make up artist who set up her bits. The location for filming was the Wellbeing Centre, which as a wonderfully bright open facade with big doors and windows. Luckily enough, blaring heat and sunshine poured through the windows, so that was my key light at slightly cooler than daylight colour balance at 5200k. This also matched the daylight light fixture I was using to add a fill and kick to the subject.


Why did I use a 2-point light setup?

I could have rocked up with the intention of using just the daylight and the incandescent lights in the centre with the mentality that it will illuminate my subject well, but there are risks you have to be willing to take if you approach lighting in a casual way. Some points to remember when thinking about lighting your subjects;

  • Are they defined from the background?
  • Do they have harsh shadows on their face?
  • Moving sunlight will change throughout the day, in brightness, direction and colour.
  • bts wellbeing light setup

Now, when you haven't been to the location before it is difficult to judge the lighting conditions, so firstly if you can have a RECCE of the location. It is very beneficial as you can begin to compose the scene, judging the internal and external lighting, now noisy the environment is, whether you will need a backdrop instead of a plain background.. All points to consider before you turn up with the camera kit and begin filming.

Defining the subject from the background is what makes them look 3-dimensional and not flat, this is the same for the shadows too as it shows that features are visible on the face. With DSLR's it is possible to use depth of field to define your subject from the background, but lighting can also be used to 'pop' the subject out of the BG.

Harsh shadows are caused by strong direct light, and are unwanted as they mask features and don't represent the subject properly, unless this is the effect you are looking for. For piece to cameras and interviews having soft shadows around the nose show the features of the subject, again making them look real.

The sunlight is your best friend and worst enemy at the same time... As the Earth rotates, we move further away or closer to the sun which changes the lights direction; if you start filming in the morning with your subject lit from the front, by 12 noon the sun is over head and by the late afternoon the light will be behind you. To combat this, keep continuity by filming at the same times each day, or even simpler be aware of the suns direction and gradually rotate the subject and other lights to keep a constant illumination. For me, I was filming from 11am through to 15:00 with the sunlight to my left for the whole day which was very beneficial, but not every time will I be that lucky!

Watch out for clouds that can block the sunlight, and be aware of how the colour temperature of daylight changes throughout the day; cool in the morning and warm in the evening. For me, shooting in midday sun meant a constant temperature of 5200K for both cameras, matching the other light.

The use of a kicker or fill light, pushes out the shadows caused by the key light (the sun), and gives a halo effect to the hair of the subject making them stand out. The difference is subtle but effective.


Camera Setup and Composition

Once I had my lighting up and running, it was time to set up the cameras and audio equipment. I was going to shoot using the Samyang 35mm T/1.5 cine lens, but this would result in being intimately close to Yvonne, the subject, which would be quite off putting and may add shadows/interference such as me rustling papers to the recording. Instead, I used a telephoto lens as I can be a good distance away from the subject, and create a narrow field of view that frames up as an MCU (medium close up).

My main A camera was the 5D mkIII, and although the Sigma lens can open up its aperture to F/2.8 for shallow depth of field, this was not required for today. Instead, the camera was set to F/4.5 for a still shallow depth of field, but deep enough for the subject to move forward and backwards in the frame a little, and to de-focus the background. The ISO was set to 200, although when the Sun disappeared behind clouds I would ride the ISO to 250 or 320 depending. To stick to the 180 degree shutter rule, the electronic shutter remained locked at 1/50th.

The B camera was the Canon 60D, I paired this with the sharp Tamron 24-70 F/2.8 and shot wide open, again riding the ISO when required. I did this because this camera was capturing a wide shot of the subject, so depth of field was not noticeable. To keep continuity, both cameras were set to a white balance/colour temperature of 5200K, but it appears that the 60D picture is slightly yellow/green than the 5D picture.

behind the scenes camera dslr audio setup light

Audio

The often forgotten partner to the pretty pictures you see, having top quality audio is just as important as having your subject in focus and exposed. I used the Zoom H6 as my recorder, with the XY mic attached to capture one stereo recording. I also used the Sennheiser ENG-G3 wireless mic kit, attaching a lav/lapel mic to the subject which would be my main audio source. As a back up I also used the Rotolight Roto-Mic plugged into the 5D just in case. Remember to take headphones so you can monitor the sound recording, just like you would use the cameras screen to compose the picture.

Behind the scenes wellbeing video shoot adam plowden videography canon 5D lilliput

The filming went brilliantly. As a precaution I decided to use the 'record to multiple card' function in the 5D so I had a back up of the footage in case the cards got corrupted from such long recording times. As mentioned earlier with the lighting, as the light slowly changed, I also adjusted the position of the kick/fill to push back the shadows.

I was very impressed with the Lilliput 1018 field monitor too, and although it is larger than monitors I would usually use the touch screen control and diverse functions suited the shoot well, so I could keep a close eye on the changing light levels.

After the principal piece to camera filming was complete, I ventured out into Epsom and Ewell with Yvonne to film some b-roll pieces that would add to the information and dialogue about wellbeing and health. So, we visited Shadbolt Park outdoor gym, Ewell Court Library, Epsom's Derby Square, we were going to hit the market but by that time it was 17:30 and no chance of finding fresh fruit and veg to film.. We returned to the car to go to the last location, Epsom Downs, when this happened...

adams broken down car

My car broke down. The filming day abruptly ended with a call to my insurers for recovery, while I also arranged a taxi for Yvonne to take her to the train station. That didn't put a dampener on the day though, I had captured great video and dialogue that I hope will help many people in the borough and wider community who may be suffering with cancer, heart disease, diabetes or dementia.

I then ingested the footage, and backed up a whopping 80Gb of footage and audio.. Lots to edit through, but thankfully those wonderful geniuses at Red Giant have a tool called Pluraleyes which can sync video with externally recorded video, so suddenly the issue to matching up the audio to the video disappeared, saving me potentially hours of work!

pluraleyes un-synced A bunch of un-synced video and audio clips gets transformed into this -  behind the scenes pluraleyes sync video

Pluraleyes then allows you to export the sequence as an XML that I then imported into Adobe Premiere Pro to edit! It's ready to go!


Overall, very happy with the footage and the outcome of the first day! I need to get out and shoot some more cutaways/b-roll of healthy food, socializing and some more bits and bobs to add.

Sorry for the silence!

Blimey, wiping the dust from my blog I can see it has been neglected over the last couple of weeks. I can explain this, I've buried my head deep into working on a recycling video for my local council. For this I have designed and animated original graphics in Illustrator and After Effects, to be edited together in Premiere Pro. I can't give too much of what I'm working on away until the video is publicly released on the council website and other displays around the town of Epsom! But as you are a dedicated lot, and showing you the techniques I used won't do any harm!

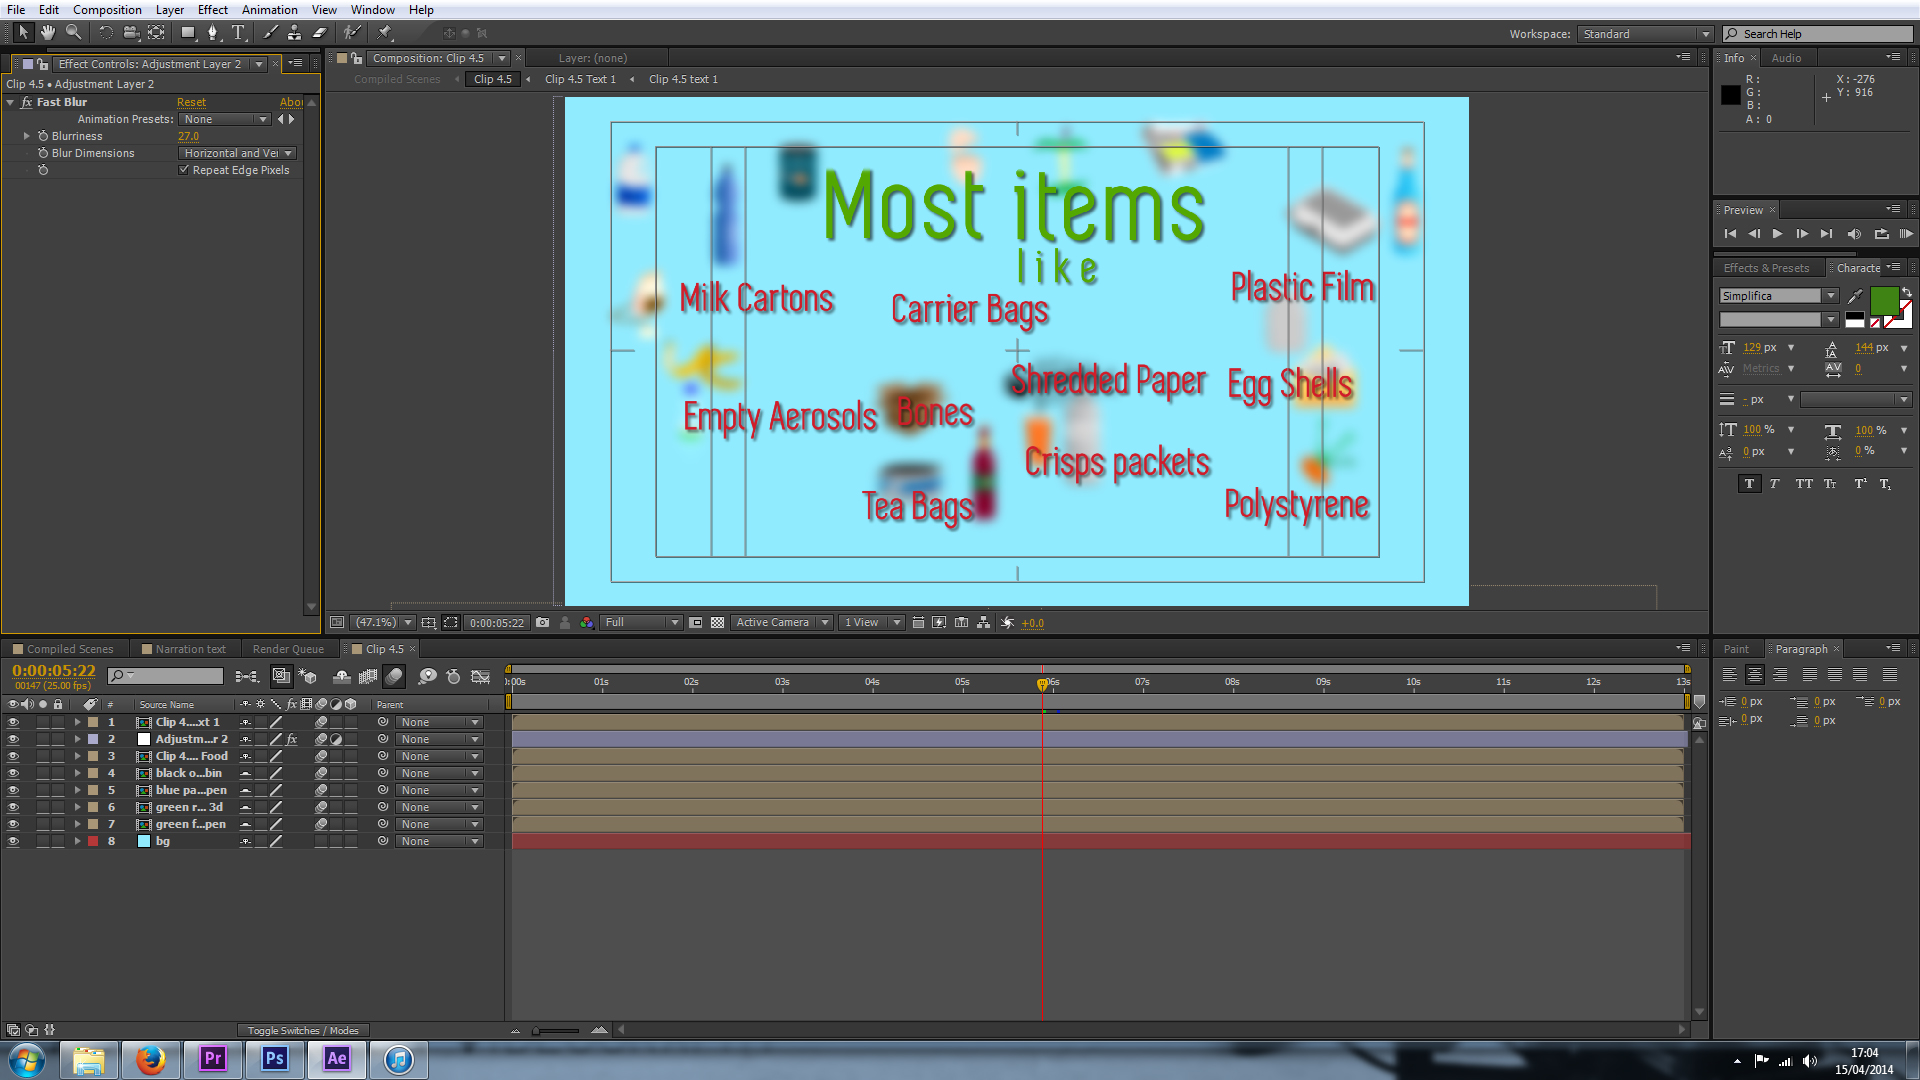
Here's a screenshot from my AE window. Here you can see the little graphics floating around in the background, and overlaid on top is animated text.

recycling animation graphics motion vfx gfx design illustrator after effects I've used pre-comps here to create different sections of each 'clip'. This allowed me to keep my timeline and frame tidy as I would only be working on specific parts of the clip at a time. For example, in the above frame the little graphics are pre-composed with their animation keyframes, so I can layer up the blur and text on top to be revealed later. For each 'clip' I also pre-composed all of the text as these are animated individually using various effects.

recycling animation graphics motion vfx gfx design illustrator after effects  particle world simulation Some of the more complex motion graphics, here I used falling particles (Particle World II) to fill up the alpha channel of a recyclable object, where a mask then revealed a solid; making the object look like it is filling up with the falling particles. To create this effect I changed the physics parameters to allow the particles to fall slowly, and spread as they go. Remember to use random seed when duplicating effects like this too ;)

filming videography videographer dslr film interview To add to the emotive feeling of the video, it was important to include human thoughts and processes on why recycling is important and beneficial to the environment and us! This is me interviewing Alan about how easy it is for him to recycle.

Equipment used includes: Canon 5D mkIII, Tamron 24-70mm F/2.8 VC, Zoom H6, Sennheiser ENG-G3, Rotolight RL-48, Manfrotto 755 carbon fibre pro tripod and MVH500.

This was a quick and easy shoot, using DSLR for videography means I have great light sensitivity in post places and it is easy to set up. I used the Rotolight to kick a little more into Alan's face, and recorded using a wireless lav mic and the XY stereo mic on the Zoom for a backup. Setup-interview-de-rig took one hour.

Pleased with the outcome, I got onto editing the sequences together now that the animation was looking good!

filming videography videographer dslr film interview In Premiere Pro, I used the Luma Corrector and RGB Curves to adjust the exposure and colour balance of the clips, here you can see the split view with the original on the right and the edited on the left. The Luma Corrector does a great job of removing Gamma, which takes out a gamma curve (grey) from the footage and can be used with contrast to create a really punchy, cinematic look.

With still more to go, and an aerial shot from a DJI to go and film, I am eager to see peoples reactions when the video is complete!

Adams video week roundup!

Blimey lots has been going on over the last week, I hope it has been as hectic for you as it has been for me! Monday started with continuing the design of the graphics for a recycling animation, a daunting task which put my drawing skills to the test. Bearing in mind I've spent the majority of the last year behind a camera, I took my time to learn the techniques I would need to use Illustrator properly. I would usually use Photoshop over Illustrator, but until I recently found out PS is not truly vector, and as I would be using a combination of the Pen tool and others to design the images this was very important, as I would need to transform the graphics later in After Effects.

My best mate Glen came down from Wycombe for a  surprise week to, so I spent plenty of time catching up with him and chatting about work. He gave me so very important advice; "Everything is too complicated these days, you should keep it simple and your audience won't know the difference, especially if it is moving and animated anyway." True words, and I took Glens advice which not only sped up the process, but made me more confident with the work I was producing.

Here's a screenshot to show all of them! (I think I am working on a 10K canvas).

screenshot graphics design drawing art 2d vector create illustrator

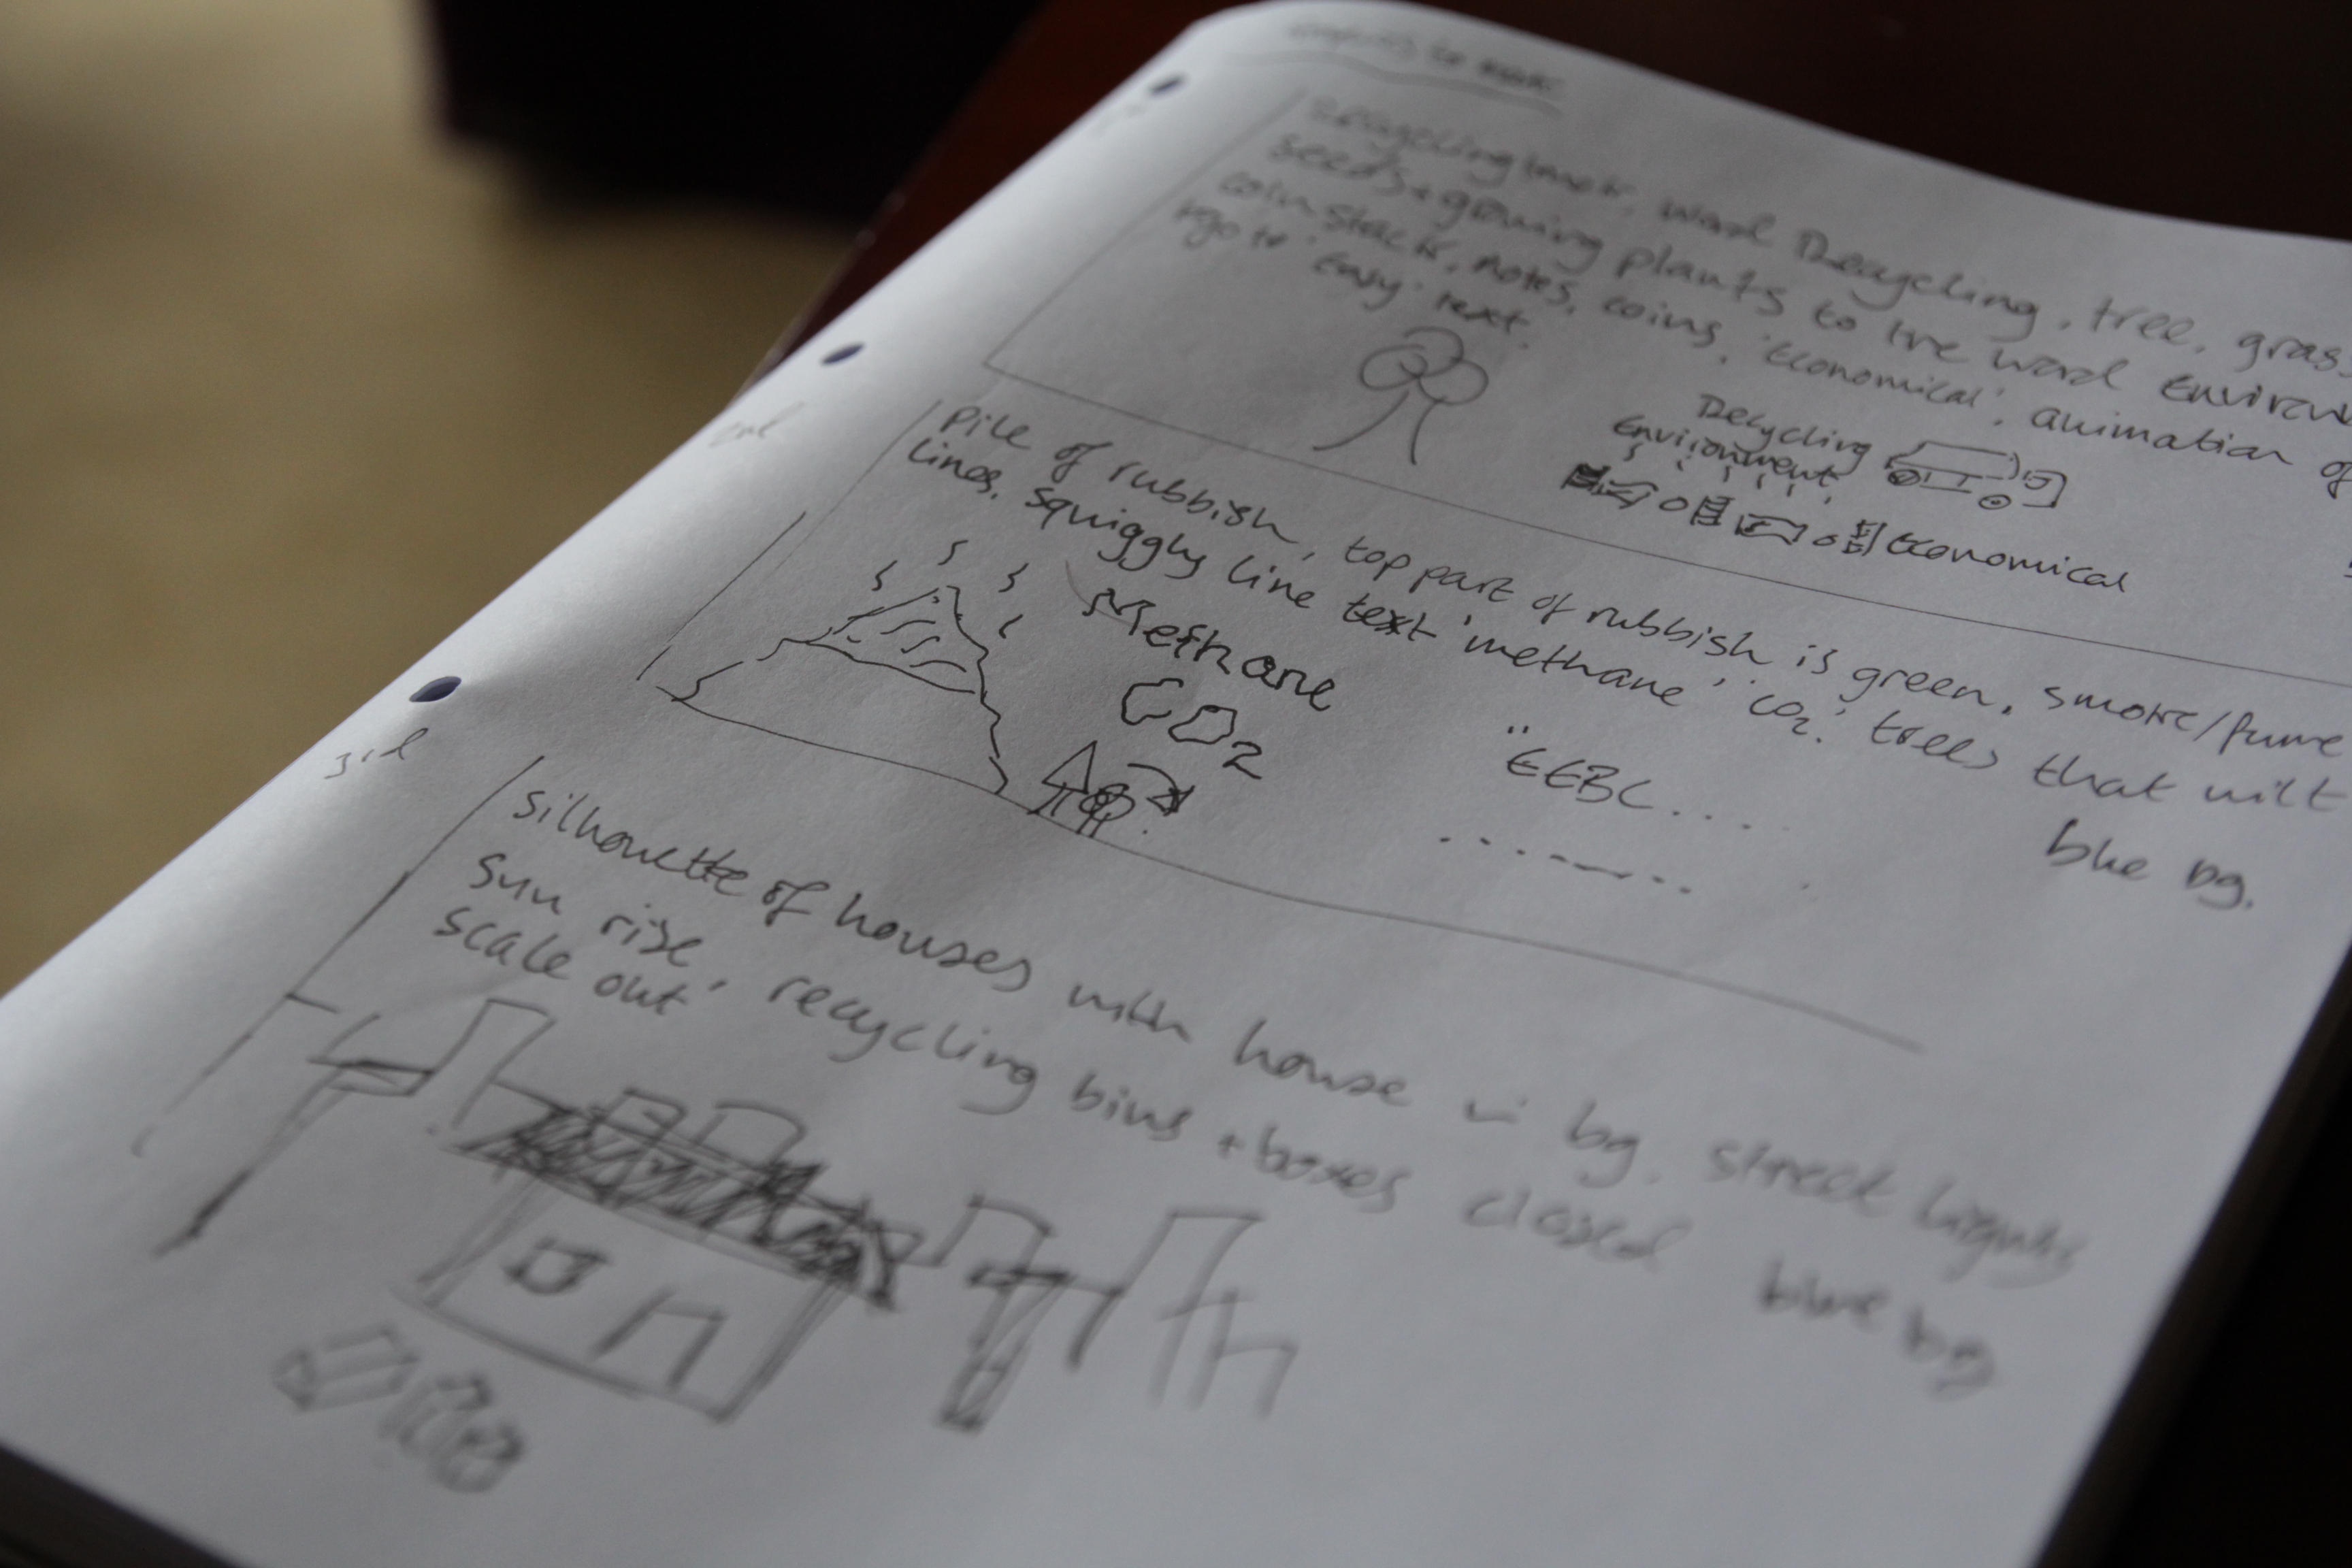
The graphics design has been on-going, I practiced when I was first commissioned, but it just shows how familiarizing yourself with the tools and applications can ease your work! A very very important part of this process was to intensively storyboard and plan each scene, so I know what graphics can be generated beforehand, so I spent a good couple of days story boarding and sketching the graphics I would need, followed by a long list of assets I would go on to to create.

Pre-vis sketches:

design plan planning graphics creation motion animation

For the rest of the week I started importing the graphics into After Effects, and setting up the 15 scenes. I am finally starting to see progress! I am still working on this section, and it will take another week or so to complete all the animations. Again, I storyboarded this in the planning, so I know exactly what to produce for which scene which saves so much time. Also, the best thing about this planning part is that it does not have to be a work of art to depict your ideas, just a simple sketch to represent what you will need to create.

graphic storyboard plan pre-production animation motion graphics

On Thursday I joined a crew of fashion designers, hair stylists and models to film a magazine photoshoot for Sherman Hawthorne (the hair stylist and creative director of the shoot) at The Lemonade Factory studios on Queenstown road. With eccentric styles and art direction, I set about to capture high contrast, dramatic footage which will compliment the photos. It was an early start, here I am waiting for my train at Clapham Junction;

video shoot equipment kit list manfrotto camera dslr fashion hair photoshoot lemonade factory

I was a single shooter, I had the pleasure of transporting the equipment to the shoot which included a steadicam vest that I ended up not using. I've learned my lesson here not to take extra kit!

My kit list was as follows:

Canon 5DmkIII (A camera), Canon 60D (B camera)

Tamron 24-70 F/2.8 VC, Samyang 14mm T/3.1 cine, Samyang 35mm T/1.5 cine, Nikkor 50mm F/1.4 manual, Samyang 85mm T/1.5 cine, Sigma 70-200 F/2.8 OS

Manfrotto 755CX3, Manfrotto MVH700AH, Manfrotto Hydra arm and super clamp,

CamSmart camera rig + Lilliput field monitor, CamSmart Stabilizer vest, Flycam Nano

Zoom H6, Rotolight Roto-mic.

As with all of these shoots, time runs short so I was restricted to short burst of filming time with the models to capture the specific ethereal and industrial motif, but I also shot around the photographer to maximize my usable footage. I made use of the 50fps slow motion for the moving shots, so that the models movements are exaggerated, as well as stabilizing the shot.

As the props included wire fencing and chicken wire, aliasing was a problem when shooting shallow depth of field, or at an angle to the object. To remedy this I used a lower aperture (F/4-5.6) for some shots, but also I can add a Gaussian blur in Premiere Pro when editing to soften the lines, gently smoothing out unwanted aliasing.

A couple of frame grabs from the shoot!

fashion photo video shoot at the lemonade factory cinematic videography steadicam Here I'm using a moving shot to create a distorted perspective from outside of the set.

fashion photo video shoot the lemonade factory cinematic videography trapped cage bw Here I use a low angle shot, removing the identity of the model to create a 'trapped' and 'mysterious' feel to the model, and why she is in the box.

Weekends are always working weekend for creatives and freelancers. I spent yesterday working on the animation of the recycling project again, continuing to compose the scenes using simple 2D shapes and animation styles that have become very popular recently.

I also came across this post from Chase Jarvis about how to manage your time properly, its a great post with a detailed outline of 90-minute working slots that should improve your productivity, I urge you to read it if you're someone like me who can't stop working, then apply the plan to your working life. I know I will be!

Do Less = Do More by Chase Jarvis

I haven't had many #videoquestions come in recently, so please keep them coming so I can help with tips for the community of videographers and creatives! Send them over to me @Plowman91 on Twitter.

Finally, ending with a must watch video, check out Philip Bloom's video shot with the Blackmagic Production Camera, the 4K one at Miami Beach, what do you think of it? Is it worth investing now the Panasonic GH4 is on pre-order and it looks like Sony will have a 4K DSLR announcement coming at NAB2014 too..!!

Philip Blooms Four Corners Miami Beach (Blackmagic 4K camera)

That's all for now folks! Keep the creative juices flowing!

Meet the Panasonic GH4

We've been waiting a few months for more info on the Panasonic GH4. It briefly appeared at BVE, and only 8 were shown at The Photography Show. Due to Panasonic UK announcing the launch of the GH4 early from the trade show and professional demand, more people are asking the whats and hows of the GH4's video capabilities; in regards to 4K. It is the first consumer DSLR to offer 4K, which is a fantastic leap forward into the future of video production that will inevitably get bigger (Moore's law). We have seen recent demonstrations of Super Hi-Vision (8K) at the London Olympic games from collaboration between NHK and The BBC, but for the first time have we seen 4K possibilities coming home with us. It is now in reach.

Today, John from JHWF, his son Sam and myself headed down to Park Cameras in Burgess Hill for the Panasonic GH4 demo. Eager to try out the camera, and by that I mean actually get your hands on it and play with it, checking out the range of functions and lenses that can be used (something not so easy at trade shows), it was the perfect opportunity to get a glimpse into the reachable future for us as producers. Even more so for John, as he as already invested!

panasonic gh4 demo day dslr 4k camera dslm video

Adam from Panasonic was on hand to answer our many questions, and to demonstrate the innovative features the camera has to offer, which include continuous auto-focus in video mode, as well as how the 4K is achieved from an MFT sensor, and many more..

First of all, the body is tiny. If you compare the body to that of my Canon 5DmkIII it could easily be half the size; which for run and gun videographers, and to keep discreet is a perfect solution. Not only that, but like the Sony A7, you have a large pixel count/density sensor so regardless of the body size the image result will be incredible.

panasonic gh4 demo day dslr 4k camera dslm video recording format screen

The sensor offers the two 4K resolution standards; cinema 4K at 4096 x 2160 and UHD 4K at 3840 x 2160 up to 30fps at either 200Mbps (All-intra compression) or at 100Mbps (IPB compression), which is much better in terms of .mov image quality in comparison to the 5D mkIII max 90Mbits at All-Intra compression. Essentially this means that your image is being recorded in a better quality format, giving richer colours, wider dynamic range and more latitude for grading in post. The HD video format is top notch, offering up to 200Mbps in MP4 format, much better than nearly all DSLR's on the market today.

Due to the MFT sensor, the focal length of the lenses you mount are doubled for the equivalent. For example a 12-35mm F/2.8 is equivalent to  24-70MM f/2.8 ON A Micro Four Thirds sensor. This means that suddenly the size of the lenses you use get greatly reduced, meaning a smaller kit bag and less back ache at the end of the day.

panasonic gh4 demo day dslr 4k camera dslm video recording format screen mft lens 100 300mm

A run and gun kit using the GH4 could include the 12-35mm as mentioned above, and the 14-140mm F/3.5-5.6 is enough to cover your indoor and outdoor shots, and can fit in a small shoulder bag. What more could you ask for?

The dual OLED screens replicate the live sensor beautifully, with such clarity too. Now a live view finder has been implemented into the view finder, you get an incredible 10,000:1 contrast ratio which is extremely high speed, unlike LCD which refresh rate is much slower. No need for a Z-finder anymore! Oh by the way it is touch screen too, and you can focus and take a photo by tapping the area of the screen you would like to focus on!

IMpanasonic gh4 demo day dslr 4k camera dslm video recording format screen mft lens OLED dual live view finder touch screen

Another incredible feature was the built in Wi-Fi which can be used to control most of the cameras functions INCLUDING touch sensitive focusing and recording (in 4K) via your Apple of Android device! So, leave your camera set up with the Wi-Fi connected to your device and set up your shot from elsewhere! In the right situation, this feature could be killer, much like the GoPro's wi-fi function for those awkward and obscure shots!

panasonic gh4 demo day dslr 4k camera wi fi

More professional video features include; zebra bars for setting exposure, center marker for image composition, colour bars and 1KHz tone, synchro scan which is useful for suppressing TV and fluorescent light flicker and a Cinelike gamma curves which can be applied. This would come in handy for productions where heavy grading and LUT's can be applied.

There is also the YAGH interface, which was not at the demo, but its functionality is to provide a DC-12V power input to the camera and interface, which allows 4:2:2/10 bit recording with XLR inputs, timecode, VU meters, which turns the camera from a pro-videography/cine camera to a full system camera for broadcasting. Adam showed us some setups on his phone from recent Hollywood productions using the GH3.

As you may know, I purchased my 5D mkIII in December, for videography/cinematography. To me, I don't know if I should feel pissed off that I should have waited for the GH4 to be released so I can future-proof my productions, or whether I should jump in and get another A camera right there and then. But then I thought, I have an incredible camera system right here already, and just because this (yes rather amazing) new resolution has become available, doesn't mean my potential clients will want it. At the moment the current structure and system for broadcasting 4K in the mainstream media of television is non-existent, until the big change happens which means either updating current HD systems to cope with the greater requirements of 4K, or a completely new 4K network is created, the only channel for viewing will be the internet, or cinema. So, if your deliverables are all for YouTube, then go for it, you have a way to get your work out there in its native resolution already. Otherwise, be prepared to down-scale to 1080 HD for normal playback. This may have fantastic results for you, and keeps the incredible clarity, colour richness and the 'wow' factor that 4K is now being renown for.

http://www.youtube.com/watch?v=hHKJ5eE7I1k

If you are a current Canon/Nikon or other brand shooter, then the answer to your question is not "You will need to buy new lenses for this camera". A few manufacturers haave designed and produced many workarounds to lens to mount converters; famously Metabones, but also LensAdaptor are worth checking out if you currently shoot with non-MFT lenses. These adapters fit onto the body and lens and effectively allow the lens to be used with a different lens mount.

To conclude, if I had the money I would happily invest in the Panasonic GH4 and not only for the 4K. The high data rates even for 1080p HD are high enough to be broadcasted which opens up what I can deliver for my clients, the kit is smaller so I get less back ache, the Depth From Defocus system allows continuous auto-focus during video, up to 96fps slow motion recording in 1080p HD, Wi-Fi control. I'd be really interested in testing this camera out in a 'Great Camera Shootout' review, so clear up the rest of the questions I have about not only capturing video in 4K, but also to see how the MFT 16Mp sensor holds up against the Canon 5D mk III which with Magic Lantern can record RAW.. We shall see, only the future will tell!

panasonic gh4 4k dslr camera demo test day park cameras 1

Please bear in mind that I have never captured footage in 4K, or worked with a 4K camera, footage or system. So what knowledge I am basing this on is my university dissertation in implementing 4K programming into the current UK broadcasting industry, copious research into 4K cameras, technology and productions, attending IBC and many other trade shows to understand the up-to-date technology available.


Video Questions; Choosing the right camera, picture profiles and using ND filters!

Heyo all! Thanks for sending in your questions, I will try to answer as many as I can will practical, real world examples! If you have any more, please send them my way! Question from Chris via Facebook: "Can you recommend any camcorders for HD video and good low light performance?"

Answer: A DSLR for video is not the right choice everytime. Why do you think television broadcasters use camcorders and system cameras? For broadcasting, there are regulations and legal limits that must be followed for the final video to be shown live; there are many including the compression of the video signal, the black and white level (check out waveform monitors and video signal) to name a couple. DSLR's do not adhere to these regulations hence we don't see TV crews running around with 5D's in London.

Where DSLR's produce a great image due to the large CMOS sensor, they have big restrictions such as needing to change lenses, poor audio support (unless you invest in audio equipment), rolling shutting, aliasing, moire.. I could keep going.

So, taking camcorders in the equation; most have long zoom ranges (20x and more!) at wide apertures, with additional digital gain, in built ND filters, built in stereo microphone and audio in/out. The sensors are different too, some using CCD (which splits the 3 colour channels) for better colour rendition and less compression.

These days, manufacturers such as Sony, Canon, JVC produce ENG (electronic news gathering) camcorders with those above features, meaning no extra kit to carry, most are hand held or shoulder mount for ease of use. Therefore it is seemingly easier to video on a camcorder, until you require a large sensor camera for artistic video.

Product recommendations for camcorders - Sony AX and VG range, Canon Legria, XA and XF range, JVC produce great camcorders too and have stepped up their game over the last year with the GM-HY range including a 4K model too.

If you want to spend a little more, the Sony HXr-NX3 (recently reviewed by Den Lennie) looks incredible for what you get in one camera - http://www.sony.co.uk/pro/article/broadcast-products-get-close-up-hxr-nx3

Next question from SAHIB on Twitter: "Do you use a neutral picture style when shooting, and do you use neutral density filters?"

Answer: For those unaware of picture profiles on your camera, check them out in the 3rd section of the movie shooting (red) menu (for Canon users). There are a number of options listed, which alter the way the picture is recorded depending on your choice, you can also customize these profiles too using the INFO button.

Canon picture styles - Standard, Portrait, Landscape, Neutral, Faithful, Monochrome.

I will not be detailing the ins and outs of all the picture styles, more of a visual comparison.

What does a picture profile do? Much like LUTS, picture styles adjust the intensity level of the; Sharpness, Contrast, Saturation and Colour Tone in the image, so what picture profile you use can change the 'look' of the video you capture.

Check out this video I put together today showing the results of the cameras picture profiles, and others I have loaded onto the camera. You can see a clear change in the image, but it is subtle differences that will make your video work stand out.

https://vimeo.com/85655816

I previously used the Neutral picture profile, customized to reduce the contrast, saturation and colour tone to produce a very grey and flat image. I was using this profile to achieve this look, as it is how RAW footage is captured to then be graded in post production. Neutral does replicate this 'flat' look, but after doing research into other profiles, Neutral reduces the data that is required in the picture (the contrast and saturation) that I would then put back in in post. This causes noise to be generated in the image, and can cause it to look unnatural and crushed, as the contrast and saturation that had been removed by the picture profile is being added back in later in the workflow.

That was long, but I hope it makes sense. If you compare the 'Standard' to 'Neutral' there is an evident drop in saturation and contrast, with a loss of detail in the top of the trees. If you compare 'Neutral' to 'VisionColor', there is an increase in saturation and contrast in the shadows and highlights.

The 'Neutral' picture style, similar to Technicolor CineStyle reduces the data the sensor captures, so I would not recommend using it if you plan to do colour correction and grading in your workflow. REMEMBER - whatever you capture when out filming will 'burn in' the detail, colours, sharpness and contrast into the image, making it harder to edit and remove unwanted errors. So, it would be better to use a profile that holds the data and detail so if wanted, you could work on grading the footage later.

From tests and experimenting, I favor the VisionColor profile; it is not as destructive as Neutral, holding colour and contrast without making the image flat. I definitely recommend checking them out here.

Next Question from SAHIB on Twitter: "Can ND filters change the style of video?"

Answer: This does depend on what and where your video shoot is. If you are working indoors, or with lighting that can be controlled by you then neutral density filters may not be required as you can alter the brightness of the scene by reducing the intensity of the lights. However, if you're out filming in a situation where you have little to no control over the lighting, then ND filters are key.

Personally I use variable ND filters, currently from Polaroid but much better filters are available from Hoya & Tiffen. The function of these filters is to reduce the light entering the lens, meaning camera settings can be kept the same. This allows you to follow the 180 degree shutter rule, which means keeping your electronic shutter speed at 1/50th to reproduce film-like and realistic motion blur.

So, with your shutter speed locked at 1/50, and your chosen aperture has been set, the only other exposure altering options you have is to ride the camera ISO to make the image brighter or darker.

PROBLEM!

With a fast aperture of F/2.8, and you are currently shooting in sunny daylight, your image is going to be very over exposed. Reducing the aperture to F/8 or F/11 may correctly expose the image but you have lost your depth of field! What to do!

Get some Variable ND Filters!

These ND filters rotate, allowing a variable ND amount to be set externally, without changing your cameras settings! This means that you can keep your cinematic depth of field and realistic motion blur without reducing the shutter speed to 1/250th or your aperture to F/11.

I recently shot this video using an ND filter on an 85mm T/1.5, which allowed me to shoot continually at T/1.5 for extreme shallow depth of field.

Making a quick edit: Variable ND filters are one of many options. ND Filters also come in stops; increasing by a factor of doubling so 2, 4, 8 etc. If you can stretch to separate stop ND filters they work just as well, and with the lower end (under £100 products) they will be better quality than one under £100.

In videography and cinematography, ND filters are applied in the matte box in front of the lens. So if you plan to use one, look in to matte boxes with the ability to add filters, but prepare to pay for it!

http://vimeo.com/84790518

Well, that covers Video Questions for today! I hope to have answered and covered all bases, and remember they are from my personal knowledge and experience.

Got any more? Send them my way!

Little leak from B&H.. ZOOM H5

I've stumbled across a leak from B&H photo detailing a new ZOOM handy recorder; H5.

Will be interesting to see how this works with the current Tascam DR-60D and DR-100mkII recorders, however I do know the H4N does have a number of problems, maybe it was time for an upgrade.. It is a sigh of relief for videographers, bands, journos who don't need the 6 channel power of the H6 but would like the option of external XLR/TRS microphone/device inputs.

Check out the article here - http://news.doddleme.com/equipment/zoom-announces-h5-handy-recorder/

Everything you need to know for videography and docu-film making! (Infographic)

pov-documentary-tools-survey-2013-results-500-v4[1]

Videomic Go!

RODE's new on-board microphone for small cameras!

Why is music so important to your production?

As videographers come and go, especially those that focus more on the visuals rather than the audio aspect of production, some may not realize the importance of the sound that accompanies the visuals. It builds atmosphere, tension, and can play on many different emotions and feelings that is just not possible through visuals (hearing someone behind you for example). Remember, AUDIO is 50% of a final video or film, the other 50% is the VISUALS. Without good audio, your audiences perception of the recreated reality portrayed in the visuals becomes blurred as it is not realistic to hear naturally, think about it!

If you are working on a production where you know the quality of the audio or visuals will be compromised, then have a back up plan! I shoot all the time on my Canon 60D, DSLR's having notoriously terrible in built microphones so I overcome this in ENG situations by using a RODE Videomic, which does the job. However, for exceptionally clean and high quality audio recording an external mic+recorder device is crucial especially for talking heads! I used the Zoom H2 audio recorder to capture the sound externally, to then sync up in post.

A GREAT TIP!! If you are in a shooting situation that allows; set the camera and audio device recording and clap. This will create a spike in the audio waveform and will make it so much easier to sync up later on!

My reason for discussing; I'm currently choosing the accompanying music for the GLF conference video. I use a site called Audio Network to source most of my audio media as it has great creative commons uses and is reasonably priced too, as well as having such a vast array of production style music.

So far, to go with the up-beat and enthusiastic, youthful visuals I have chosen these two to go with the visuals; let me know what you think!

If You Wanna

How's It Going?

I look forward to hearing your thoughts on the music, and any similar production questions or issues you may be having!

What do YOU want to know about Video, Editing, Graphics, Audio, Live?

I've had my fair share of experience over the last couple of years, working in many different situations from audio engineering at the London 2012 Olympic Games, to single filming the Prime Minister of Kuwait, to weddings, to motion graphics and more. I can write about pretty much any of the above situations, the camera skills and techniques used as well as anything else really, but I want to hear from YOU so you can learn from this blog!

What do you want me to write about? Do you have any questions about the video and media industry or its practices?

Contact me so I can help!!

[contact-form][contact-field label='Name' type='name' required='1'/][contact-field label='Email' type='email' required='1'/][contact-field label='Website/Facebook/Twitter/Blog' type='text'/][contact-field label='What do you want to know?' type='textarea' required='1'/][/contact-form]

Thinking about Audio?

One big problem that lots of solo or freelance videographers stumble across is sound. It is easy for some to focus only on the visuals, rather than both the visuals and audio; one has to remember that a piece of media is 50/50 between V and A, so capturing crisp and audible sound is just as important as in focus, well exposed images.I've had countless problems with sound over the years, more recently I have found practical solutions using the Zoom H4N, but before I had access to that portable stereo recorder I used a Rode VideoMic. Many newbies will be famililar with it; a standard on-camera shotgun mic with ok quality.. Very ok to the sub standard level. One issue I've always had with it is the amount of background room noise, but Adobe Audition does a reasonably good job of removing the sound print from the signal.

However, all that terrible tech is about to change as Zoom have begun shipping their all new H6; a 6 channel portable recorder, with interchangeable mic capsules! I've just watched the test + review from B&H and it looks incredible, and it would be hard to forget fantastic quality sound with that bulky piece of kit in the bag! I've been in contact with the Zoom team so lets hope I can get my hands on one soon!

http://www.youtube.com/watch?v=yBfJveLuANk