techniques

Thinking of making the jump to 4K?

You are in the same boat as me.. Having bought my 5D mkIII last December, there was no accessible 4K option until the Panasonic GH4 made its appearance in the Spring. I was devastated. Having invested heavily in Canon gear, any future move I make will need to fit with my current EF mount lenses, not to mention everything else such as batteries, memory cards and my overall production workflow.

http://www.eoshd.com/2014/04/panasonic-gh4-vs-sony-a7s-compared-wins-4k-battle-paper/

(EOS HD comparison between the cameras).

At the moment, there are two options on the table. Said to be like comparing apples and oranges, the Sony A7s and GH4 are the current competing professional cameras that offer 4K functionality, however for people that own the cameras and have been comparing the two have found it difficult. This is for a few reasons:

Sensor size: The A7s is full frame, the GH4 is MFT.

4K in camera: The GH4 can record 4K internally, the A7s requires an external recorder such as an Odyssey or Shogun.

Philip Bloom using the Q7, from: http://philipbloom.net/2014/07/19/magician/

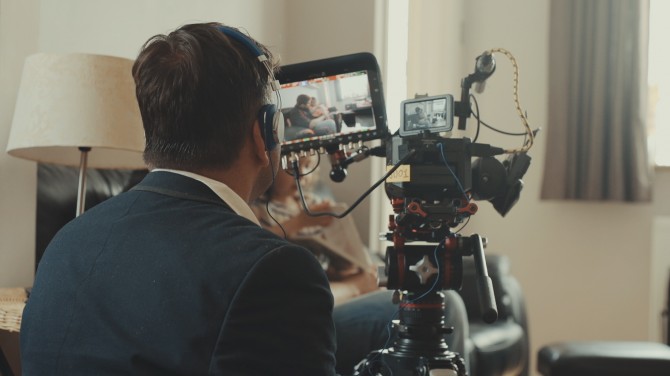
Jeromy, CEO of Atomos talking to me and Sam from The IABM about new products and the IBC Show.

Now, many people will be arguing that what does the increased resolution allow you to do, that HD doesn't? The image produced from the 5D is great; good in low light, versatile, fits my style of filming... But it also has big downfalls for being a DSLR, and not a video camera.

Something that is unique about these two cameras is that their 'out of the box' functionality has been fine tuned for video applications, as well as high end photography. This is what Canon has left behind in their non Cinema line cameras, and Magic Lantern has struck gold on with their firmware hack enabling awesome video functions.

I have only recently installed ML on my 5D mkIII due to the current firmware on the camera. It was shipped with version 1.2.3, I was hesitant to downgrade the firmware and was patient in waiting for ML to develop a tested and working version for 1.2.3. Now having access to on screen aid such as waveform monitors and audio levels make such a difference, and restart movie for the longer filming durations is great. It turns your 'photography' camera into basically a video camera.

From: About DSLR (Youtube).

For my type of videography, the benefits of having not only 4K, but a wider range of options for recording will allow me to crop and downscale any 4K acquisition to HD and hold incredible picture detail, dynamic range and depth of field.

The recording bit rates are higher, meaning more data is stored for post production editing, compositing or grading.

Lastly, it should increase the production value of what I produce. Now, I am not stating that better equipment makes better videos. It does give you the opportunity to step up with what you can do in your work, and especially as it keeps you up to date in a world of ever changing and improving technology.

So, what is my investment cost?

This is dependent on your current shooting kit, and whether you can merge your current system with a new one. Perhaps you already shoot Sony or Panny, so you're in luck.

For me, all my lenses are Canon EF mount, some are electronic, others are manual, so an adapter would be needed in my case. The price of this is dependent on the glass you use, or are going to use.

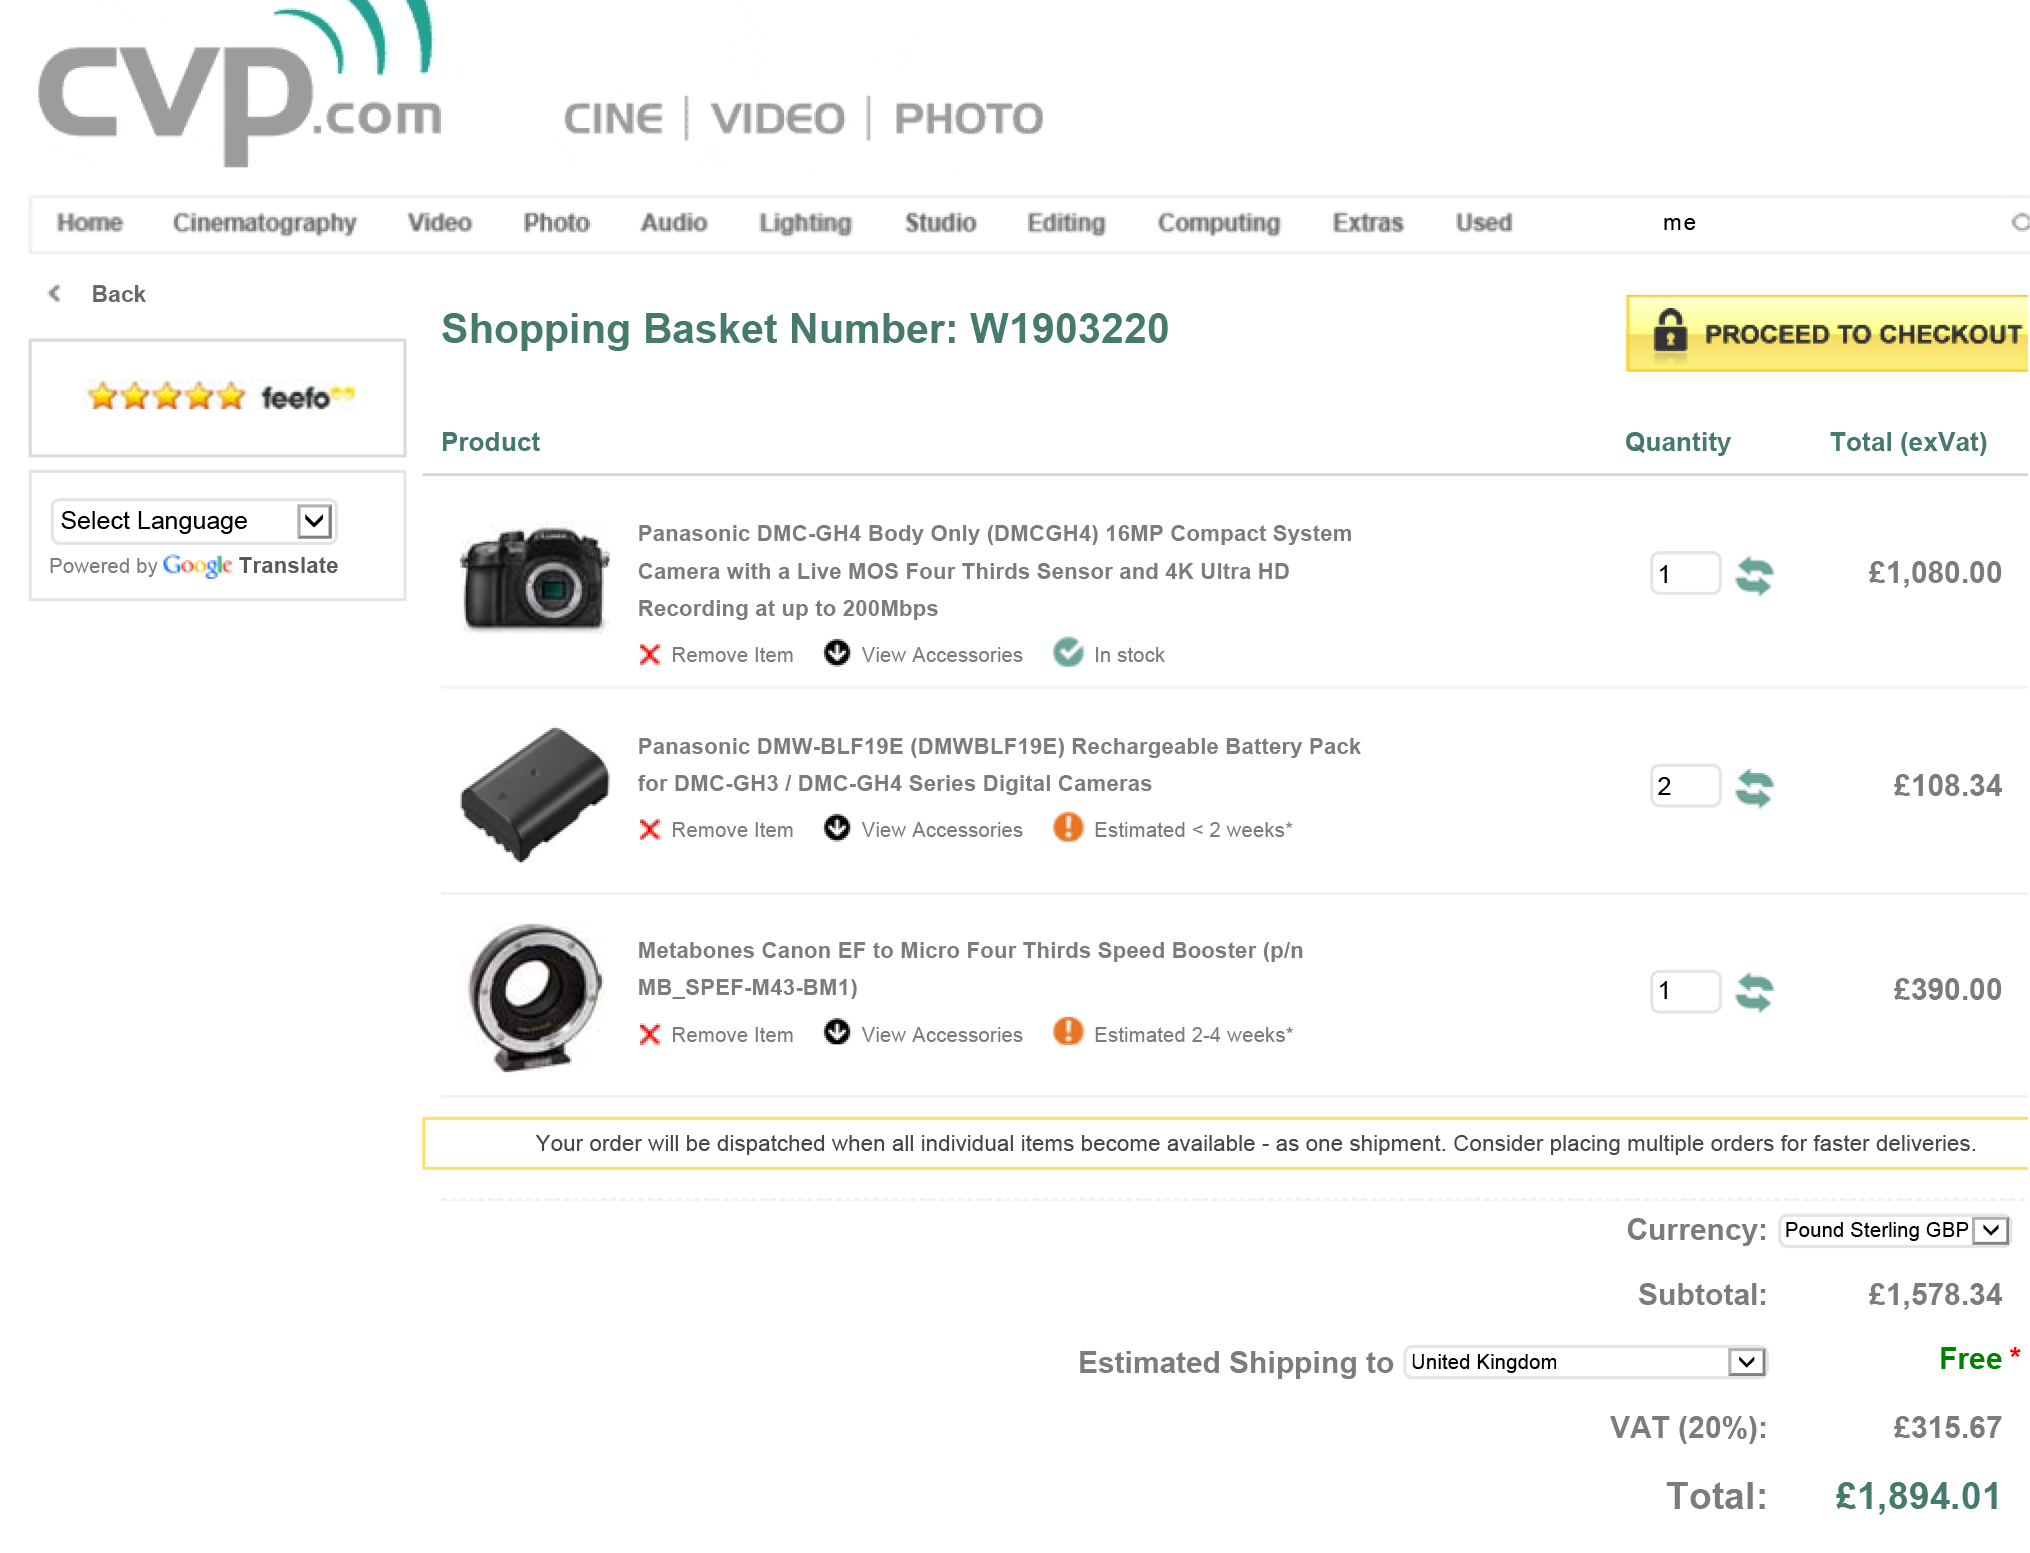
Let's look at the Panasonic GH4 to start with.

Panasonic GH4 (body only) - £1296.00

Metabones Speedbooster EF to MFT (smart with electronics) - £468.00

GH4 batteries x 2 -£130

Transcend 600x ultimate SD card x 2 (Amazon price) - £36

Now, as the GH4 is MFT, I might purchase a wide angle lens because my current ultra wide angle 14mm T/3.1 would be almost 28mm T/6 due to the sensor equivalence. So, my options would be either:

Panasonic 12 - 35mm F/2.8 - £829.00

I did have the Samyang 12mm T/2, realizing it does not come in MFT mount.. So the above would be my option. I have used it before, it has great OIS and has a decent depth of field for an F/5.6 equivalent lens.

Total GH4 investment inc extra lens - £2759.00 (excluding extra lens - £1930.00)

That £1930 was pretty much the same price I paid for the 5D mkIII body only.
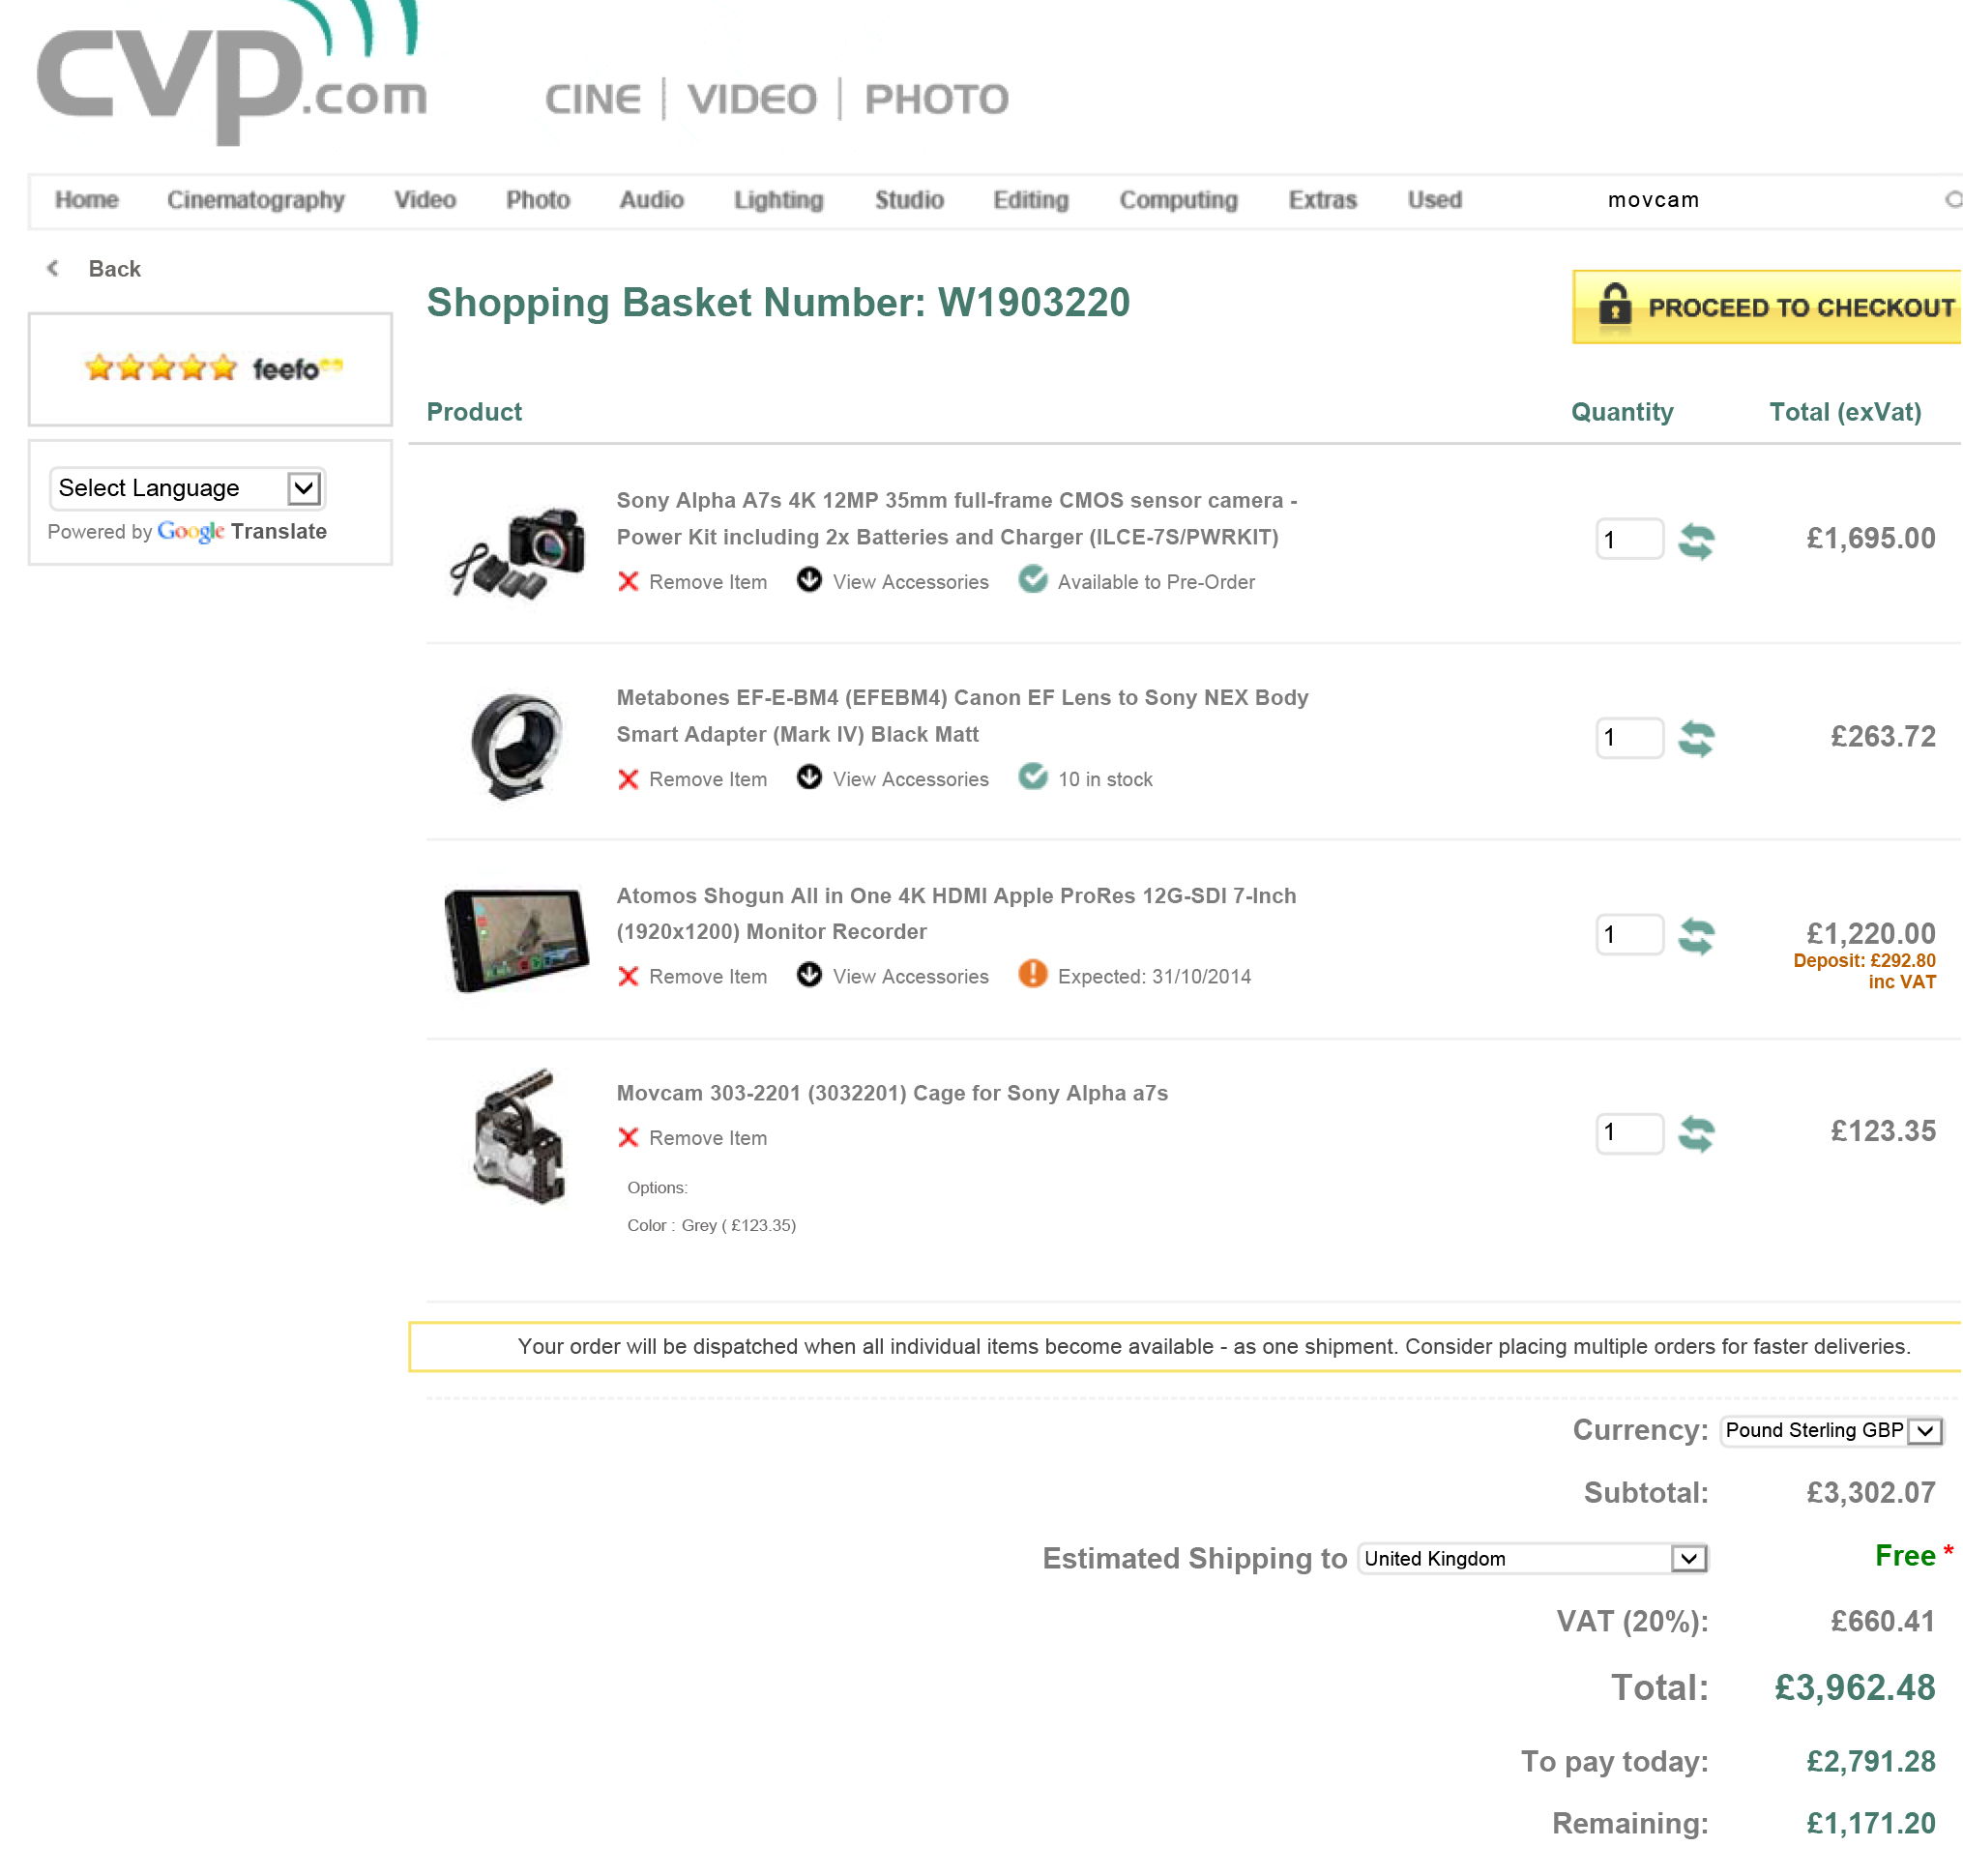
Panasonic GH4 basket

Now the Sony A7s.

Sony A7s (body and battery/PWR kit) - £2034.00

Metabones Speedbooster EF to E (smart with electronics) - £316.46

Transcend 600x ultimate SD card x 2 (Amazon price) - £36

The A7s does not record 4K internally, so I would need to purchase the Atomos Shogun recorder at - £1464.00

Also, as the A7s is compact in size, a cage is required to make it more accessible with the recorder and mics etc.

Movcam A7s cage - £148.02

Total A7s investment - £3998.48

(All prices are including VAT from CVP).

Sony A7s basket
Adam using the Panasonic GH4

Now.. I've shot on the Panasonic GH4 and I like it. When I've talked to Panasonic reps about the product they all had the same comment that Panasonic listened to videographers, and you can tell. The available recording formats and codecs allow a range of uses for the camera, and the features it packs into its tiny form are perfect for those that already utilize DSLR for video.

(Look back to earlier this year to the Park Camera's Panasonic open day - https://ajp1991.wordpress.com/2014/03/16/meet-the-panasonic-gh4/)

Personally, and this is very subjective to the way I was filming when using the camera, the captured video looked like video. Some will understand what I mean, others won't, but for those that have been shooting on a full frame camera, the 'look' is there. Obviously the sensor plays a large part in that, but if I purchased a GH4 kit outright (disregarding my current EF mount lenses).. I would purchase the Voightlander 25mm and the trusted Samyang cine lenses which might just combat the 'look' issue I feel like I have. As well as high quality ND filters so my shutter can remain at 1/50th.

Really quick GH4 test:

Trying out the 4K, and again a basic test:

(Please if you have experience, tips, footage or photos that you would like to share, please do!)

What am I going to do then?

My dad taught me something really great; good things come to those who wait. In other words, have patience.

As others test out, review and produce videos using the GH4 and A7s (and other cameras that pop up here and there), I will be closer to making my decision. For now, I know to hold off. A good thing for me to do would be to road test both cameras, work it with all of it's video functions and produce a couple of vids that I can look back on. The folks at Park Camera's are great at in store demos, but I can also wait for BVE in Feb 2015.

So, I can frustratingly wait a little longer for my jump to the next innovation of video production and delivery.

In the mean time I can always look at Blackmagic Design's options that shoot 4K, as well as the Apertus AXIOM modular camera, and keep the new Arri Alexa 65 and RED Dragon for my dreams.

axiom-modules-06[1]

From - https://www.apertus.org/

Behind the scenes of yesterdays Wellbeing videoshoot!

06:30 Kit bag, check.

Audio kit, check.

Lighting, check.

Brain, just about.

bts early morning sky

Yesterday I was out filming talking heads and some b-roll for a Wellbeing project on behalf of EEBC. Wellbeing is our general mental and physical health, but there are many factors in the way that we live that can affect our chances of developing serious health problems in the future. These include some sensitive subjects, that I was capturing to provide an information base for those in the community that may be suffering, or have friends and relatives of those diagnosed with; Cancer, Coronary Heart Disease, Dementia and Diabetes.

I was featuring nutritional expert Yvonne McMeel throughout the videos, so I began by planning my main piece to camera with her in the Wellbeing Centre.

This was a standard video shoot, so I packed my kit bag to be prepared with whatever the day would bring! This included;

Video - Canon 5D mkIII, Tamron 24-70 F/2.8 VC, Sigma 70-200 F/2.8 OS, Canon 60D.

Audio - Zoom H6, Roto-Mic, Sennheiser ENG-G3 100 wireless.

Grip - Manfrotto 755CX3 tripod + MVH500AH, Manfrotto 190Pro-B (old version) tripod, Super clamp and magic arm.

Lighting - Daylight balanced 85W studio light with soft umbrella.

Extras - Lilliput 1018 (I am currently testing out and reviewing this product).

behind the scenes videography equipment

I took along the Lilliput 1018; the new flagship 10 inch touch screen field monitor, which produced crisp pictures and well represented colours. I ran this on a F-970 battery with HDMI through from the 5D, so I could monitor both. This did however cause the camera to heat up quite quickly. However, the monitor has awesome features usually found on high end products which include; exposure and focus peaking, on screen waveform monitors, levels and much more, which came in very handy for assessing the quality of the picture. (More coming later regarding this product).

behind the scenes make up artist Char1 behind the scenes make up artist Char2 Char doing her make up thang!

I began setup at 9am, shortly followed by Char the make up artist who set up her bits. The location for filming was the Wellbeing Centre, which as a wonderfully bright open facade with big doors and windows. Luckily enough, blaring heat and sunshine poured through the windows, so that was my key light at slightly cooler than daylight colour balance at 5200k. This also matched the daylight light fixture I was using to add a fill and kick to the subject.


Why did I use a 2-point light setup?

I could have rocked up with the intention of using just the daylight and the incandescent lights in the centre with the mentality that it will illuminate my subject well, but there are risks you have to be willing to take if you approach lighting in a casual way. Some points to remember when thinking about lighting your subjects;

  • Are they defined from the background?
  • Do they have harsh shadows on their face?
  • Moving sunlight will change throughout the day, in brightness, direction and colour.
  • bts wellbeing light setup

Now, when you haven't been to the location before it is difficult to judge the lighting conditions, so firstly if you can have a RECCE of the location. It is very beneficial as you can begin to compose the scene, judging the internal and external lighting, now noisy the environment is, whether you will need a backdrop instead of a plain background.. All points to consider before you turn up with the camera kit and begin filming.

Defining the subject from the background is what makes them look 3-dimensional and not flat, this is the same for the shadows too as it shows that features are visible on the face. With DSLR's it is possible to use depth of field to define your subject from the background, but lighting can also be used to 'pop' the subject out of the BG.

Harsh shadows are caused by strong direct light, and are unwanted as they mask features and don't represent the subject properly, unless this is the effect you are looking for. For piece to cameras and interviews having soft shadows around the nose show the features of the subject, again making them look real.

The sunlight is your best friend and worst enemy at the same time... As the Earth rotates, we move further away or closer to the sun which changes the lights direction; if you start filming in the morning with your subject lit from the front, by 12 noon the sun is over head and by the late afternoon the light will be behind you. To combat this, keep continuity by filming at the same times each day, or even simpler be aware of the suns direction and gradually rotate the subject and other lights to keep a constant illumination. For me, I was filming from 11am through to 15:00 with the sunlight to my left for the whole day which was very beneficial, but not every time will I be that lucky!

Watch out for clouds that can block the sunlight, and be aware of how the colour temperature of daylight changes throughout the day; cool in the morning and warm in the evening. For me, shooting in midday sun meant a constant temperature of 5200K for both cameras, matching the other light.

The use of a kicker or fill light, pushes out the shadows caused by the key light (the sun), and gives a halo effect to the hair of the subject making them stand out. The difference is subtle but effective.


Camera Setup and Composition

Once I had my lighting up and running, it was time to set up the cameras and audio equipment. I was going to shoot using the Samyang 35mm T/1.5 cine lens, but this would result in being intimately close to Yvonne, the subject, which would be quite off putting and may add shadows/interference such as me rustling papers to the recording. Instead, I used a telephoto lens as I can be a good distance away from the subject, and create a narrow field of view that frames up as an MCU (medium close up).

My main A camera was the 5D mkIII, and although the Sigma lens can open up its aperture to F/2.8 for shallow depth of field, this was not required for today. Instead, the camera was set to F/4.5 for a still shallow depth of field, but deep enough for the subject to move forward and backwards in the frame a little, and to de-focus the background. The ISO was set to 200, although when the Sun disappeared behind clouds I would ride the ISO to 250 or 320 depending. To stick to the 180 degree shutter rule, the electronic shutter remained locked at 1/50th.

The B camera was the Canon 60D, I paired this with the sharp Tamron 24-70 F/2.8 and shot wide open, again riding the ISO when required. I did this because this camera was capturing a wide shot of the subject, so depth of field was not noticeable. To keep continuity, both cameras were set to a white balance/colour temperature of 5200K, but it appears that the 60D picture is slightly yellow/green than the 5D picture.

behind the scenes camera dslr audio setup light

Audio

The often forgotten partner to the pretty pictures you see, having top quality audio is just as important as having your subject in focus and exposed. I used the Zoom H6 as my recorder, with the XY mic attached to capture one stereo recording. I also used the Sennheiser ENG-G3 wireless mic kit, attaching a lav/lapel mic to the subject which would be my main audio source. As a back up I also used the Rotolight Roto-Mic plugged into the 5D just in case. Remember to take headphones so you can monitor the sound recording, just like you would use the cameras screen to compose the picture.

Behind the scenes wellbeing video shoot adam plowden videography canon 5D lilliput

The filming went brilliantly. As a precaution I decided to use the 'record to multiple card' function in the 5D so I had a back up of the footage in case the cards got corrupted from such long recording times. As mentioned earlier with the lighting, as the light slowly changed, I also adjusted the position of the kick/fill to push back the shadows.

I was very impressed with the Lilliput 1018 field monitor too, and although it is larger than monitors I would usually use the touch screen control and diverse functions suited the shoot well, so I could keep a close eye on the changing light levels.

After the principal piece to camera filming was complete, I ventured out into Epsom and Ewell with Yvonne to film some b-roll pieces that would add to the information and dialogue about wellbeing and health. So, we visited Shadbolt Park outdoor gym, Ewell Court Library, Epsom's Derby Square, we were going to hit the market but by that time it was 17:30 and no chance of finding fresh fruit and veg to film.. We returned to the car to go to the last location, Epsom Downs, when this happened...

adams broken down car

My car broke down. The filming day abruptly ended with a call to my insurers for recovery, while I also arranged a taxi for Yvonne to take her to the train station. That didn't put a dampener on the day though, I had captured great video and dialogue that I hope will help many people in the borough and wider community who may be suffering with cancer, heart disease, diabetes or dementia.

I then ingested the footage, and backed up a whopping 80Gb of footage and audio.. Lots to edit through, but thankfully those wonderful geniuses at Red Giant have a tool called Pluraleyes which can sync video with externally recorded video, so suddenly the issue to matching up the audio to the video disappeared, saving me potentially hours of work!

pluraleyes un-synced A bunch of un-synced video and audio clips gets transformed into this -  behind the scenes pluraleyes sync video

Pluraleyes then allows you to export the sequence as an XML that I then imported into Adobe Premiere Pro to edit! It's ready to go!


Overall, very happy with the footage and the outcome of the first day! I need to get out and shoot some more cutaways/b-roll of healthy food, socializing and some more bits and bobs to add.

Change of discipline today; photographer!

Madeleine pink table centre piece flowers Madeleine Pink table centre piece at Epsom RAC (Canon 5D mkIII, Samyang 14mm @T/3.1, 1/60's, ISO 1600). I am not a yes man. I will never say yes to doing something I haven't had experience in, as it can just cause anger, frustration and disappointment from both myself and the client, especially if I don't deliver what is expected.

Photography for me is one of those disciplines. Personally I am not a photographer, I don't have an education or background in still photography apart from graphics and VFX, so I go against one of my own rules here purely because of the following reasons, that may be applicable to you too!

1) I learned videography and production on broadcast video cameras, transitioning to DSLR through the wedding film job I do; I was heavily trained and now 3 years on my 5D mkIII is my port of call. Many will be in the same position as me here and will follow the exposure triangle (aperture, shutter speed, ISO).

2) While at university, and still now I study cinematic and storytelling techniques (it wasn't included in my Television and Video Technology BSc. course). Whether it be moving the camera or with a static shot, the composition of storytelling is a present and constant thought in my work.

3) I have prepared myself heavily with the correct equipment and research to use; high speed lenses, a range of lights to compose the image, building mood boards and finding out the clients requirements (as well as any inspiration they have that will add).

4) My client is very happy with what I produce, and if they weren't they wouldn't ask me to work with them again.

Note: I never advertise myself as a photographer.

That makes me confident to go out and take some photos of flowers for a florist, which I am doing today!

Madeleine pink table centre piece flowers Madeleine Pink table centre piece at Epsom RAC (Canon 5D mkIII, Tamron 24-70mm @F/3.2, 1/50's, ISO 3200).

Transferring the skills from DSLR videography to photography have been easier for me, probably because I always shoot in manual, I love taking my camera out with me wherever I go, and the storytelling techniques of composing images are still present in photos like they are in video.

If however you find it a little more difficult, consult the exposure triangle, and keep a couple of things in mind;

Aperture - Wide open allows lots of light to enter, shallow depth of field. A narrow aperture reduces the light making the image darker, and creating a deep depth of field. Using focus and blur is one of the main tools the director uses to concentrate the audiences attention onto specific details.

Shutter speed - Controls the motion due to how long the sensor is exposed to the light. A fast shutter captures fast motion with minimal blur (sports and outdoor), a slow shutter means the sensor is exposed for longer, allowing the subjects to move in the frame while it is open, creating blur.

ISO - Digital noise added to increase the image exposure. Low ISO results in low noise, crisp images but with no added exposure, where high ISO will increase your exposure but will introduce digital noise that is more visible in dark situations.

Other key points to remember: White Balance/Colour Temperature - make sure your whites are white and your blacks are black. This depends on what light you are using, daylight for example is 5600K, but Tungsten is 3200K.

Make sure your camera is set to capture RAW and JPEG images to allow for greater definition when editing the pictures afterwards!

Madeleine pink table centre piece flowers Madeleine Pink table centre piece at Epsom RAC (Canon 5D mkIII, Nikkor 50mm @F/1.8, 1/50's, ISO 1600).

It is worth a go if you are confident you can produce the images your potential client is looking for. Being a videographer not a photographer, I do not charge a standard fee to have me out for an hour and to post process the images later. This is for two reasons; I am a new business, and so is my client. Why out price your skills and make it a hard decision for your potential client to use you? Secondly, like I keep mentioning I am not a photographer and although I have rates and targets to meet financially, I see this more of getting out with the camera to be creative for an afternoon rather than a job.

Some points to consider if you are ever approached by someone who requires something different from your usual line of work! Do not forget to do your research though. Unfortunately I have had a number of experiences of photographers embarking on video without understanding the full production process, where I've been asked by their client to correct the mistakes.. So if you're a photographer doing video, again have confidence in that you will be able to produce exactly what is expected, and with the internet being the biggest learning and education network, there really is no excuse nowadays!


Video Questions; Choosing the right camera, picture profiles and using ND filters!

Heyo all! Thanks for sending in your questions, I will try to answer as many as I can will practical, real world examples! If you have any more, please send them my way! Question from Chris via Facebook: "Can you recommend any camcorders for HD video and good low light performance?"

Answer: A DSLR for video is not the right choice everytime. Why do you think television broadcasters use camcorders and system cameras? For broadcasting, there are regulations and legal limits that must be followed for the final video to be shown live; there are many including the compression of the video signal, the black and white level (check out waveform monitors and video signal) to name a couple. DSLR's do not adhere to these regulations hence we don't see TV crews running around with 5D's in London.

Where DSLR's produce a great image due to the large CMOS sensor, they have big restrictions such as needing to change lenses, poor audio support (unless you invest in audio equipment), rolling shutting, aliasing, moire.. I could keep going.

So, taking camcorders in the equation; most have long zoom ranges (20x and more!) at wide apertures, with additional digital gain, in built ND filters, built in stereo microphone and audio in/out. The sensors are different too, some using CCD (which splits the 3 colour channels) for better colour rendition and less compression.

These days, manufacturers such as Sony, Canon, JVC produce ENG (electronic news gathering) camcorders with those above features, meaning no extra kit to carry, most are hand held or shoulder mount for ease of use. Therefore it is seemingly easier to video on a camcorder, until you require a large sensor camera for artistic video.

Product recommendations for camcorders - Sony AX and VG range, Canon Legria, XA and XF range, JVC produce great camcorders too and have stepped up their game over the last year with the GM-HY range including a 4K model too.

If you want to spend a little more, the Sony HXr-NX3 (recently reviewed by Den Lennie) looks incredible for what you get in one camera - http://www.sony.co.uk/pro/article/broadcast-products-get-close-up-hxr-nx3

Next question from SAHIB on Twitter: "Do you use a neutral picture style when shooting, and do you use neutral density filters?"

Answer: For those unaware of picture profiles on your camera, check them out in the 3rd section of the movie shooting (red) menu (for Canon users). There are a number of options listed, which alter the way the picture is recorded depending on your choice, you can also customize these profiles too using the INFO button.

Canon picture styles - Standard, Portrait, Landscape, Neutral, Faithful, Monochrome.

I will not be detailing the ins and outs of all the picture styles, more of a visual comparison.

What does a picture profile do? Much like LUTS, picture styles adjust the intensity level of the; Sharpness, Contrast, Saturation and Colour Tone in the image, so what picture profile you use can change the 'look' of the video you capture.

Check out this video I put together today showing the results of the cameras picture profiles, and others I have loaded onto the camera. You can see a clear change in the image, but it is subtle differences that will make your video work stand out.

https://vimeo.com/85655816

I previously used the Neutral picture profile, customized to reduce the contrast, saturation and colour tone to produce a very grey and flat image. I was using this profile to achieve this look, as it is how RAW footage is captured to then be graded in post production. Neutral does replicate this 'flat' look, but after doing research into other profiles, Neutral reduces the data that is required in the picture (the contrast and saturation) that I would then put back in in post. This causes noise to be generated in the image, and can cause it to look unnatural and crushed, as the contrast and saturation that had been removed by the picture profile is being added back in later in the workflow.

That was long, but I hope it makes sense. If you compare the 'Standard' to 'Neutral' there is an evident drop in saturation and contrast, with a loss of detail in the top of the trees. If you compare 'Neutral' to 'VisionColor', there is an increase in saturation and contrast in the shadows and highlights.

The 'Neutral' picture style, similar to Technicolor CineStyle reduces the data the sensor captures, so I would not recommend using it if you plan to do colour correction and grading in your workflow. REMEMBER - whatever you capture when out filming will 'burn in' the detail, colours, sharpness and contrast into the image, making it harder to edit and remove unwanted errors. So, it would be better to use a profile that holds the data and detail so if wanted, you could work on grading the footage later.

From tests and experimenting, I favor the VisionColor profile; it is not as destructive as Neutral, holding colour and contrast without making the image flat. I definitely recommend checking them out here.

Next Question from SAHIB on Twitter: "Can ND filters change the style of video?"

Answer: This does depend on what and where your video shoot is. If you are working indoors, or with lighting that can be controlled by you then neutral density filters may not be required as you can alter the brightness of the scene by reducing the intensity of the lights. However, if you're out filming in a situation where you have little to no control over the lighting, then ND filters are key.

Personally I use variable ND filters, currently from Polaroid but much better filters are available from Hoya & Tiffen. The function of these filters is to reduce the light entering the lens, meaning camera settings can be kept the same. This allows you to follow the 180 degree shutter rule, which means keeping your electronic shutter speed at 1/50th to reproduce film-like and realistic motion blur.

So, with your shutter speed locked at 1/50, and your chosen aperture has been set, the only other exposure altering options you have is to ride the camera ISO to make the image brighter or darker.

PROBLEM!

With a fast aperture of F/2.8, and you are currently shooting in sunny daylight, your image is going to be very over exposed. Reducing the aperture to F/8 or F/11 may correctly expose the image but you have lost your depth of field! What to do!

Get some Variable ND Filters!

These ND filters rotate, allowing a variable ND amount to be set externally, without changing your cameras settings! This means that you can keep your cinematic depth of field and realistic motion blur without reducing the shutter speed to 1/250th or your aperture to F/11.

I recently shot this video using an ND filter on an 85mm T/1.5, which allowed me to shoot continually at T/1.5 for extreme shallow depth of field.

Making a quick edit: Variable ND filters are one of many options. ND Filters also come in stops; increasing by a factor of doubling so 2, 4, 8 etc. If you can stretch to separate stop ND filters they work just as well, and with the lower end (under £100 products) they will be better quality than one under £100.

In videography and cinematography, ND filters are applied in the matte box in front of the lens. So if you plan to use one, look in to matte boxes with the ability to add filters, but prepare to pay for it!

http://vimeo.com/84790518

Well, that covers Video Questions for today! I hope to have answered and covered all bases, and remember they are from my personal knowledge and experience.

Got any more? Send them my way!