vfx

Shadows and Light was INCREDIBLE!

I arrived for the brand new 'Shadows and Light' two day filmmaking workshop on Sunday evening, excited to hone in on skills and meet new friends. The drive was smooth, only an hour from Surrey down to Brighton where I was greeted by lovely staff and great room at the Umi (on the seafront).

I dumped my stuff and met my good friend and VFX/Director mastermind HaZ before heading to the pre-drinks to meet everyone. Informal drinks like this are perfect for networking, so remember business cards!!

I met Olly, the 'behind the scenes' filmmaker for the night and the first day and got chatting as he was using a 5D mkIII like me. I also caught up with Nino, and met the wonderful organizer of the event, Fraser, who did a great job of running the event, keeping everything in check.

HaZ and I also chatted to Ollie Kenchington about production for grading and many other things, another great person to meet!!

I also met Yusuf at the pre-drinks when talking about shooting on the A7S, and on returning to the hotel I met Giordano Borghi, an Italian wedding filmmaker who I really enjoyed chatting to over a whisky on the rocks.

Day one was hosted at 'Dukes at Komedia' theatre in Brighton town, great venue with comfortable seats for recovery from the late night.. I was enthralled by Vincent Laforets presentation about motion, in which I got grilled by Vincent in front of the professionals and attendees over my 'Seasons Are Changing' video. He commented it was beautifully shot, but the long takes with unmotivated movement would make the audience somewhat bored. It was fantastic feedback from him, despite the public screening!!

Technical Difficulties?

After a break, HaZ presented his talk about VFX in low budget film making, and also considering and directing it in your films. As always HaZ is just a fantastic chap and screened the whole SYNC film, which I was the 1st AC on (shot in Southend), and features one of my shots on the jib!

It was then I met James, who is incorporating film into his company. He's a fantastic dude, and it was great to meet him and chat more throughout the day. I look forward to collaborating in the future :)

Another talk that got me thinking was 'Colour Grading' by Olly Kenchington, who got in deep with shadows and light, and colour theory, and how to produce such grades in Resolve with ease, as well as enhancing the shots/scenes from OK to GREAT!

Day 1 ended with Philip Bloom's talk, followed by the party! Well done to the raffle winners, great prizes donated from the events sponsors; Miller, Rode, Adobe and more.

Day 2 comprised of intense group workshops covering many areas of filmmaking. We were divided into groups which was great for networking with new people attending, and headed to Philip Bloom's workshop on using gimbals (like the MoVI) for filming motion. We got hands on with a range of equipment to see what it's like to operate/walk around using an M5 with a Sony A7S.

I was impressed by this little Defy G2X gimball.

Next on to James Miller's 'Lens Whacking' workshop, very hands on with old manual lenses out in the street. I met one of the models, Ruby, and had a great time filming her while trying to get the hang of 'whacking' the lens for 'ethereal' looking light leaks and almost 'tilt-shift' esque focusing.

Luckilly for us, the sun was beaming through the clouds which was perfect for trying to get some leaks in the frame. We stopped for lunch, then continued on to Vincent's workshop.. The BEST of the day!

Vincent talked through a number of movies with a moving camera, breaking down the scene to show how the narrative flows and is complemented by moving the camera, and the characters in frame. We then got hands on blocking out a small scene, which was fantastic to see to get to grips with working as a director when moving the camera.

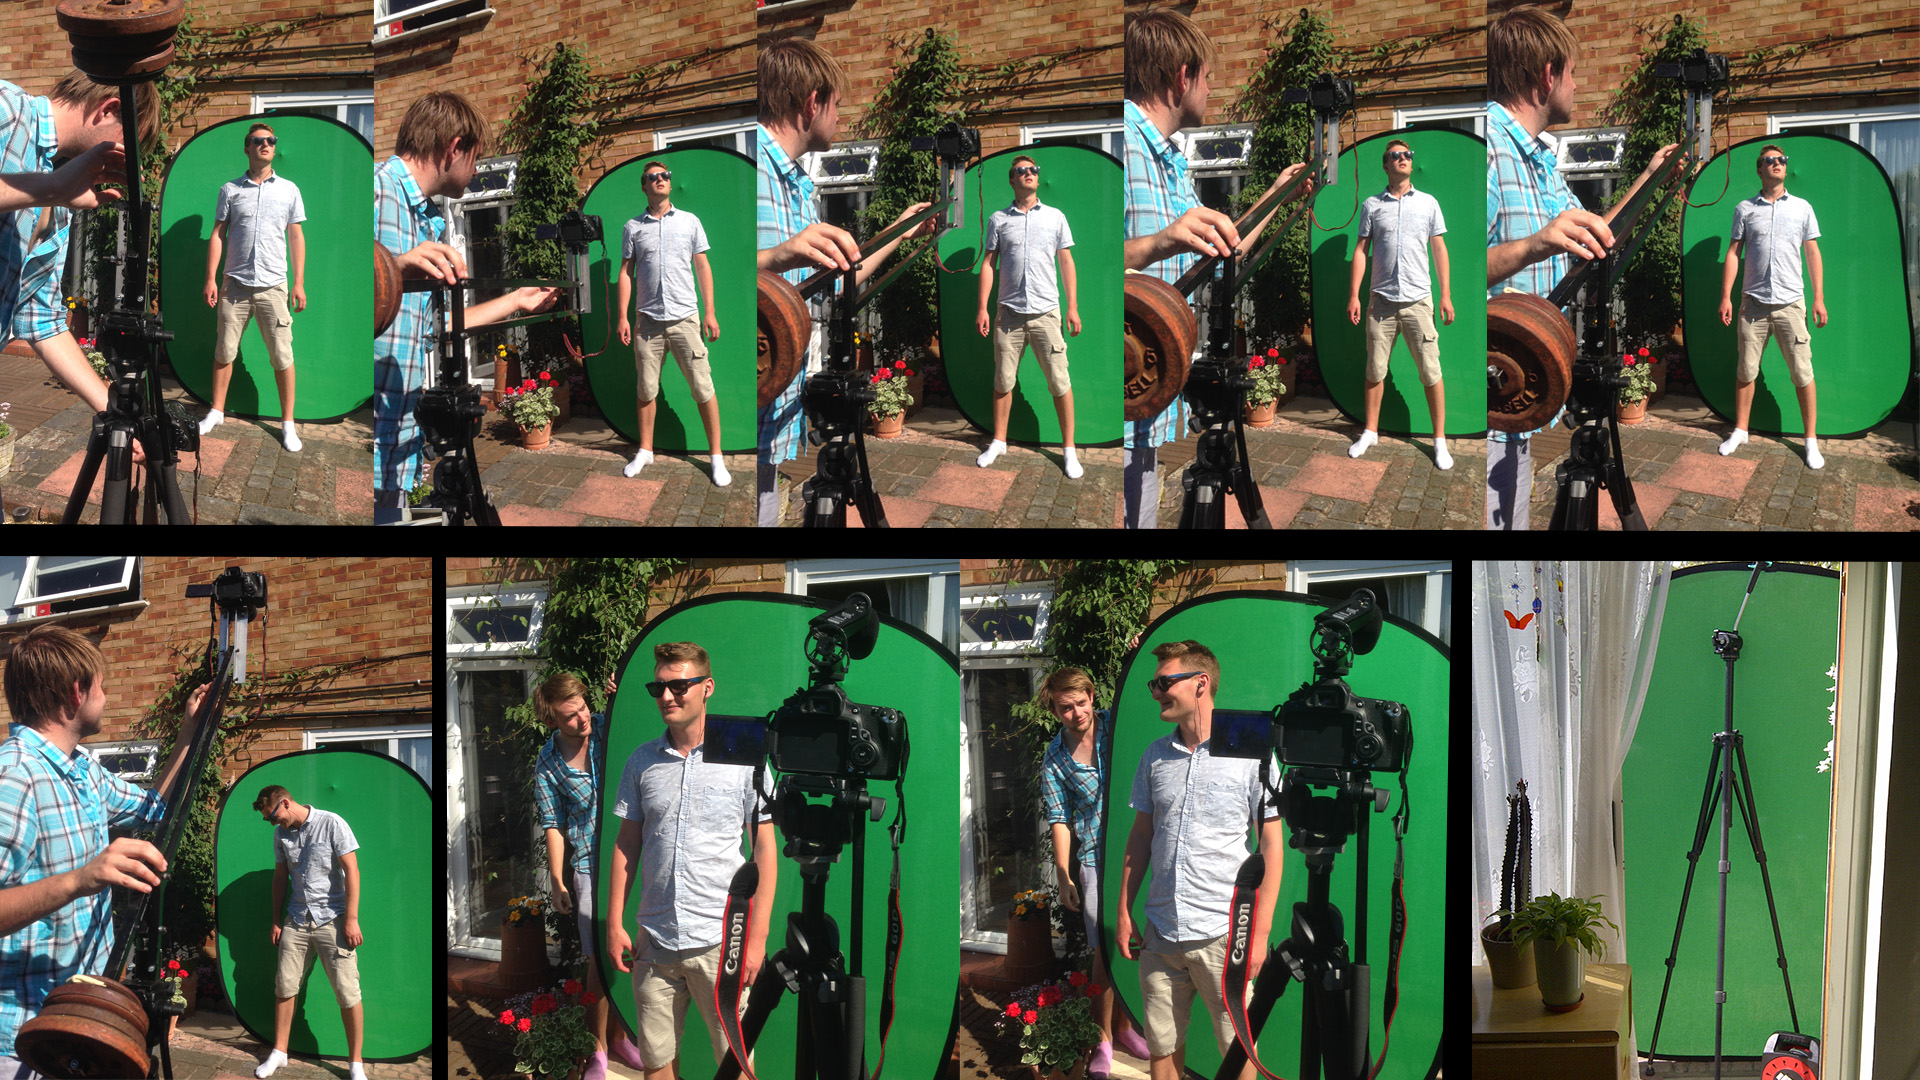
Lastly was my good mate, Nino, who was talking about filming interviews and using motion control to add interest to otherwise uninspiring corporates. Using a bright window, we set up an interview scene with LED lights and the Kessler second shooter device to move the camera on the pocket dolly. This added much needed life to an otherwise 'standard' two camera shoot.

It was how big, Nino?!

I had an awesome time, and was happy to give a piece to camera about my thoughts on the workshop. Over the two days I learned an incredible amount that I can directly apply to my work to make films that are more engaging and that have motivated movement! I made loads of new friends too, both from the UK and internationally. For networking and collaboration, there was no better place to be.

What a few months it has been!

Blimey, my last post was a while ago.. Honestly, since then work has got heavy and much of my time is either spent behind the camera or the screen. One exception was the Manfrotto Pro Backpack50 review, shot by Glen Symes for me where I actually appear in a video! Manfrotto pro backpack50 review video adam plowden and glen symes videography

Some of the things I've been up to range from filming quite a few weddings [embed]https://vimeo.com/98328657[/embed] to filming and editing for a series of videos on health and wellbeing.

eebc health and wellbeing video edit adam plowden videography

On the side, I've talked at EEHS about going through uni and starting a business, am preparing for my Manfrotto Tour videography seminar and other bits and bobs.. I'm sure if you follow me on twitter or facebook you'll have an idea of the things!

Going back a few weeks, my main projects have been the EEBC Health and Wellbeing video series, and an animation on Telecare. This is a predominantly piece to camera series, with additional b-roll shots to add to the videos messages which range from stopping smoking, to eating a healthy and balanced diet. The standard production of information videos ensued, editing down from around 45-50 minutes to a concise 2 minutes providing the relevant facts and summaries on prevention. Editing in Premiere Pro, I used the very good Luma Corrector tool for exposure changes and a simple RGB curves adjustment for the colour temperature.

I find the Luma Corrector better to work with, as by adjusting the Gamma control slightly, it removes the washed grey look to push out the prominent shadows and highlights meaning that it is very simple to correct/match shots; especially as I filmed using daylight as my key.

adobe premiere pro screenshot luma corrector effect adjust exposure

As per the clients request I have also added subtitles, which I created using the dynamic link into After Effects (noting at this point that if you're doing several stages of an edit, to duplicate the sequence you are working on before you start the next stage as Premiere and AE require you to save your work for updates to take place, meaning no Ctrl-Z/Command-Z to get back to a timeline with the clips rather than your 'replace in AE linked composition').

premiere pro dynamic link sequence editing

I was also out photographing flowers for a wedding, for the florist Madeleine Pink a few weeks ago too! Taken on a range of lenses with the Canon 5D mkIII (Tamron 24-70mm, Sigma 70-200mm, Samyang 14, 35, 85mm cine, and Nikkor 50mm).

Madeleine pink floral wedding flower photography adam plowden videography Madeleine pink floral wedding flower photography adam plowden videography button hole Madeleine pink floral wedding flower photography adam plowden videography button hole 2 Madeleine pink floral wedding flower photography adam plowden videography brides bouquet Madeleine pink floral wedding flower photography adam plowden videography table bouquet Madeleine pink floral wedding flower photography adam plowden videography table bouquet silhouette Madeleine pink floral wedding flower photography adam plowden videography table bouquet 2 Madeleine pink floral wedding flower photography adam plowden videography table bouquet 3 Madeleine pink floral wedding flower photography adam plowden videography table bouquet 4

Since then, I ventured into using Lightroom to edit the photos as well, still learning bits and bobs but found a range of fantastic presets here that create some great looks. I'd appreciate your thoughts on the photos and the looks as well, as it's mostly stab in the dark/emotive based :P

[gallery ids="4278,4279,4280,4281,4282,4283,4284,4285,4286,4287"]

A couple of weeks ago I had the pleasure of filming Dan and Kelly's wedding in Ashford + Foxhills where I met the awesome Ash; a unique wedding photographer! Check out the wedding film here [embed]https://vimeo.com/97953644[/embed], and definitely check out Ash's work over at Ash Darling Photography! Highly recommended by me :D and I believe I'll be working with Ash soon on an up coming wedding, really looking forward to it!


Believe it or not, I have been doing some videography too! In between editing the health and wellbeing videos, and on the pre-production sketches of the telecare animation I spent a couple of afternoons in The Woodland Garden in Bushy Park; one of my favorite places to go to switch off work mode, relax and shoot some video for personal projects. I've named this one 'Waterhouse', it's the name of the part of the garden where a balcony looks over a pond with a waterhouse to the left. It poses interesting thoughts to its original function, the bricks and foundations holding strong throughout years of use and bad weather. Virginia Creepers pursue to edge up its sides, gripping on to reach the sunlight through the tree canopy.

beautiful blooming purple Allium flower photography adam plowden video waterhouse

The edit is complete, but I am now working on a quirky hipster logo/title animation for the beginning of the video so as soon as it has been animated and comped into the footage I will upload!

The kit I used for the 'Waterhouse' video include; Manfrotto 755Cx-3 tripod, Edelkrone Slider+ v2, Canon 5D mkIII, Canon 100mm F/2.8 macro (hence why the shake on the slider is slightly more visible than without IS/OS, but I have used Warp Stabilizer where I can). Tamron 24-70mm, Sigma 70-200mm, Samyang 14, 35, 85mm cine, Nikkor 50mm. After using the Canon macro lens, I have totally decided to purchase the Sigma 105mm F/2.8 OS macro lens; firstly because of future video productions where a small minimum focus distance is necessary (product, people, detail shots), also it has optical stabilization which I found was needed when moving the camera and lens on the slider, and lastly its around £400.. Bargain!


Things I've learned so far from doing this kind of work;

  • Shoot with a widespread histogram (unless I wish to isolate the subject from shadows behind).
  • Lightroom is awesome, try playing with the presets I linked to work on the developer tools.
  • Regardless if it has been a long day filming, if you want to talk to someone, always, always, always do it!
  • I want a macro lens for intricate detailed shots, as my current range does not let me get close enough to the subject.
  • Take some hand held lights for kicks and fills; the venue room where the table decorations were photographed was very dark. With a tripod and a couple of lights I would have had much more control over the lighting composition.
  • Dabble in a variety of work types, to keep it interesting and different!
  • I need a slider for cinematic moving shots; I have made my choice; not the Edelkrone! There will be a whole blog post on this coming soon.

Finishing off my showreel by creating a cinemagraph!

Inspired by Framestores recent Eastenders tv advert, in which they created cinemagraphs to depict the suspected murderers of Lucy, I decided to embark on my own cinemagraph to complete my showreel. I'm deep into After Effects, for this kind of animation I am using one still image, with no plate to make it difficult for myself. However, its a good job the subjects have high contrast against the white background or I would really struggle with this! I will be uploading more as I go, but for now I must dive back in!

showreel cinemagraph

Sorry for the silence!

Blimey, wiping the dust from my blog I can see it has been neglected over the last couple of weeks. I can explain this, I've buried my head deep into working on a recycling video for my local council. For this I have designed and animated original graphics in Illustrator and After Effects, to be edited together in Premiere Pro. I can't give too much of what I'm working on away until the video is publicly released on the council website and other displays around the town of Epsom! But as you are a dedicated lot, and showing you the techniques I used won't do any harm!

Here's a screenshot from my AE window. Here you can see the little graphics floating around in the background, and overlaid on top is animated text.

recycling animation graphics motion vfx gfx design illustrator after effects I've used pre-comps here to create different sections of each 'clip'. This allowed me to keep my timeline and frame tidy as I would only be working on specific parts of the clip at a time. For example, in the above frame the little graphics are pre-composed with their animation keyframes, so I can layer up the blur and text on top to be revealed later. For each 'clip' I also pre-composed all of the text as these are animated individually using various effects.

recycling animation graphics motion vfx gfx design illustrator after effects  particle world simulation Some of the more complex motion graphics, here I used falling particles (Particle World II) to fill up the alpha channel of a recyclable object, where a mask then revealed a solid; making the object look like it is filling up with the falling particles. To create this effect I changed the physics parameters to allow the particles to fall slowly, and spread as they go. Remember to use random seed when duplicating effects like this too ;)

filming videography videographer dslr film interview To add to the emotive feeling of the video, it was important to include human thoughts and processes on why recycling is important and beneficial to the environment and us! This is me interviewing Alan about how easy it is for him to recycle.

Equipment used includes: Canon 5D mkIII, Tamron 24-70mm F/2.8 VC, Zoom H6, Sennheiser ENG-G3, Rotolight RL-48, Manfrotto 755 carbon fibre pro tripod and MVH500.

This was a quick and easy shoot, using DSLR for videography means I have great light sensitivity in post places and it is easy to set up. I used the Rotolight to kick a little more into Alan's face, and recorded using a wireless lav mic and the XY stereo mic on the Zoom for a backup. Setup-interview-de-rig took one hour.

Pleased with the outcome, I got onto editing the sequences together now that the animation was looking good!

filming videography videographer dslr film interview In Premiere Pro, I used the Luma Corrector and RGB Curves to adjust the exposure and colour balance of the clips, here you can see the split view with the original on the right and the edited on the left. The Luma Corrector does a great job of removing Gamma, which takes out a gamma curve (grey) from the footage and can be used with contrast to create a really punchy, cinematic look.

With still more to go, and an aerial shot from a DJI to go and film, I am eager to see peoples reactions when the video is complete!

Adams video week roundup!

Blimey lots has been going on over the last week, I hope it has been as hectic for you as it has been for me! Monday started with continuing the design of the graphics for a recycling animation, a daunting task which put my drawing skills to the test. Bearing in mind I've spent the majority of the last year behind a camera, I took my time to learn the techniques I would need to use Illustrator properly. I would usually use Photoshop over Illustrator, but until I recently found out PS is not truly vector, and as I would be using a combination of the Pen tool and others to design the images this was very important, as I would need to transform the graphics later in After Effects.

My best mate Glen came down from Wycombe for a  surprise week to, so I spent plenty of time catching up with him and chatting about work. He gave me so very important advice; "Everything is too complicated these days, you should keep it simple and your audience won't know the difference, especially if it is moving and animated anyway." True words, and I took Glens advice which not only sped up the process, but made me more confident with the work I was producing.

Here's a screenshot to show all of them! (I think I am working on a 10K canvas).

screenshot graphics design drawing art 2d vector create illustrator

The graphics design has been on-going, I practiced when I was first commissioned, but it just shows how familiarizing yourself with the tools and applications can ease your work! A very very important part of this process was to intensively storyboard and plan each scene, so I know what graphics can be generated beforehand, so I spent a good couple of days story boarding and sketching the graphics I would need, followed by a long list of assets I would go on to to create.

Pre-vis sketches:

design plan planning graphics creation motion animation

For the rest of the week I started importing the graphics into After Effects, and setting up the 15 scenes. I am finally starting to see progress! I am still working on this section, and it will take another week or so to complete all the animations. Again, I storyboarded this in the planning, so I know exactly what to produce for which scene which saves so much time. Also, the best thing about this planning part is that it does not have to be a work of art to depict your ideas, just a simple sketch to represent what you will need to create.

graphic storyboard plan pre-production animation motion graphics

On Thursday I joined a crew of fashion designers, hair stylists and models to film a magazine photoshoot for Sherman Hawthorne (the hair stylist and creative director of the shoot) at The Lemonade Factory studios on Queenstown road. With eccentric styles and art direction, I set about to capture high contrast, dramatic footage which will compliment the photos. It was an early start, here I am waiting for my train at Clapham Junction;

video shoot equipment kit list manfrotto camera dslr fashion hair photoshoot lemonade factory

I was a single shooter, I had the pleasure of transporting the equipment to the shoot which included a steadicam vest that I ended up not using. I've learned my lesson here not to take extra kit!

My kit list was as follows:

Canon 5DmkIII (A camera), Canon 60D (B camera)

Tamron 24-70 F/2.8 VC, Samyang 14mm T/3.1 cine, Samyang 35mm T/1.5 cine, Nikkor 50mm F/1.4 manual, Samyang 85mm T/1.5 cine, Sigma 70-200 F/2.8 OS

Manfrotto 755CX3, Manfrotto MVH700AH, Manfrotto Hydra arm and super clamp,

CamSmart camera rig + Lilliput field monitor, CamSmart Stabilizer vest, Flycam Nano

Zoom H6, Rotolight Roto-mic.

As with all of these shoots, time runs short so I was restricted to short burst of filming time with the models to capture the specific ethereal and industrial motif, but I also shot around the photographer to maximize my usable footage. I made use of the 50fps slow motion for the moving shots, so that the models movements are exaggerated, as well as stabilizing the shot.

As the props included wire fencing and chicken wire, aliasing was a problem when shooting shallow depth of field, or at an angle to the object. To remedy this I used a lower aperture (F/4-5.6) for some shots, but also I can add a Gaussian blur in Premiere Pro when editing to soften the lines, gently smoothing out unwanted aliasing.

A couple of frame grabs from the shoot!

fashion photo video shoot at the lemonade factory cinematic videography steadicam Here I'm using a moving shot to create a distorted perspective from outside of the set.

fashion photo video shoot the lemonade factory cinematic videography trapped cage bw Here I use a low angle shot, removing the identity of the model to create a 'trapped' and 'mysterious' feel to the model, and why she is in the box.

Weekends are always working weekend for creatives and freelancers. I spent yesterday working on the animation of the recycling project again, continuing to compose the scenes using simple 2D shapes and animation styles that have become very popular recently.

I also came across this post from Chase Jarvis about how to manage your time properly, its a great post with a detailed outline of 90-minute working slots that should improve your productivity, I urge you to read it if you're someone like me who can't stop working, then apply the plan to your working life. I know I will be!

Do Less = Do More by Chase Jarvis

I haven't had many #videoquestions come in recently, so please keep them coming so I can help with tips for the community of videographers and creatives! Send them over to me @Plowman91 on Twitter.

Finally, ending with a must watch video, check out Philip Bloom's video shot with the Blackmagic Production Camera, the 4K one at Miami Beach, what do you think of it? Is it worth investing now the Panasonic GH4 is on pre-order and it looks like Sony will have a 4K DSLR announcement coming at NAB2014 too..!!

Philip Blooms Four Corners Miami Beach (Blackmagic 4K camera)

That's all for now folks! Keep the creative juices flowing!

Creating ambience in motion graphics

I've been working on the title graphic for the Rotolight BVE video, sometimes I can get going straight away with designing and animating however (and I presume this is due to getting up early to start working) I was stuck for ideas.. VideoHive is a great resource for re-made graphics sequences for After Effects, but they are also great for getting inspiration on how to create the atmosphere and effects for your own work. I spend a good half hour looking through the pre-made effects and gathered some ideas.

One key point I've found to make the graphics seem realistic, and to give it an ambience there are a couple of things you can do to make it more life like. Number one is to use a particle generator to create dust to naturally drift around the environment. The particles can be given physical attributes like gravity and wind, which makes the animation more realistic.

after effects particles atmosphere ambience rotolight

Number two, using light and lens flares; this leak of light appears to give the environment in which your text, graphics etc seem to be in a 3D space shot through a camera - these are naturally occurring when out filming and in our eyes, so it can be used too.

Number three; textures and patterns; for a graphic based (not so much vfx based) title, tiling textures and patterns to create a wallpaper background is visually appealing, as is only using a number of tones from a simple colour pallet.

Number four; interpolation and motion blur. Again just like in real life, our brains process the images we see at around 16 frames per second, and fills in the spaces in between. In graphics this motion blur needs to be added, to correctly interpolate the animation and blur of a subject or object. The local and global motion blur (bouncing ball) icons are easily found on the timeline so be sure to click!

Number five; depth of field. In cinematography the director uses the depth of field to move the audiences attention through the frame to reveal new parts, to uncover secrets and ideas. This can be done in motion graphics too, by using a Camera. When you have a camera in your composition, be sure to check 'enable depth of field' and to set your aperture to a low F stop (F/1.8 for example) and increase the blur amount. After Effects then generates depth of field using the camera settings; making objects close and far away from the camera blurred.

rotolight title graphic after effects camera blur

Here's a snap of the working-graphic for the title, for a cinematic look to the video I have also applied an anamorphic aspect ratio overlay. I might make some changes later, but for now it is off for comments and feedback. If you have any questions about the graphics or videography then give me a shout!

rotolight rotomic ring light tiele motion graphic video


Andrew Kramer (VideoCopilot) does it again!

I'm a big fan on Andrew Kramers work and contribution to the industry, running the After Effects tutorial and blog website, creating the title sequence for Star Trek Into Darkness film, it has had a big impact on my learning. tron_1[1] videocopilot

I first started using VideoCopilot when I was 16, designing a title sequence for a series of webisodes I had written and was planning to film, direct and produce. It never got made, and I'm sure I've got the original work somewhere. My point being is that to this day I still use this amazing resource for my work now, learning new techniques for effects creation. If you haven't checked it out before, I urge you to do so immediately!

Here's the latest tutorial, creating '3D' volumetric light rays which will look great in mysterious, dark trailers or titles!

http://www.youtube.com/watch?v=frXQxwMKh6c

New supercomputer is built!

I've been waiting months to finally have a computer that can handle the work that I do!! Previously working on laptops (which coincidentally die each year) I needed to step up the game to a high performance desktop which will expand my capabilities in not only video editing, but also motion graphics and compositing. I got myself an i7, NVIDIA 650TI 2Gb graphics card and all the rest to allow working speedily in Adobe applications (taking advantage of the mercury playback engines) and also allowing me to use Speedgrade and DaVinci Resolve for professional colour grading as the new graphics card is CUDA enabled!! My workflow speed will go through the roof!

Throughout all of January, the components dribbled in one by one, until it was only the PSU to come. Amaz0n buggered up my order, which I was expecting in 2-4 weeks. The order then got pushed back another 2-4 weeks, which I was furious about, so got on to Amazon support who clarified the 'warehouse' issue.. Everything is computerized these days so I don't understand how a major marketplace cannot get there warehouse stock levels and back order numbers right!!

I cancelled my order with Amazon, and put it through Scan instead, who delivered the Corsair 1000w PSU in only 2 days. Top service!

Being impatient (eager), I wanted to get the new computer going as quickly as possible so I begun assembling the components in the case. I had never done this before so the nerves were running riot, washing my hands every couple of minutes to make sure I wasn't getting grease or dirt on the motherboard. It was stressful, but I managed to get most of the bits it, bar the CPU and hard drives.

Yesterday Sam helped me put together the rest of the components and the cabling, and the building of my new workstation - could not have done it without him!

newcomputer blank canvas The blank canvas of my computer.

Now all I have to do is fill it up with my work and data, install Adobe and then I can get working!

Mesmirizing fractals in After Effects

I've often pondered whether it is possible to generate geometrical, point and fractal graphics using algorithms in After Effects. Fascinated by expressions since starting in CS3, I have always experimented with different types of generation and control to create more organic motion graphics, and animate them. After learning and working with Trapcode Particular and Form, which specialize in amazing particle effects, I further played around with ideas and animations combining the particles with expressions, auxillary particles and physics to recreate a realistic particle graphic. I had varied success, but I still couldn't find a unique effect.

It has been a while since I stepped back into After Effects; I usually float between applications until I need to use them so I got myself back up to speed with AE and tried my hand back at fractals - not the ones generated by fractal noise or turbulent noise either.

After a couple of days experimenting (bearing in mind I am still working on my laptop, and not my editing supercomputer) I had got to grips with generating graphics, but with this technique the results are partly random generations so occasionally I end up with a result that is completely different to what I expected but looks fantastic! With the curves following Bezier, they look naturally pleasing too.

My fractal tests -[gallery ids="979,978,977,976,975,974,973"]


Fractal Noise does EVERYTHING in After Effects!

After finishing up the multi-camera edit of the John Sinclair Viper Madness video the other day, I have moved on to creating the graphics; title card, lower 3rds and credits in After Effects. I've used After Effects for about 7 years now, since CS3 so I've got to see it develop and grow over the years, just as my knowledge in motion graphics has too. I always find, if you're trying to create some kind of animated texture, no matter what it is, Fractal Noise will always have a solution.

To animate the title card, I added the Fractal Noise effect to a solid layer and changed the parameters so the fractal resembled smoke, using expressions to control the evolution over time. The result is perfect, simple and easy!

AE

For After Effects users that don't know the power of Brainstorm!

Check this sweet After Effects tutorial out from AETuts+ always a great resource for learning more about motion graphics in AE! http://ae.tutsplus.com/tutorials/workflow/an-overview-of-brainstorm-in-after-effects/

GLF Promo Video Title is now complete!

I've been working on the title sequence for the GLF video; started in Photoshop to create the graphics (using the original GLF logo created by CleverBox as a template). I then imported the elements into After Effects to animate them, as well as adding background footage of the schools and students! Its uploading to Vimeo now so here is a screenshot from a draft render :) title

Thank you very much Sam for sending over the fonts!

I'll post a link up to the video very soon, or just keep updated on my Facebook or Twitter or LinkedIn or even my Website!

What I've been up to.. Green Screen shooting and a Wedding at Hampton Court Palace!

What I've been up to.. Green Screen shooting and a Wedding at Hampton Court Palace!

Had another hectic week of filming for a compositing project, this time with a make shift green screen studio in my garden! Keep up with the blog to see the work in progress and the final product; a UFO film trailer! I'm compositing it together in The Foundry Nuke, the industry standard 3D compositing software for film and television, first designed for James Cameron's 'Titanic', and more recently used to create the amazing landscapes in Avatar, for the VFX in Iron Man and so many more! I was also filming the wedding of Andy and Ting at Hampton Court Palace! It was my first outdoor ceremony which was fantastic with the great weather we're having, as well as having beautiful decorations and the couple were just fantastic! Plus, the grooms god father is Theo Paphetis who was a lovely chap to film! Follow and share for more fun!